Chapter 3: HDFS
1.1 NameNode
NameNode is the manager. It stores metadata, which is data about data.
Files in HDFS are split into data blocks of 128 MB (originally 64 MB) for storage.
Replication strategy: The default replication factor in HDFS is 3.
1.2 Secondary NameNode
1.3 DataNode
1.4 Client
1.5 File Write Process
- NameNode
- DataNode
- Client
1.6 File Read Process
- NameNode
- DataNode
- Client
Component Mapping:
- ResourceManager <-> NameNode
- NodeManager <-> DataNode
2. Common HDFS Commands
1. Create Directory
hadoop fs -mkdir <paths>
Create a single directory:
hadoop fs -mkdir /home/myfile/dir1
Create multiple directories:
hadoop fs -mkdir /home/myfile/dir1 /home/myfile/dir2
2. List Directory Contents
hadoop fs -ls <paths>
Example:
hadoop fs -ls /home/myfile/
List all subdirectories recursively
hadoop fs -ls -R <path> (case-sensitive)
Example:
hadoop fs -ls -R /home/myfile/
3. Upload File
Copy one or more files from the local filesystem to HDFS.
hadoop fs -put <local_files> ... <hdfs_path>
Example:
hadoop fs -put Desktop/test.sh /home/myfile/dir1/
4. Download File
Copy files from HDFS to the local filesystem.
hadoop fs -get <hdfs_paths> <local_path>
Example:
hadoop fs -get /home/myfile/test.sh Downloads/
5. View File Contents
hadoop fs -cat <paths>
Example:
hadoop fs -cat /home/myfile/test.sh
6. Copy File
hadoop fs -cp <source_path> ... <destination_path>
Example:
hadoop fs -cp /home/myfile/test.sh /home/myfile/dir
7. Move File
hadoop fs -mv <source_path> <destination_path>
Example:
hadoop fs -mv /home/myfile/test.sh /home/myfile/dir
8. Delete File
Two main options: -rm for files, -rm -r for directories.
hadoop fs -rm <path>
Example:
hadoop fs -rm /home/myfile/test.sh
The above command only removes files. To delete a directory containing files, use the -r flag.
Usage: hadoop fs -rm -r <path>
Example:
hadoop fs -rm -r /home/myfile/dir
9. View End of File
hadoop fs -tail <path>
Example:
hadoop fs -tail /home/myfile/test.sh
10. Display File Size
hadoop fs -du <path>
Example:
hadoop fs -du /home/myfile/test.sh
11. Count Files
hadoop fs -count <path>
Example:
hadoop fs -count /home/myfile
12. Display File System Details
hadoop fs -df <path>
Example:
hadoop fs -df /home/myfile
13. Merge Files
Copy multiple files from HDFS, merge and sort them into a single local file.
hadoop fs -getmerge <src> <localdst>
Example:
hadoop fs -getmerge /user/hduser0011/test /home/myfile/dir
14. Store Echo Output to HDFS File
echo abc
echo abc | hadoop fs -put - <path>
echo abc | hadoop fs -put - /home/myfile/test.txt
Chapter 4: MapReduce Work Mechanism
1. MapReduce Functionality
MapReduce implements two core functions:
- Map: Applies a function to every member of a collection.
- Reduce: Performs an operation on results from multiple processes or independent systems in parallel.
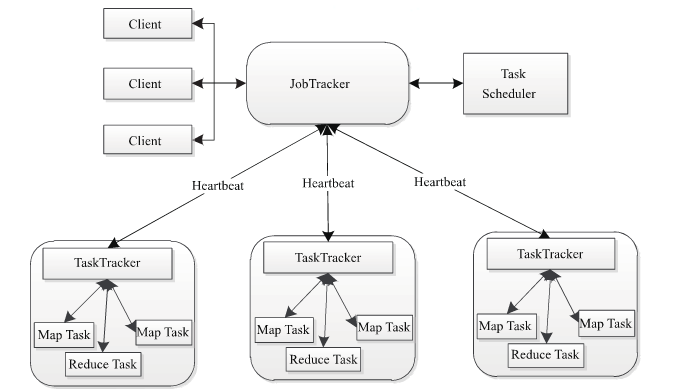
2. MapReduce Architecture
Key Concepts: Job, Tasks
It follows a master-slave structure.
Component Mapping:
- Namenode <-> Datanode
- ResourceManager <-> NodeManager
- JobTracker <-> TaskTracker
JobTracker is responsible for:
- Receiving jobs from clients, decomposing jobs, and monitoring job status.
- Distributing tasks to TaskTracker nodes for execution.
- Monitoring the execution of tasks on TaskTracker nodes.
NodeManager: A container for executing applications.
TaskTracker: Acts as the bridge between JobTracker and tasks. It receives and executes commands from JobTracker (e.g., run task, commit task, kill task). It periodically reports the status of local tasks to the JobTracker via heartbeats.
The MapReduce architecture consists of 4 independent node types:
- Client
- JobTracker
- TaskTracker
- HDFS
3. Job Scheduling
- FIFO Scheduler
- Fair Scheduler
- Capacity Scheduler
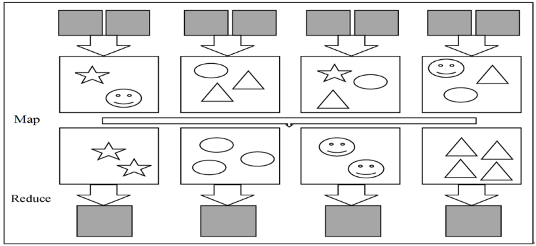
4. WordCount Process
Input Data -> Split -> Map -> Shuffle -> Reduce
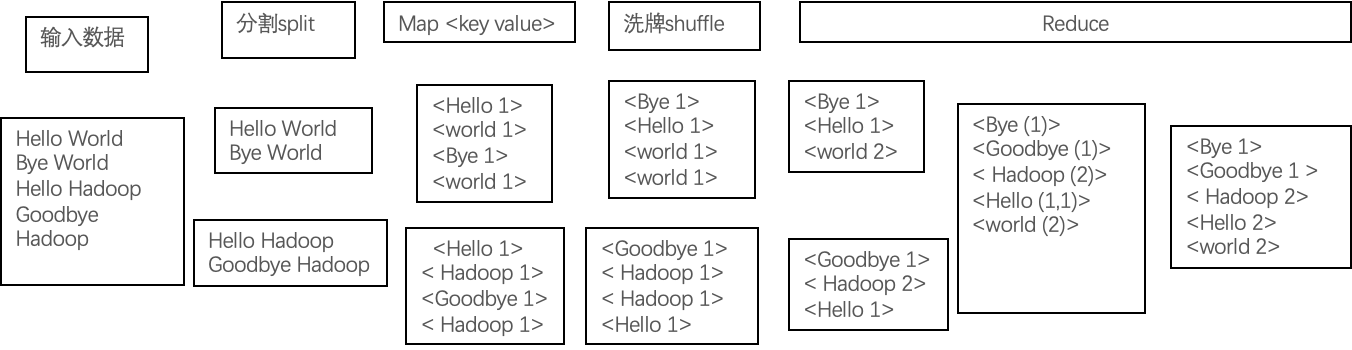
A split contains information such as <filename, start_position, length, host_list>.
- Input data is distributed to nodes via
Split. - Each Map task processes one split.
Maptasks output intermediate data.- During the
Shufflephase, data is exchanged between nodes. - Intermediate key-value pairs with the same key are sent to the same
Reducetask. - Reduce tasks execute and output the final results.
Chapter 5: Hive
1. Hive Data Model
Metadata is "data about data" or "intermediate data." It describes the properties of data, such as type, structure, history, database, table, and view information. Hive metadata is frequently read, modified, and updated, making it unsuitable for storage in HDFS. Instead, it is typically stored in a relational database.
- What you see in the Hive command line is metadata.
- What you see on HDFS is the physical data.
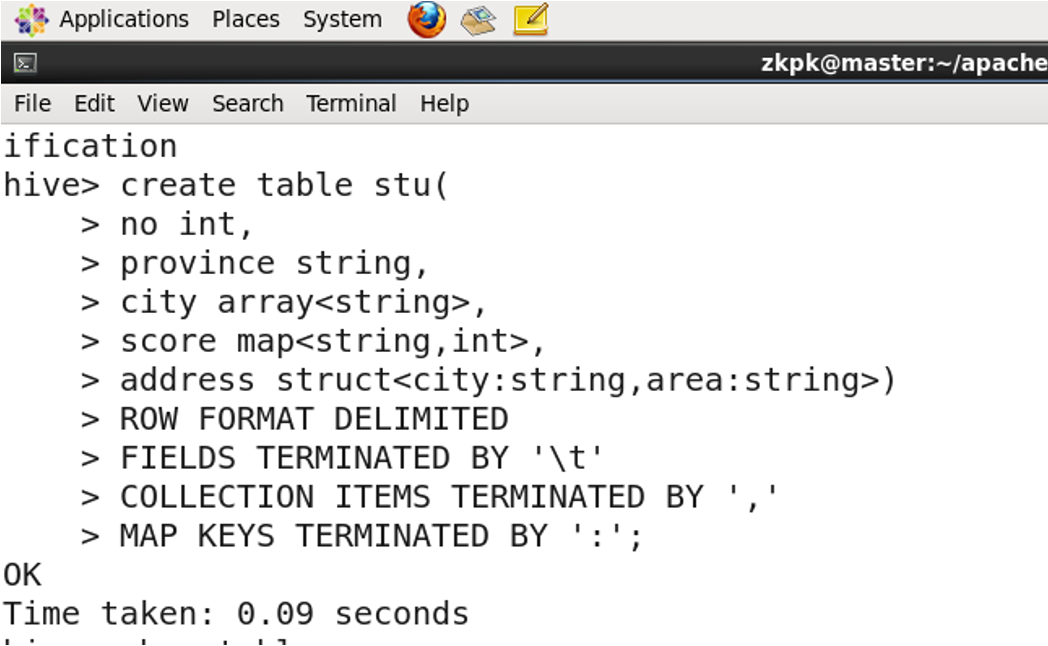
2. Complex Data Types
- ARRAY: A collection of elements of the same data type, accessible by index.
- STRUCT: A structure that can contain elements of different data types.
- MAP: A collection of key-value pairs.
3. Basic Hive Operations
3.1 Entering Hive
start-all.sh
[zkpk@master ~]$ hive
hive>
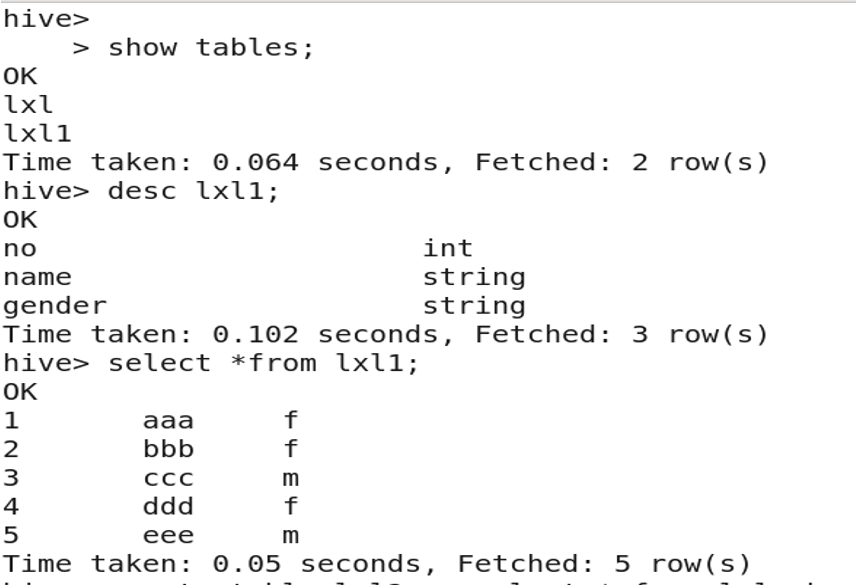
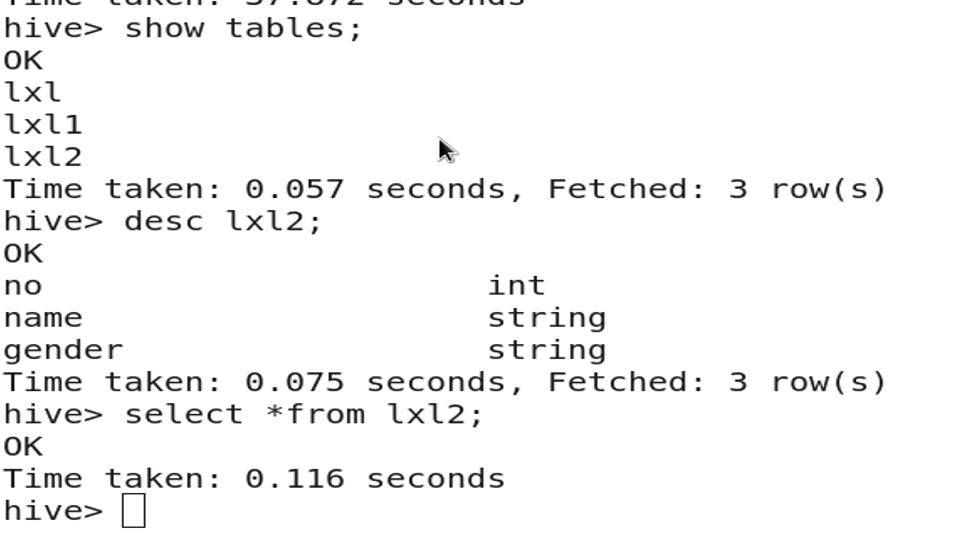
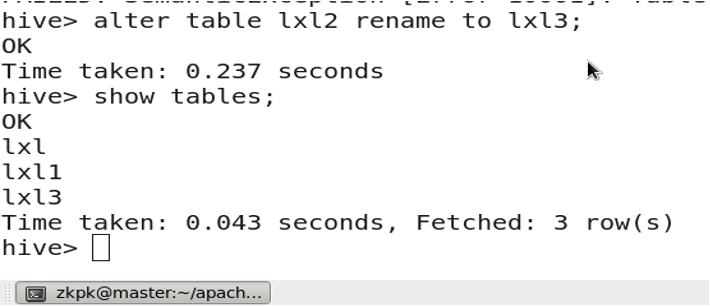
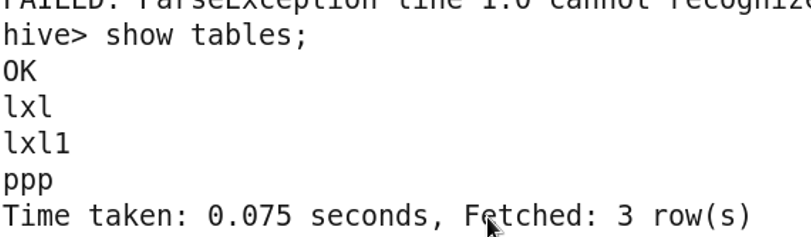
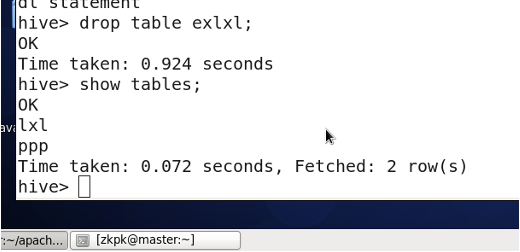
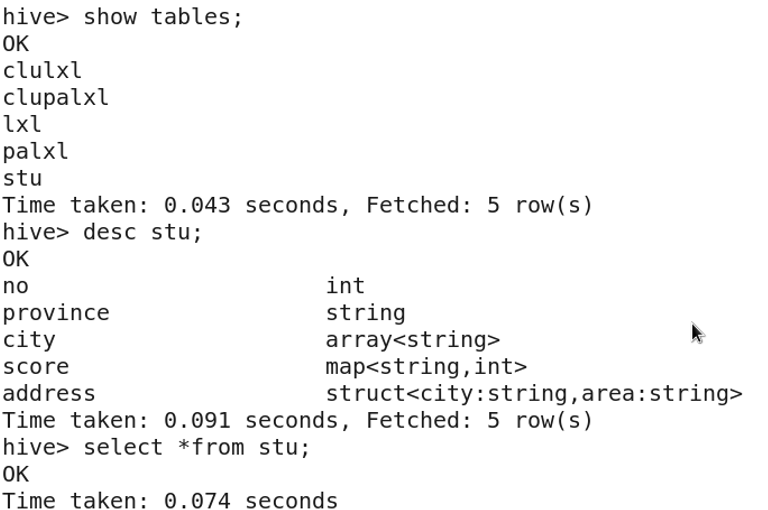
3.2 Viewing Tables

Hive commands must end with a semicolon (;).
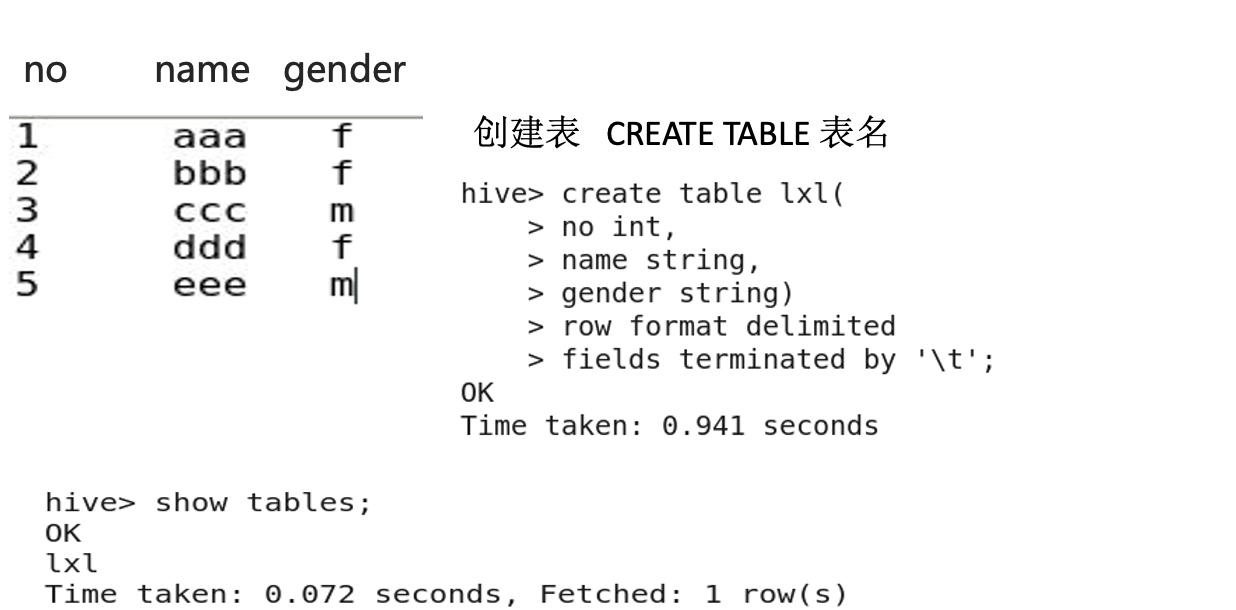
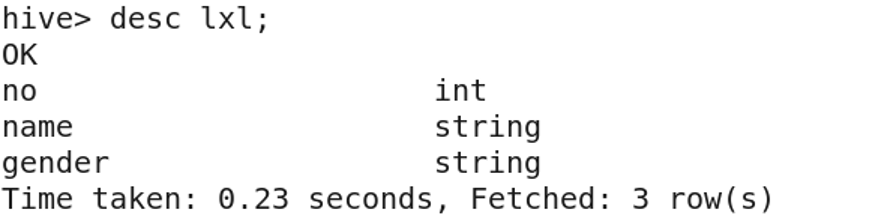
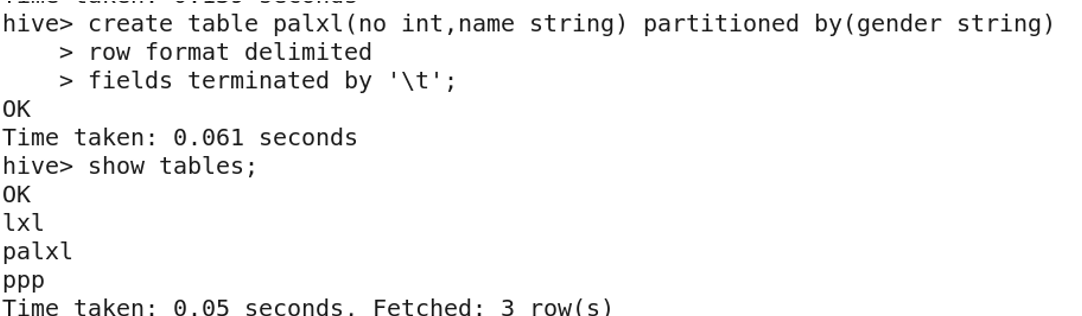
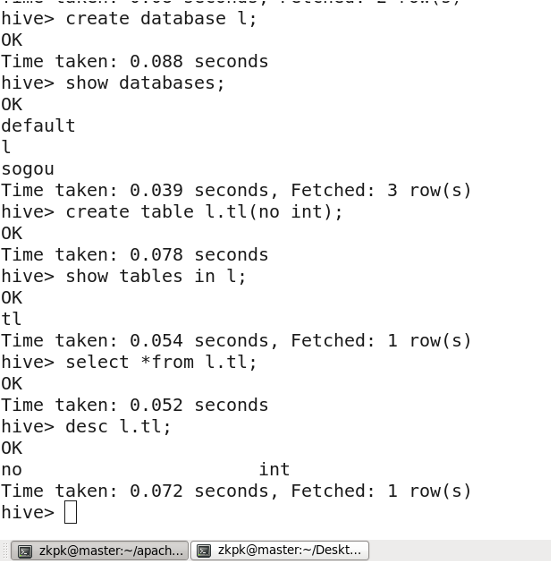
3.3 Creating a Table
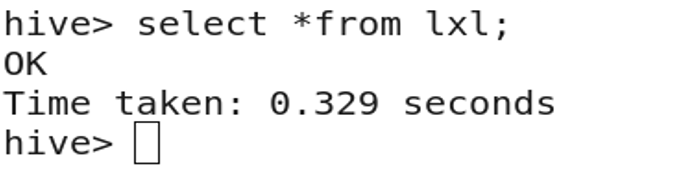
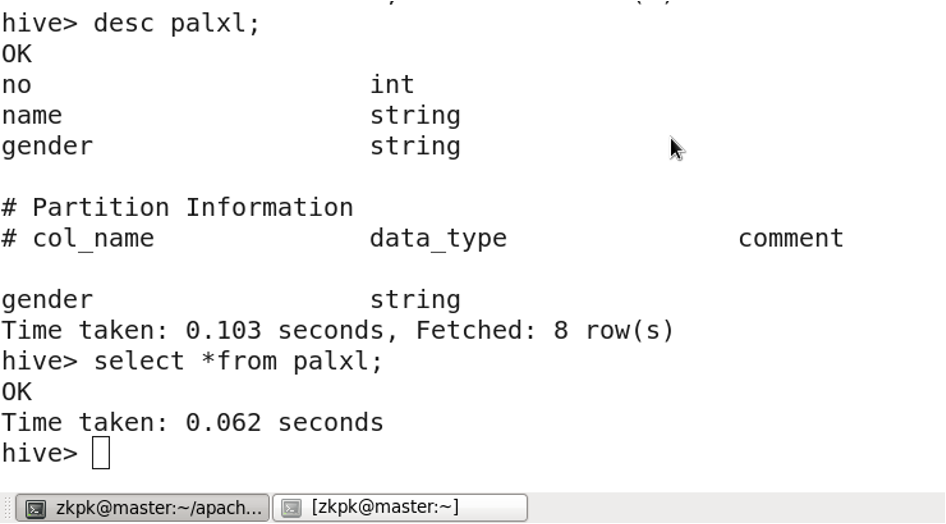
3.4 Describing a Table Structure
DESC table_name;
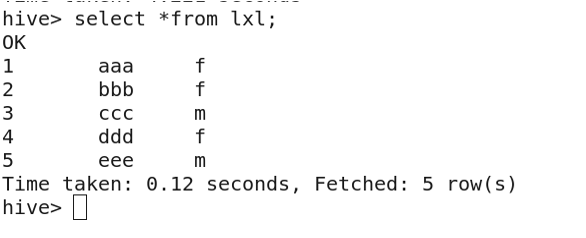
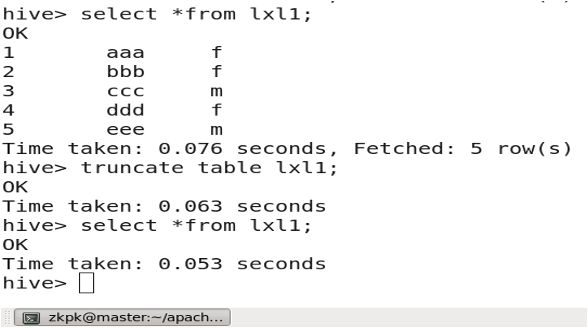
3.5 Viewing Table Data
SELECT * FROM table_name;
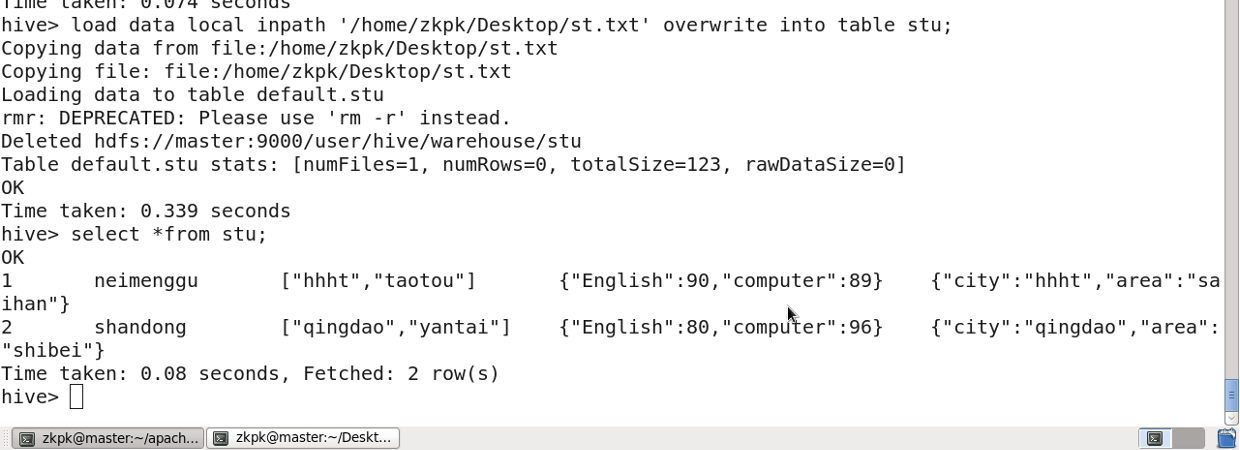
3.6 Importing Data from a File
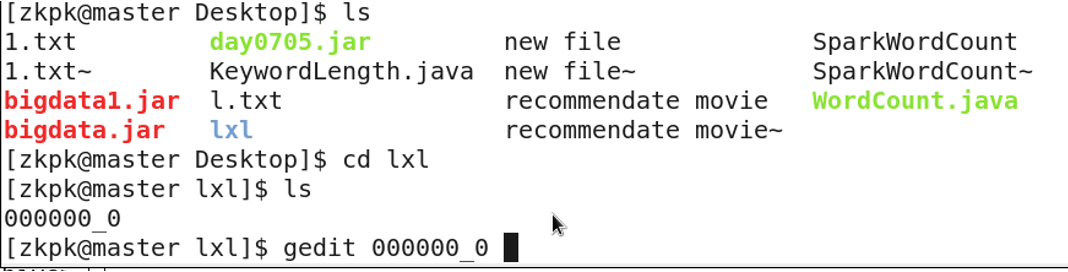
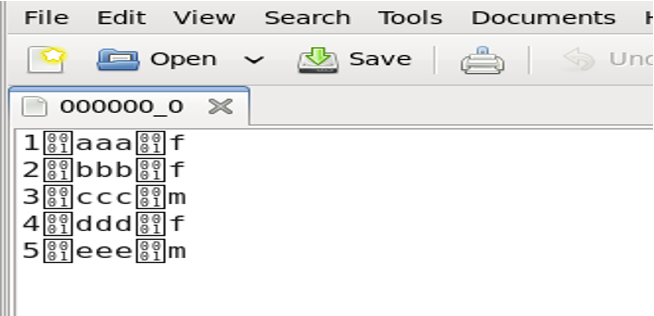
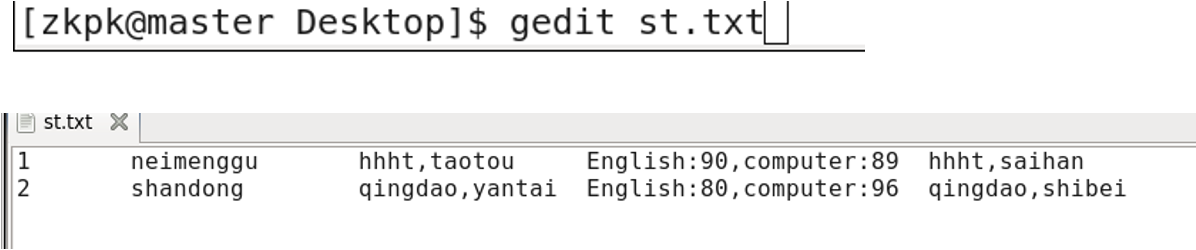
Create a local file l.txt with data:
1	aaa	f
2	bbb	f
3	ccc	m
4	ddd	f
5	eee	m
Import the data:

View the imported data:
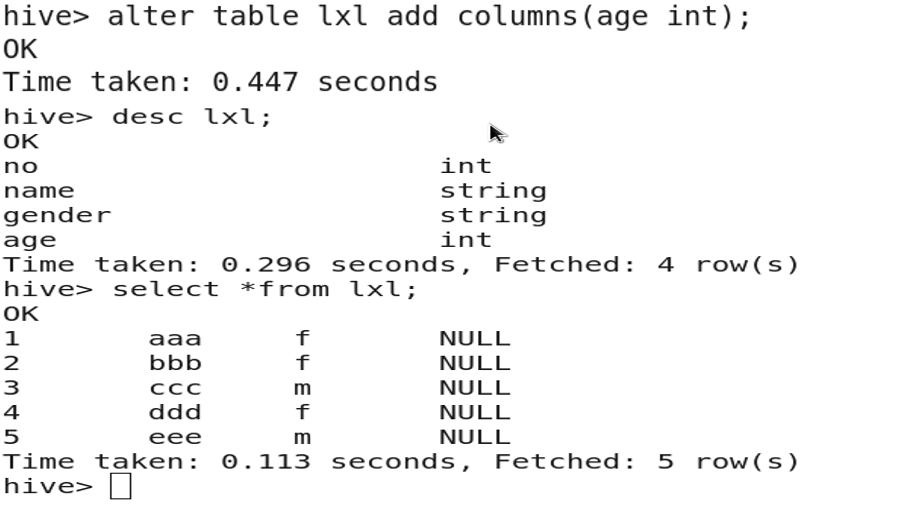
3.7 Adding a Column
ALTER TABLE table_name ADD COLUMNS (new_col_name data_type);
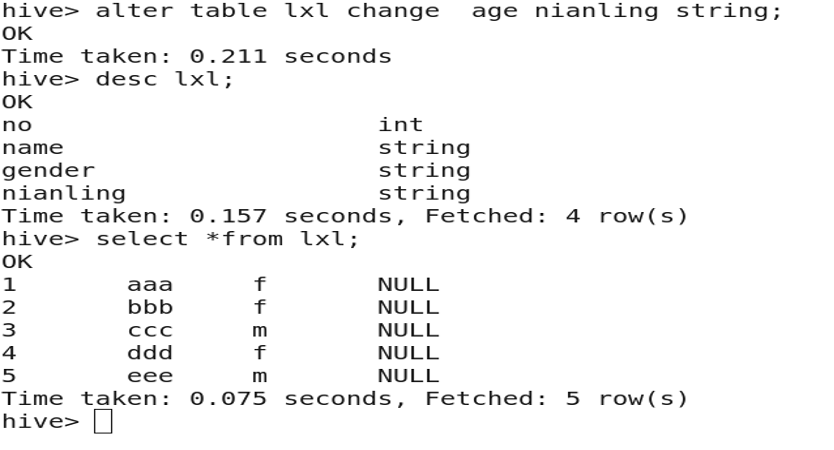
3.8 Renaming a Column
ALTER TABLE table_name CHANGE col_name new_col_name data_type;
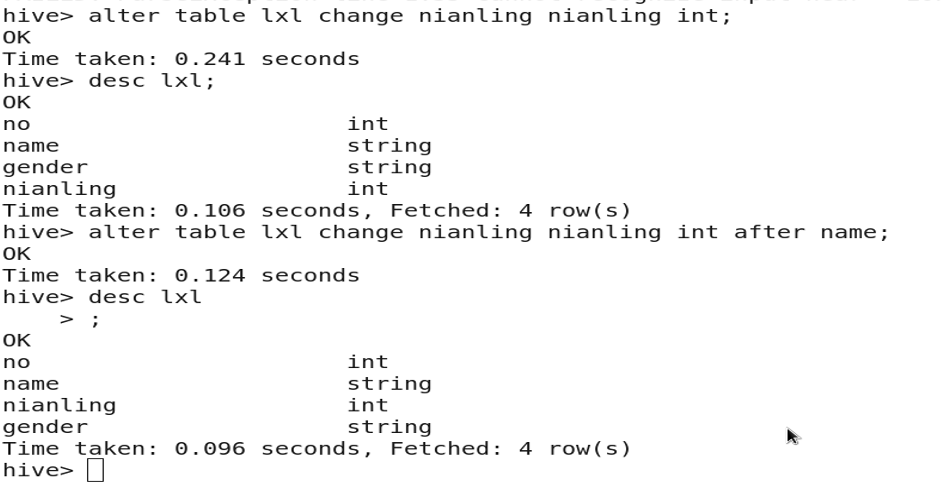
3.9 Changing Column Type or Position
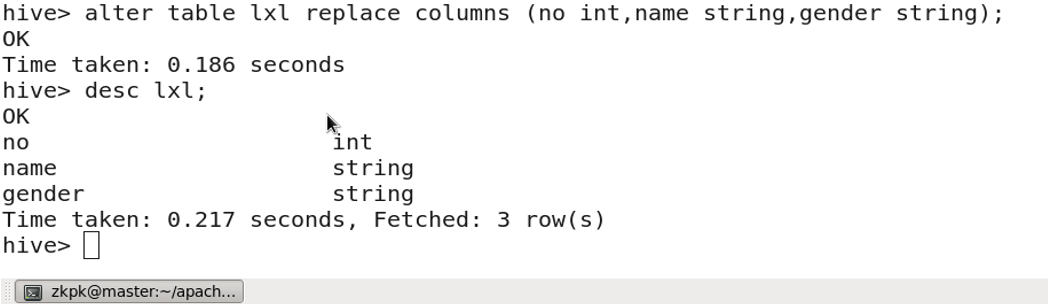
3.10 Dropping a Column
ALTER TABLE table_name REPLACE COLUMNS (col1 type, col2 type, col3 type);
-- (Only include columns to keep in the COLUMNS clause)
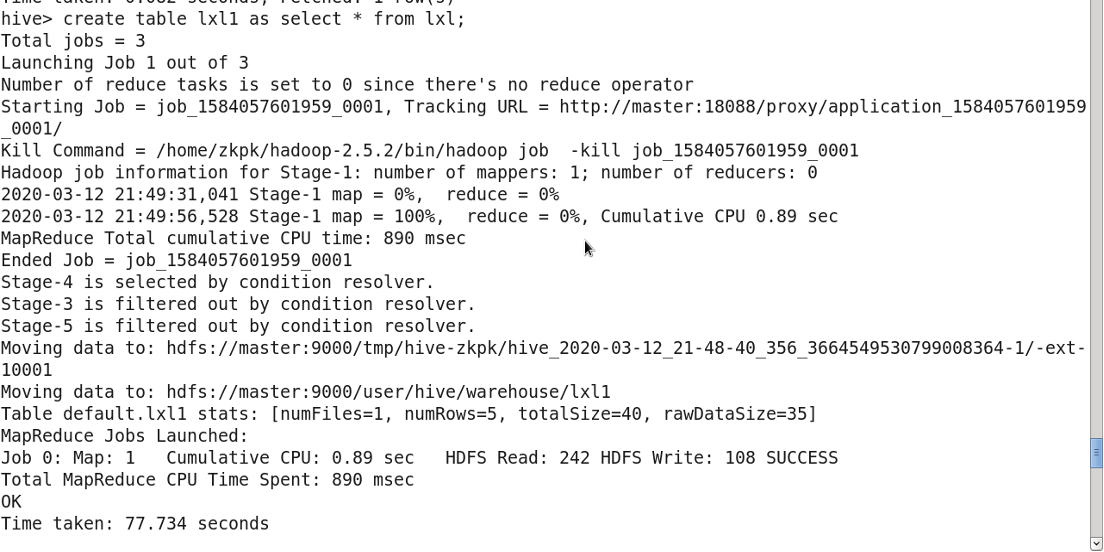
3.11 Copying a Table (with data)
CREATE TABLE new_table AS SELECT * FROM existing_table;
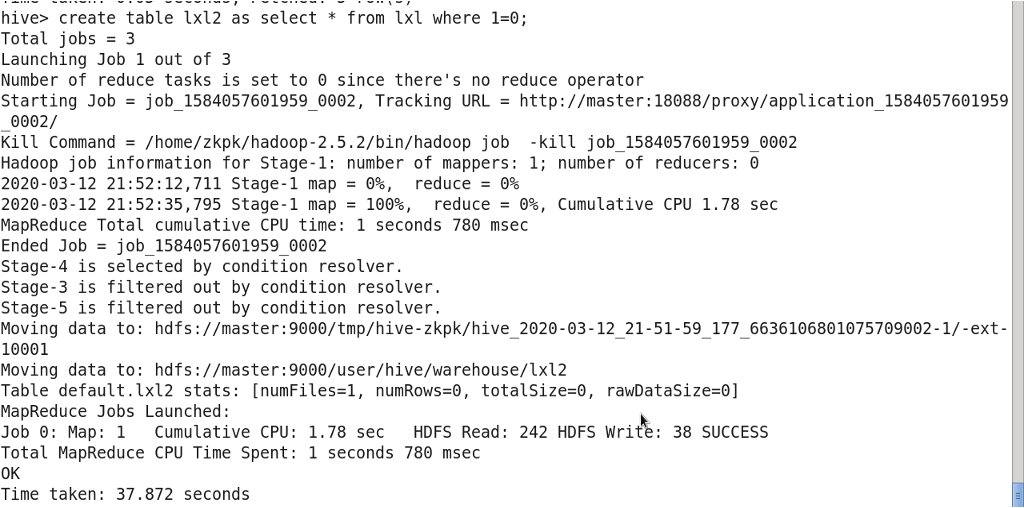
3.12 Copying Table Structure (without data)
CREATE TABLE new_table AS SELECT * FROM existing_table WHERE 1=0;
3.13 Renaming a Table
ALTER TABLE table_name RENAME TO new_table_name;
3.14 Truncating a Table
TRUNCATE TABLE table_name;
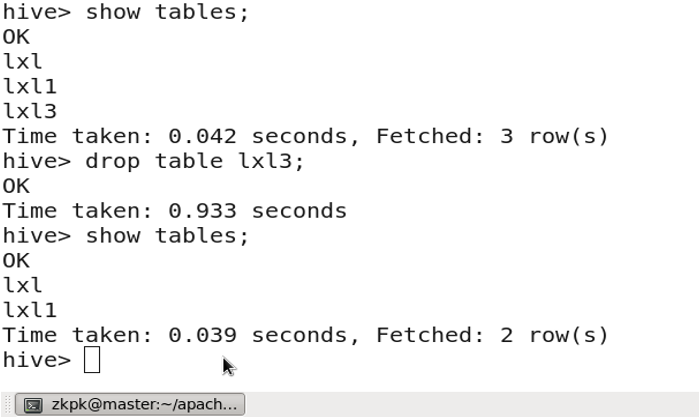
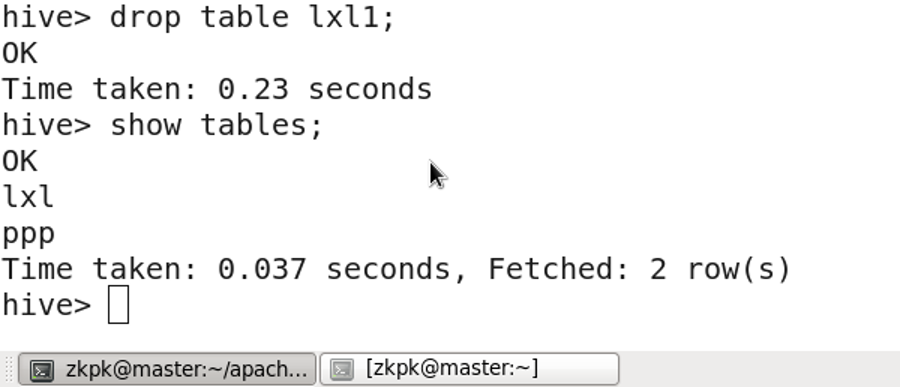
3.15 Dropping a Table
DROP TABLE table_name;
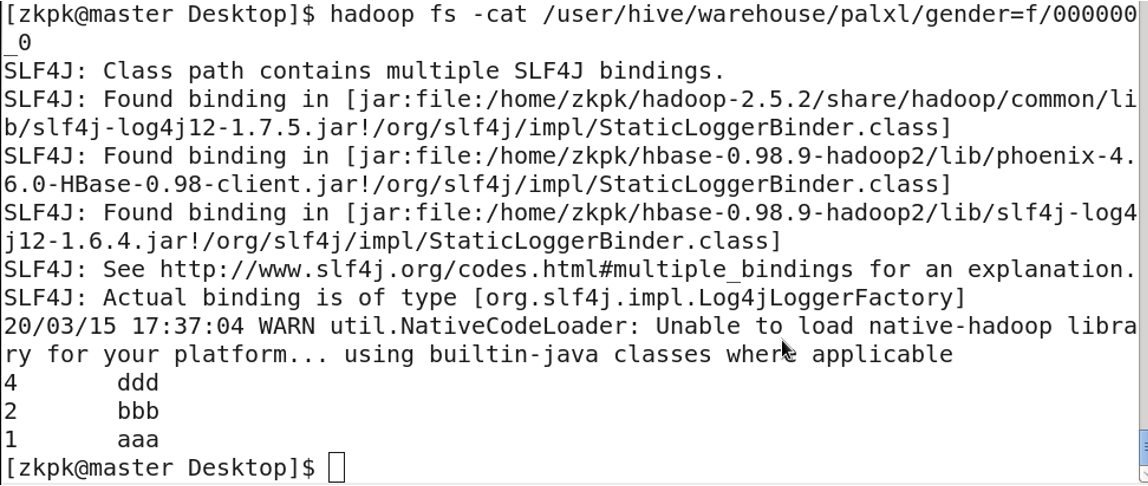
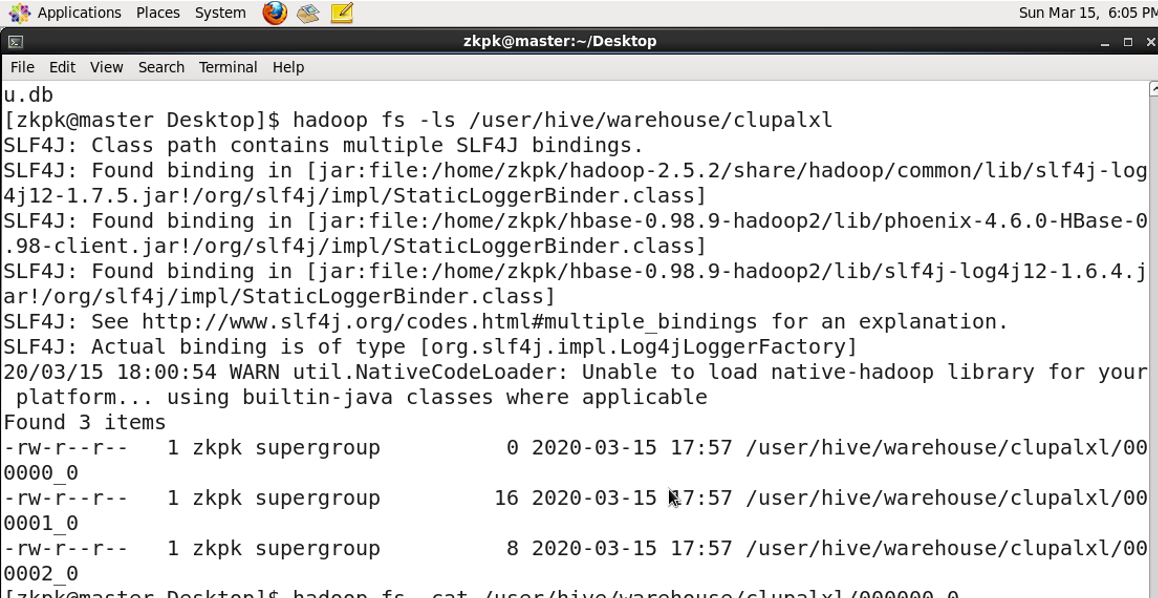
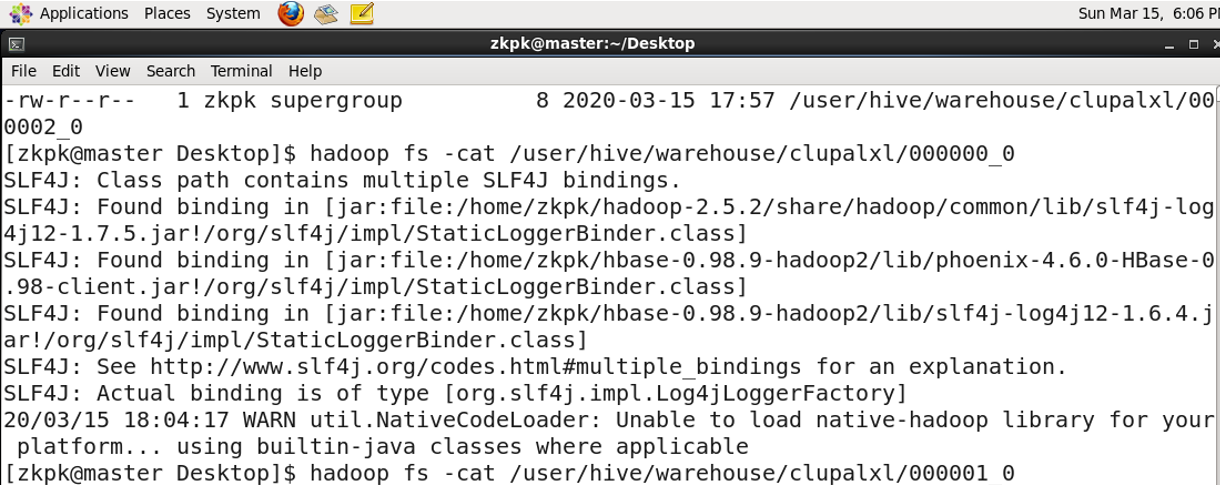
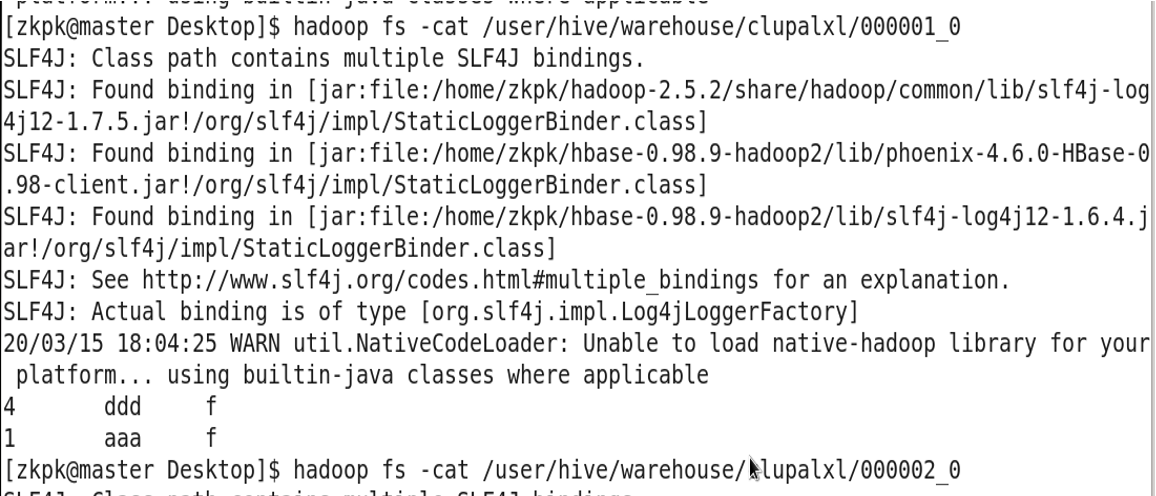
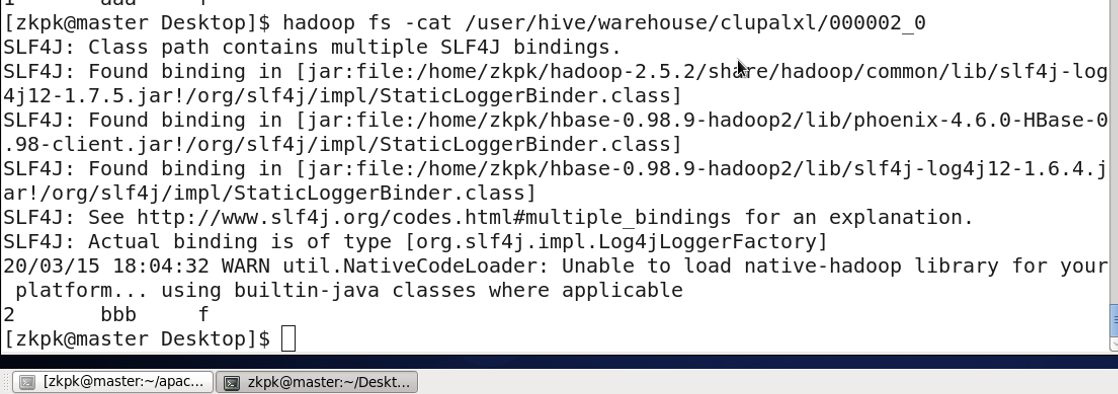
3.16 Downloading Hive Table Data to Local
INSERT OVERWRITE LOCAL DIRECTORY '/home/zkpk/directory_name' SELECT * FROM table_name;

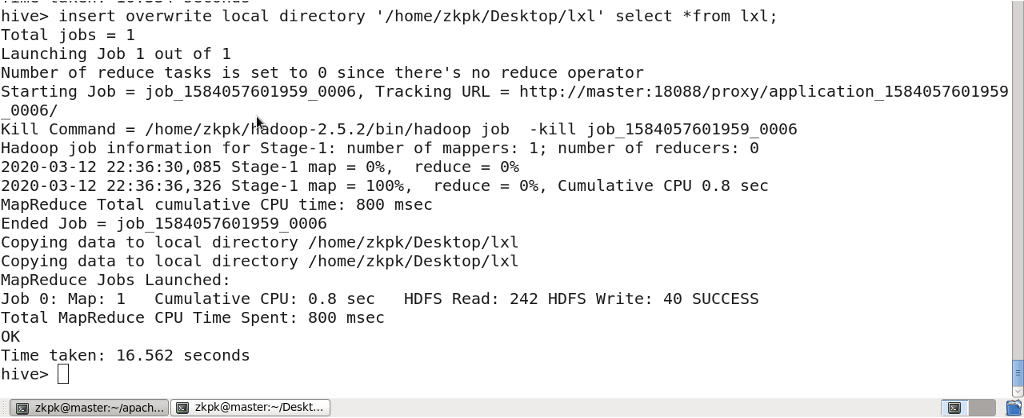
Check the downloaded data:
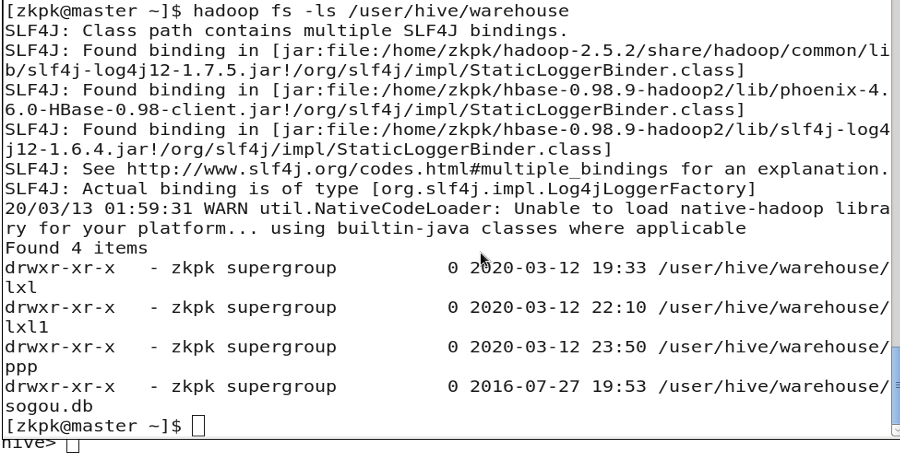
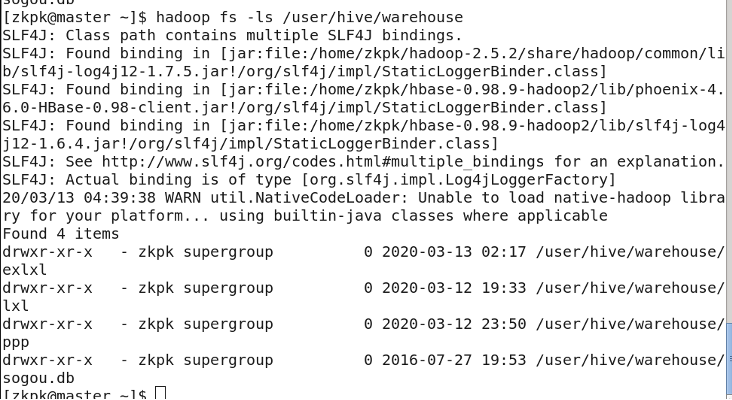
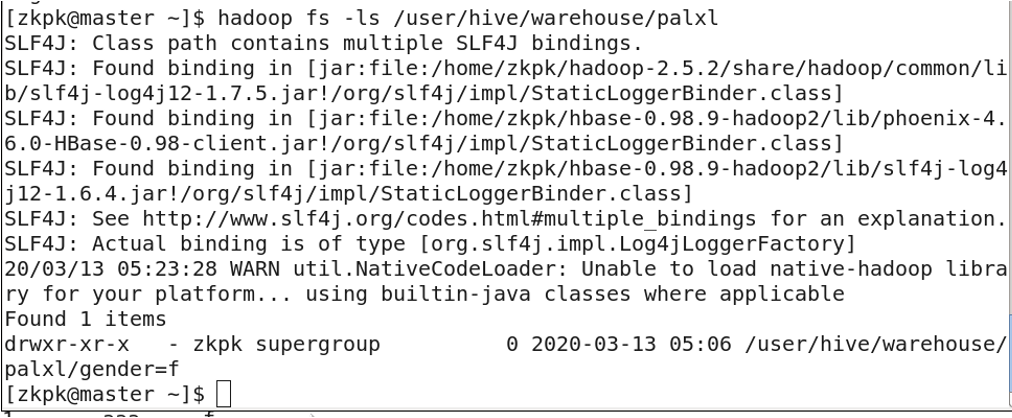
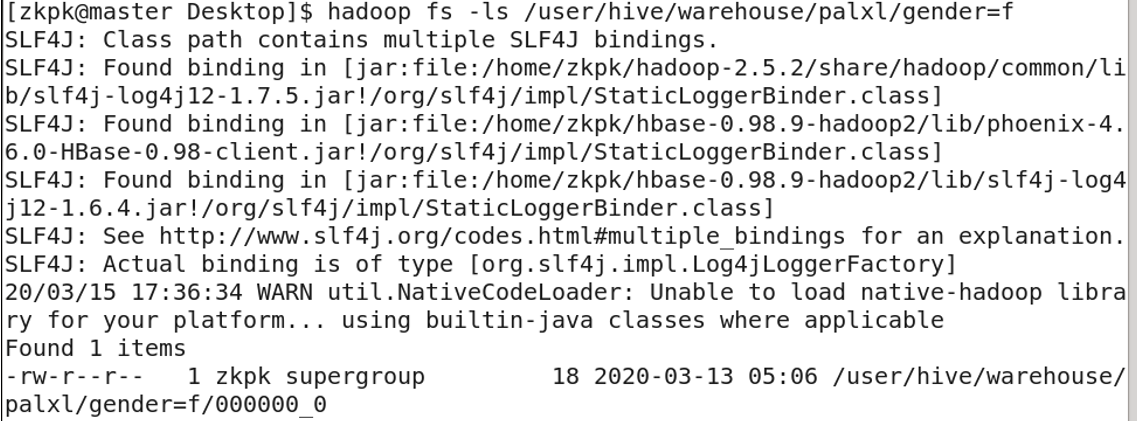
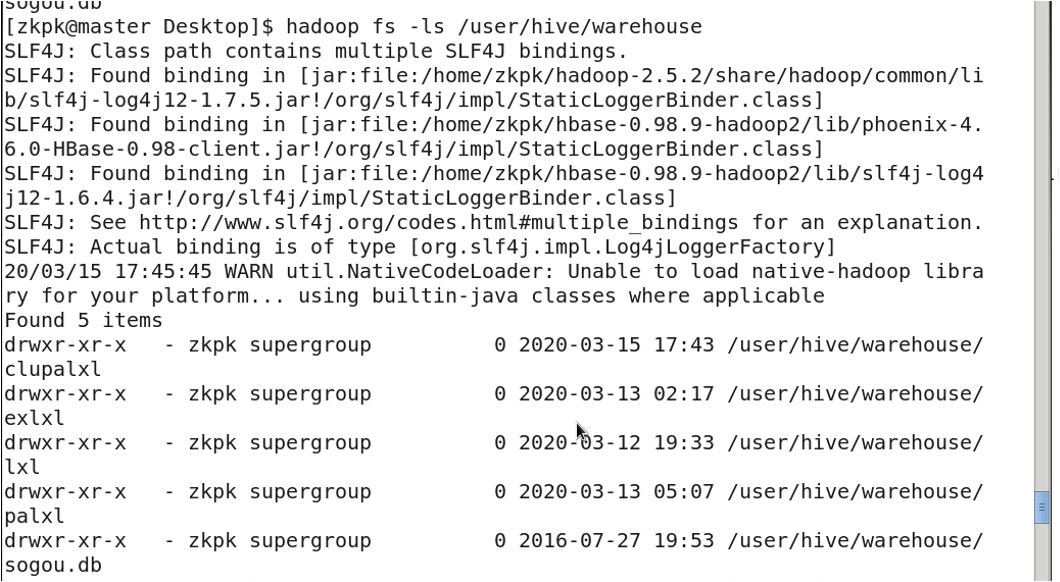
4. Table Storage Location
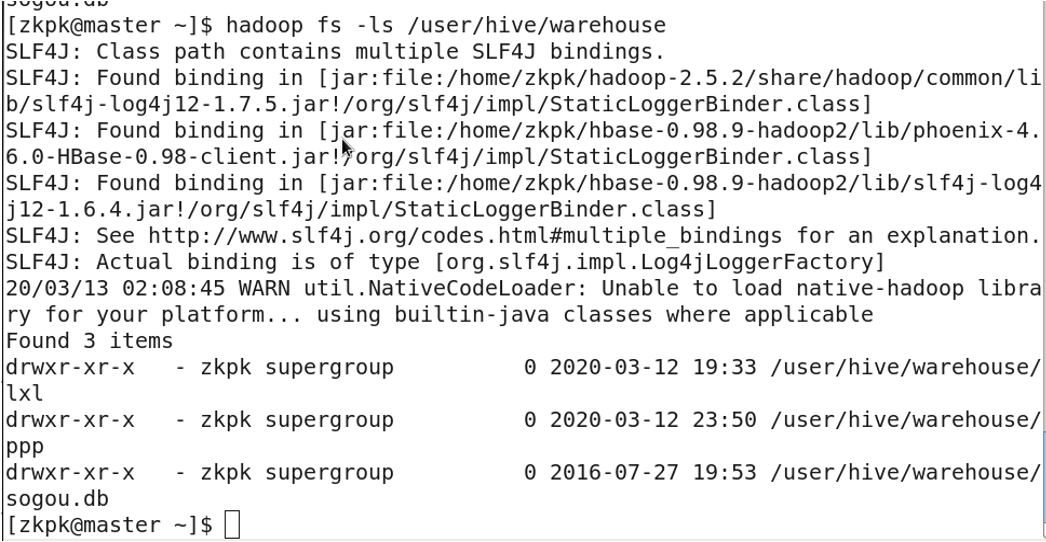
Tables are stored in HDFS at: /user/hive/warehouse
5. External vs. Internal Tables
- Managed Table (Internal Table, Temporary Table): Deleting the table removes both the metadata and the actual data files.
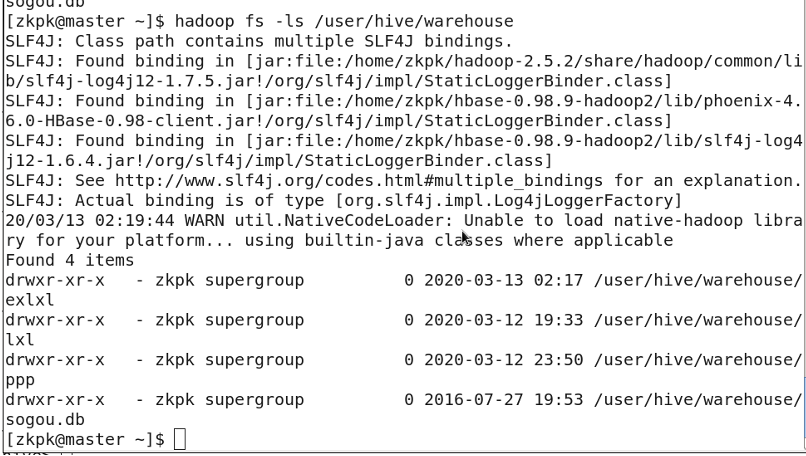
- External Table: Deleting the table only removes the metadata; the actual data files remain in HDFS.
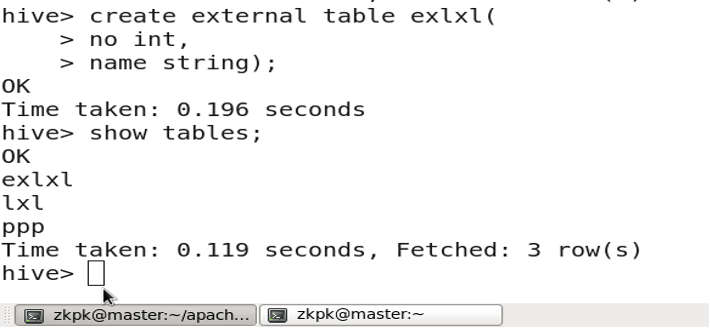
Creating an external table:
CREATE EXTERNAL TABLE table_name (...);
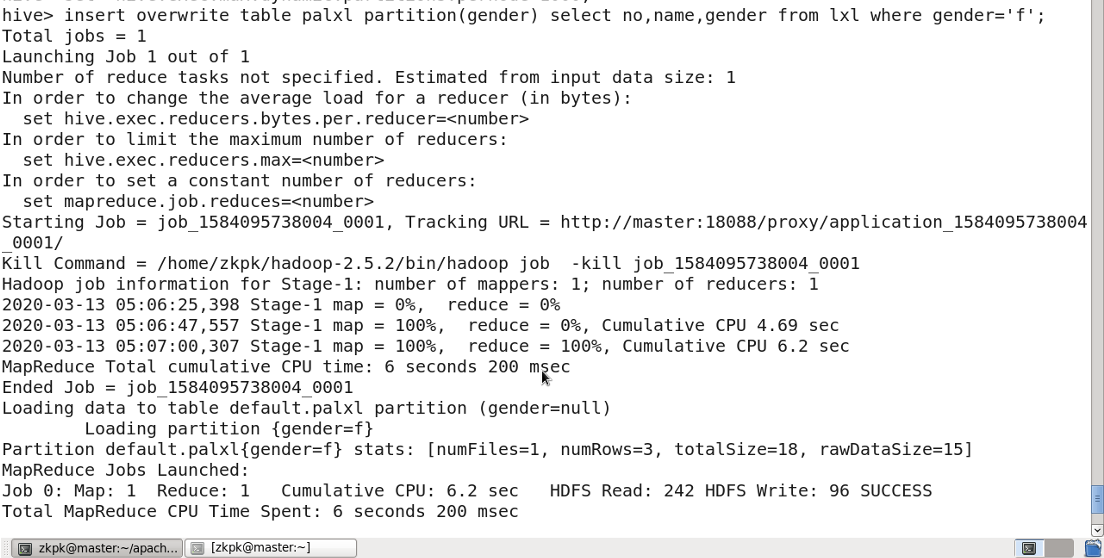
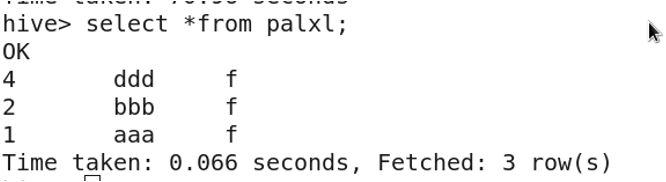
6. Partitioned Tables
Partitioned tables divide data into multiple directories based on a partition rule (e.g., column value). This improves query performance by allowing the engine to skip irrelevant partitions.

Enable dynamic partitioning:
SET hive.exec.dynamic.partition=true;
SET hive.exec.dynamic.partition.mode=nonstrict;
SET hive.exec.max.dynamic.partitions.pernode=1000;

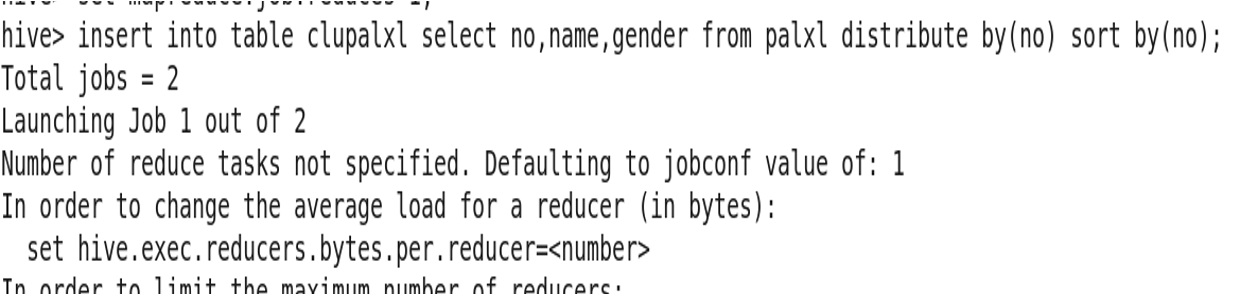
7. Bucketed Tables
For each table (or partition), Hive can be further organized into buckets, which is a finer-grained data division.
Creating a bucketed table:
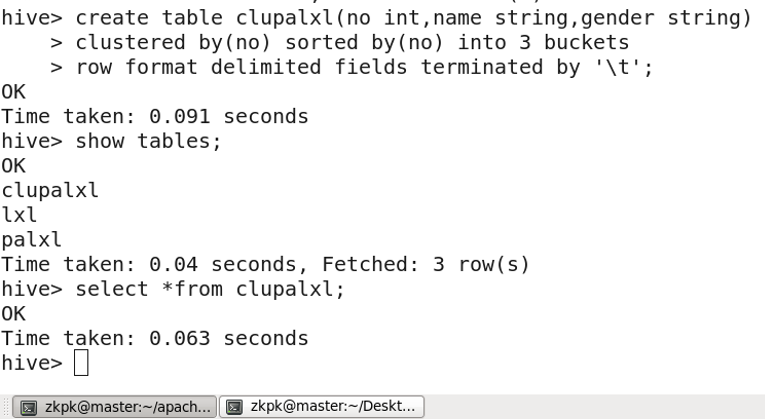
Inserting data into a bucketed table:


8. Complex Data Types (Examples)
9. Other DDL Statements
9.1 Creating a Database
9.2 Dropping a Database
Hive does not allow dropping a database that contains tables.
DROP TABLE database_name.table_name;
DROP DATABASE database_name;
To force drop a database with tables, add the CASCADE keyword:
DROP DATABASE database_name CASCADE;
10. Views
(Omitted)
11. Common HQL Commands
-
Select all fields:
SELECT * FROM lxl; -
Select specific fields:
SELECT name, gender FROM lxl; -
Limit the number of rows returned:
SELECT * FROM lxl LIMIT 3; -
Filter with WHERE:
SELECT * FROM lxl WHERE gender='f'; -
Multiple conditions with WHERE:
SELECT * FROM lxl WHERE gender='f' AND no=1;Note: String conditions can be enclosed in either single or double quotes.
-
Remove duplicates with DISTINCT:
SELECT DISTINCT age FROM lxlage; -
Group data with GROUP BY:
Often used with aggregate functions like
MAX(),MIN(),COUNT(),SUM(),AVG().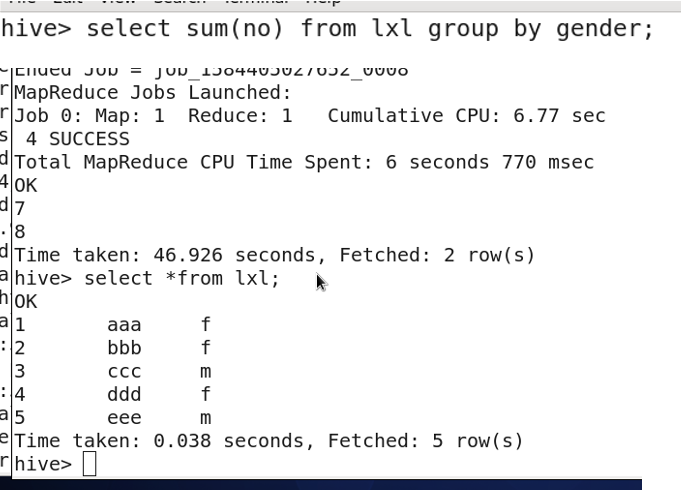
-
Order data with ORDER BY:
Default is ascending order. Use
DESCfor descending order. -
Pattern matching with LIKE:
SELECT * FROM lxl WHERE name LIKE '%a%';This finds names containing the character 'a'.
Using IN:
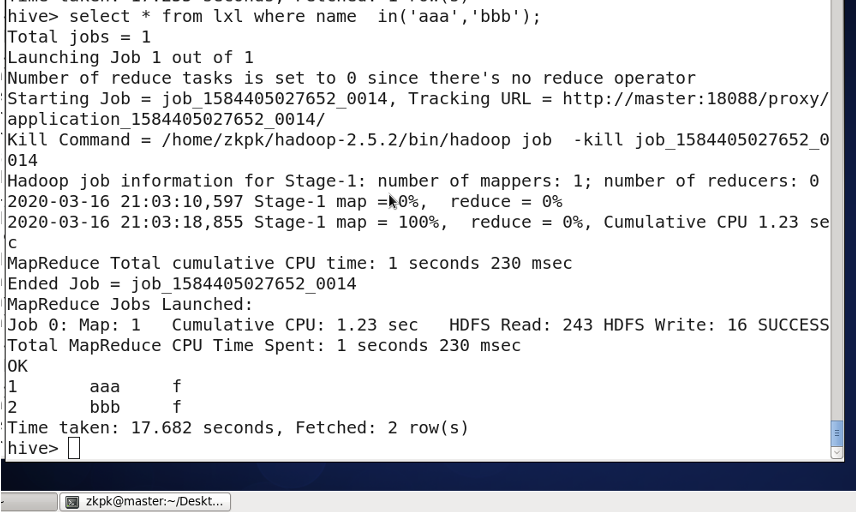
-
Range query with BETWEEN AND:
SELECT * FROM lxl WHERE no BETWEEN 2 AND 4; -
Joining tables with JOIN:
SELECT * FROM lxl JOIN lxlage ON lxl.no = lxlage.no;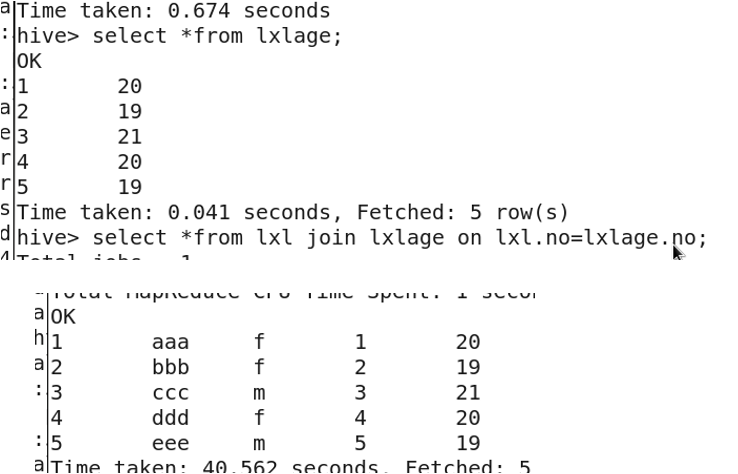
LEFT JOIN (all rows from left table):
SELECT * FROM lxl LEFT JOIN lxlage ON lxl.no = lxlage.no;RIGHT JOIN (all rows from right table):
SELECT * FROM lxl RIGHT JOIN lxlage ON lxl.no = lxlage.no; -
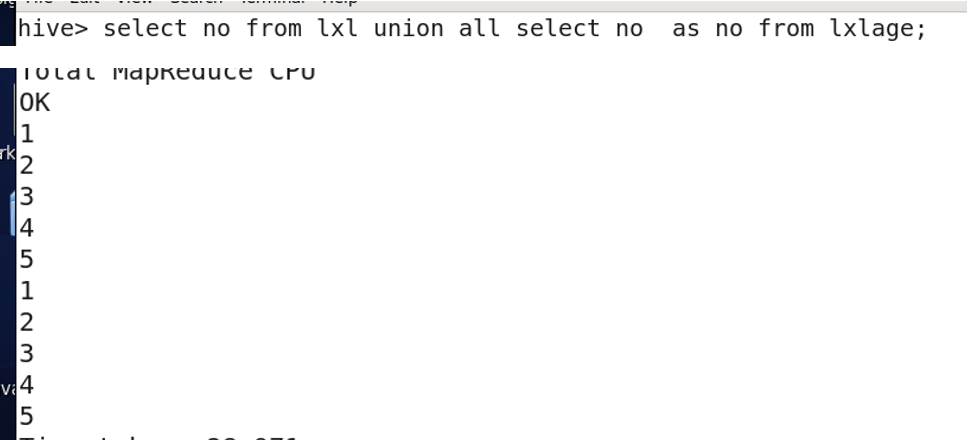
Combining results with UNION ALL:
The columns must match in name and type.
-
Filtering groups with HAVING:
Used with
GROUP BYto filter groups.WHEREcannot be used with aggregate functions.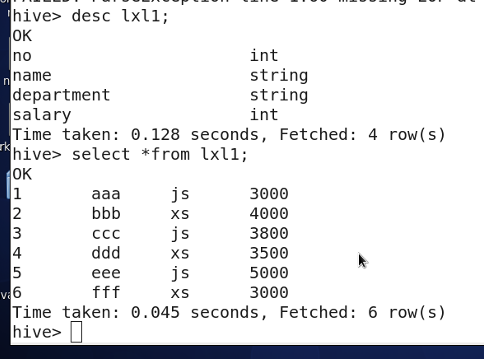
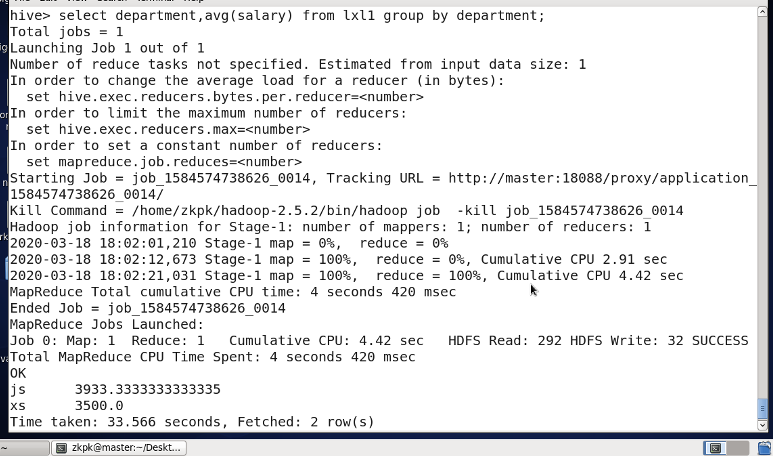 Find departments with average salary over 3800:


11. Exiting Hive
quit;
Chapter 6: ZooKeeper - Distributed Coordination System
1. Introduction
ZooKeeper is a distributed coordination service designed to solve consistency problems in distributed systems.
ZooKeeper = File System + Notification Mechanism. (Similar to a resource management system)
Both ZooKeeper and Kafka need to be started on all machines (master and slaves).
Starting Hadoop cluster is not required beforehand.
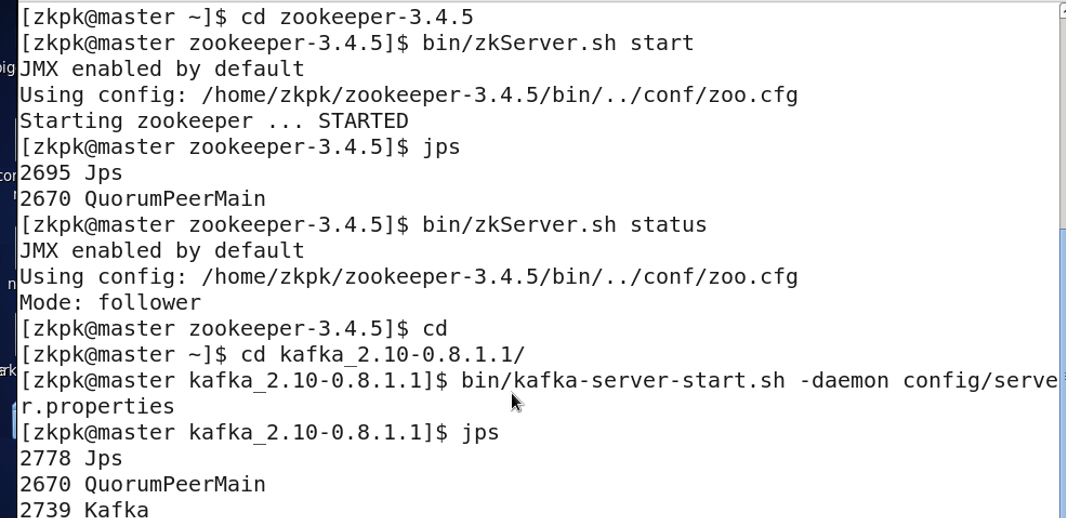
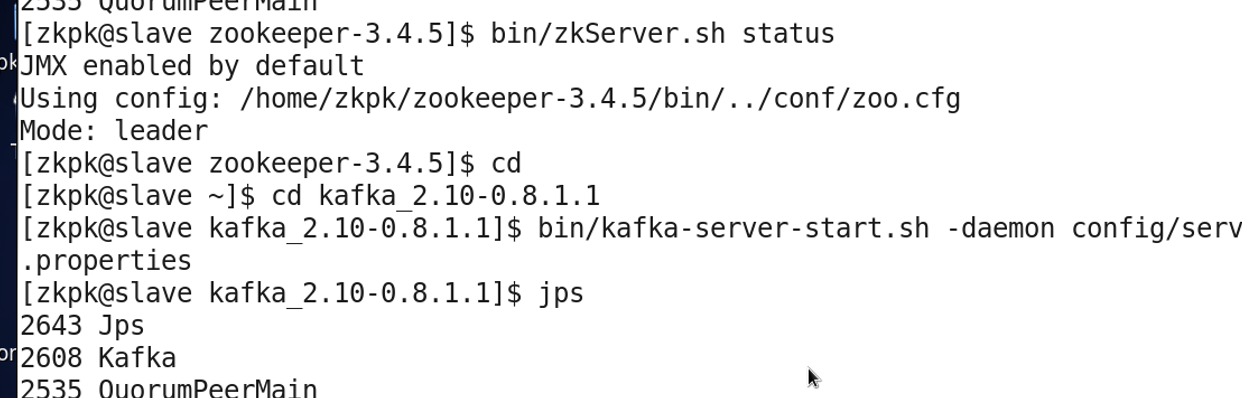
Log in to master, slave01, and slave02 nodes. Navigate to the ZooKeeper installation directory and start the service:
# On master node
cd zookeeper-3.4.10/
bin/zkServer.sh start

# On slave nodes
cd zookeeper-3.4.10/
bin/zkServer.sh start
Start command: bin/zkServer.sh start
ZooKeeper can handle two types of queues:
- Synchronization Queue: A queue is only usable when all its members are present. It waits until all members are gathered.
- FIFO Queue: Follows the First-In-First-Out principle for enqueue and dequeue operations.
2. Persistent vs. Ephemeral Nodes
ZooKeeper has four main types of nodes:
- PERSISTENT Node: Exists until explicitly deleted. It does not disappear when the client session that created it ends.
- PERSISTENT_SEQUENTIAL Node: The parent node maintains a sequence counter for its immediate children. When created, ZooKeeper appends a monotonically increasing number to the node name.
- EPHEMERAL Node: The node's lifecycle is tied to the client session. It is automatically deleted when the session ends (note: session end, not connection close). Ephemeral nodes cannot have children.
- EPHEMERAL_SEQUENTIAL Node: Similar to an ephemeral node, but ZooKeeper automatically appends a sequence number to the node name upon creation, similar to persistent sequential nodes.
3. get Command: Retrieving Node Data and Metadata
cZxid: Transaction ID for node creationctime: Node creation timemZxid: Transaction ID for last modificationmtime: Last modification timepZxid: Transaction ID for children modificationcversion: Version number of childrendataVersion: Version number of the data stored in the nodeaclVersion: Version number of the ACLephemeralOwner: Indicates if the node is ephemeral (if yes, shows session ID; otherwise 0)dataLength: Length of the datanumChildren: Number of children
4. Access Control (ACL)
ACL stands for Access Control List.
ZooKeeper nodes have 5 operation permissions: CREATE, READ, WRITE, DELETE, ADMIN (abbreviated as crwda).
Except for DELETE, the other 4 permissions apply to operations on the node itself.
5. Four-Letter Words (Admin Commands)
5.1 stat: View Node Status
[zkpk@master zookeeper-3.4.5]$ su root
[root@master zookeeper-3.4.5]# echo stat | nc 192.168.1.100 2181
5.2 ruok: Check if ZooKeeper is Running
Returns imok if running.
[root@master zookeeper-3.4.5]# echo ruok | nc 192.168.1.100 2181
imok
5.3 dump: List Outstanding and Ephemeral Nodes
[root@master zookeeper-3.4.5]# echo dump | nc 192.168.1.100 2181
SessionTracker dump:
...
Sessions with Ephemerals (0):
5.4 conf: Display Server Configuration
[root@master zookeeper-3.4.5]# echo conf | nc 192.168.1.100 2181
clientPort=2181
dataDir=...
dataLogDir=...
tickTime=2000
...
5.5 cons: List Connection Information
[root@master zookeeper-3.4.5]# echo cons | nc 192.168.1.100 2181
/192.168.0.68:49354[0](queued=0,recved=1,sent=0)
5.6 envi: Display Environment Variables
[root@master zookeeper-3.4.5]# echo envi | nc 192.168.1.100 2181
Environment:
zookeeper.version=...
...
5.7 mntr: Display Cluster Health Metrics
[root@master zookeeper-3.4.5]# echo mntr | nc 192.168.1.100 2181
zk_version   3.4.5-...
zk_avg_latency   0
zk_max_latency   4
...
5.8 wchs: Display Watch Information Summary
[root@master zookeeper-3.4.5]# echo wchs | nc 192.168.1.100 2181
0 connections watching 0 paths
Total watches:0
5.9 wchc and wchp: Display session/path watch details (may be restricted)
[root@master zookeeper-3.4.5]# echo wchc | nc 192.168.1.100 2181
wchc is not executed because it is not in the whitelist.
6. Stopping ZooKeeper
Stop ZooKeeper on all nodes (master and slaves).

Chapter 7: Kafka
1. Kafka Concepts
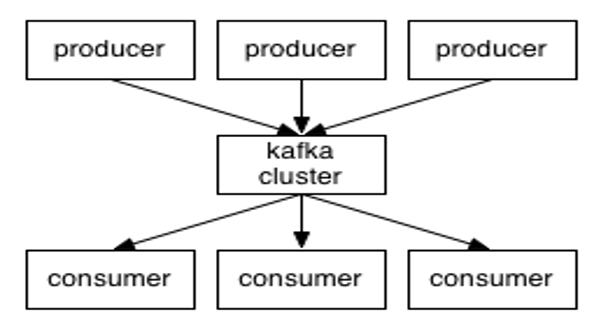
Kafka is a high-throughput, distributed publish-subscribe messaging system.
- Producer: Message producer, responsible for publishing messages to Kafka.
- Consumer: Message consumer, reads messages from Kafka.
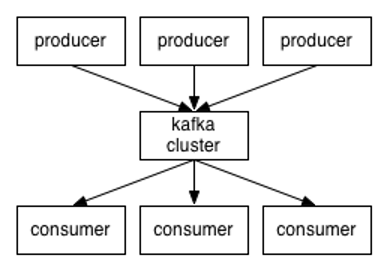
- Broker: A server node in the Kafka cluster. Each Kafka node is a broker.
- Message: The data unit in Kafka. Has metadata and a key.
- Partition: A physical concept for horizontal scalability. Topics are split into partitions.
- Topic: A category or feed name to which messages are published.
- Segment: Partitions are physically composed of multiple segments, each storing messages.
2. Kafka Features
- Persistence: Messages are persisted to disk, enabling batch consumption.
- Distributed System: Easily scalable.
- Online and Offline Support: Suitable for both real-time and batch processing.
- Compression Support: Supports snappy, gzip.
3. Common Commands
Start ZooKeeper on all nodes (master and slaves), then start Kafka on all nodes.
Create a topic named test with 1 partition and replication factor of 1:
[zkpk@master kafka_2.11-0.10.2.1]$ bin/kafka-topics.sh --create --zookeeper master:2181 --replication-factor 1 --partitions 1 --topic test

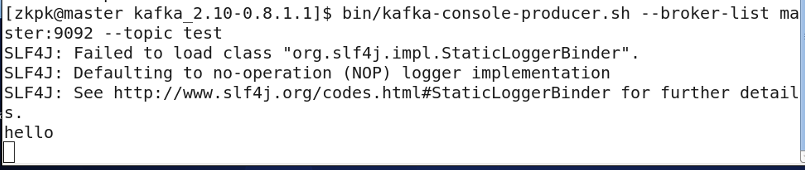
Start a console producer on master:
[zkpk@master kafka_2.11-0.10.2.1]$ bin/kafka-console-producer.sh --broker-list master:9092 --topic test
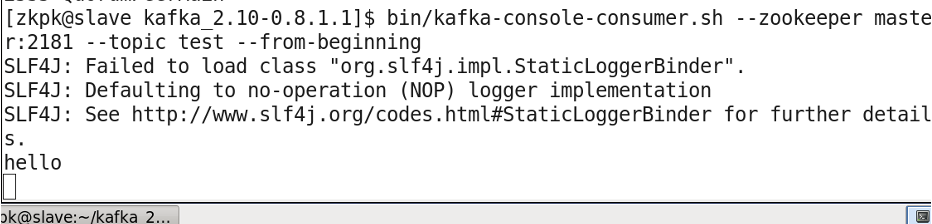
Start a console consumer on slave01:
[zkpk@master kafka_2.11-0.10.2.1]$ bin/kafka-console-consumer.sh --zookeeper master:2181 --topic test --from-beginning
List all topics:
bin/kafka-topics.sh --list --zookeeper master:2181

Describe topic details:
bin/kafka-topics.sh --describe --zookeeper master:2181 --topic test

4. Shutdown
bin/kafka-server-stop.sh
bin/zkServer.sh stop
Chapter 8: HBase
1. Introduction
HBase is a highly reliablee, high-performance, column-oriented, scalable, real-time read/write distributed database. It is an important component of the Hadoop ecosystem.
2. Differences from Traditional RDBMS
HBase differs from traditional relational databases in several key aspects:
- Data Types: HBase primarily stores strings.
- Data Operations: HBase lacks complex table relationships and uses simple operations like insert, query, delete, and truncate.
- Storage Model: RDBMS is row-oriented; HBase is column-oriented.
- Data Indexing: HBase has a single index: the row key.
- Data Maintenance: Update operations in HBase do not delete the old version of data; they create a new version, retaining old ones.
- Scalability: HBase is designed for horizontal scalability.
3. Common Commands
3.1 Startup
Standalone Mode:
start-hbase.sh
stop-hbase.sh
Pseudo-distributed Mode:
start-all.sh
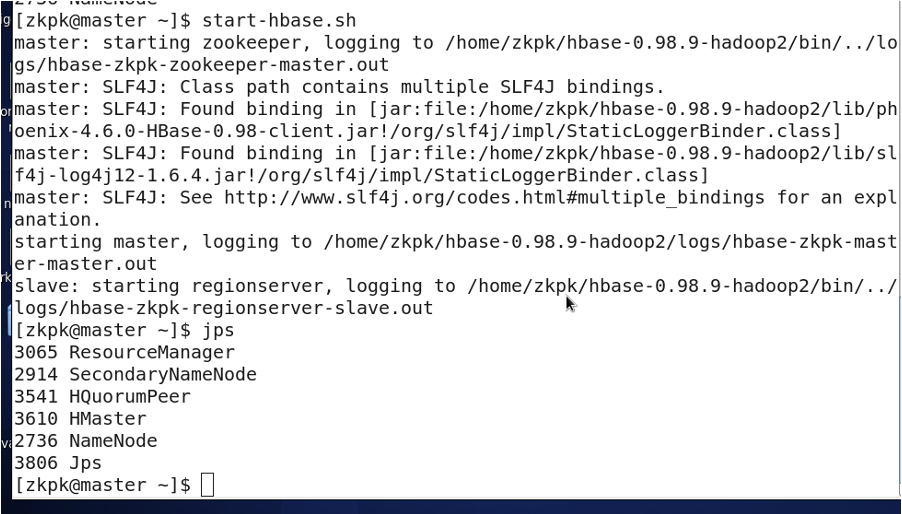
start-hbase.sh
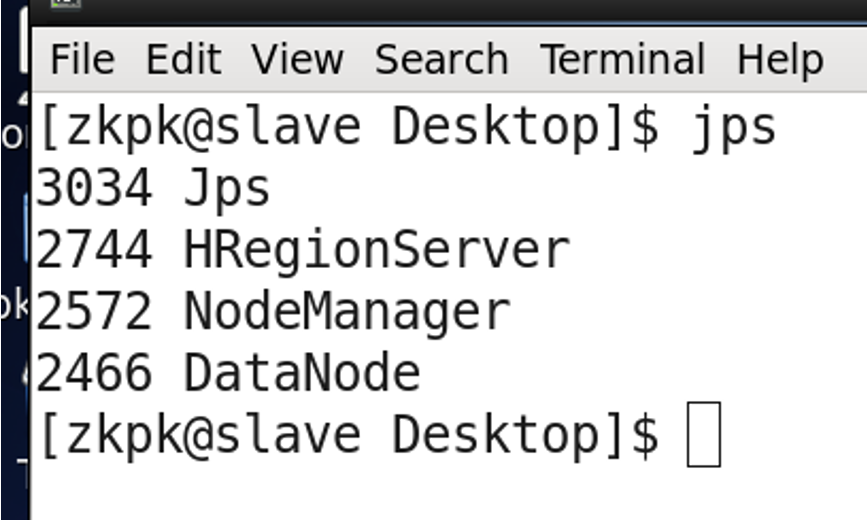
# jps should show: master -> HMaster, slave -> HRegionServer
Fully-distributed Mode:
start-all.sh

zkServer.sh start
# (Start on all nodes, jps shows QuorumPeerMain)

zkServer.sh status
# Returns follower or leader for each node

start-hbase.sh  # (Execute on master node)
3.2 Startup Sequence 2
start-all.sh
start-hbase.sh
3.3 Entering HBase Shell
...