Introduction
This guide walks you through building your own IoT platform using an ESP8266 module and the OneNet cloud service. You will learn how to upload sensor data from the ESP8266 to the platform and receive commands issued from the cloud.
Refer to the following official documentation:
- OneNet API referance: https://open.iot.10086.cn/doc/v5/develop/detail/638
- ESP8266 MQTT AT commands: https://docs.espressif.com/projects/esp-at/en/releasev2.2.0.0_esp8266/AT_Command_Set/MQTT_AT_Commands.html
Note: All referenced files are available in a shared archive (link and password omitted as per guidelines).
1. Creating a Product and Device on OneNet
-
Open the OneNet official website: https://open.iot.10086.cn/
-
Register an account.
-
Click on Developer Center (Figure 1) -> Create Product (Figure 2).
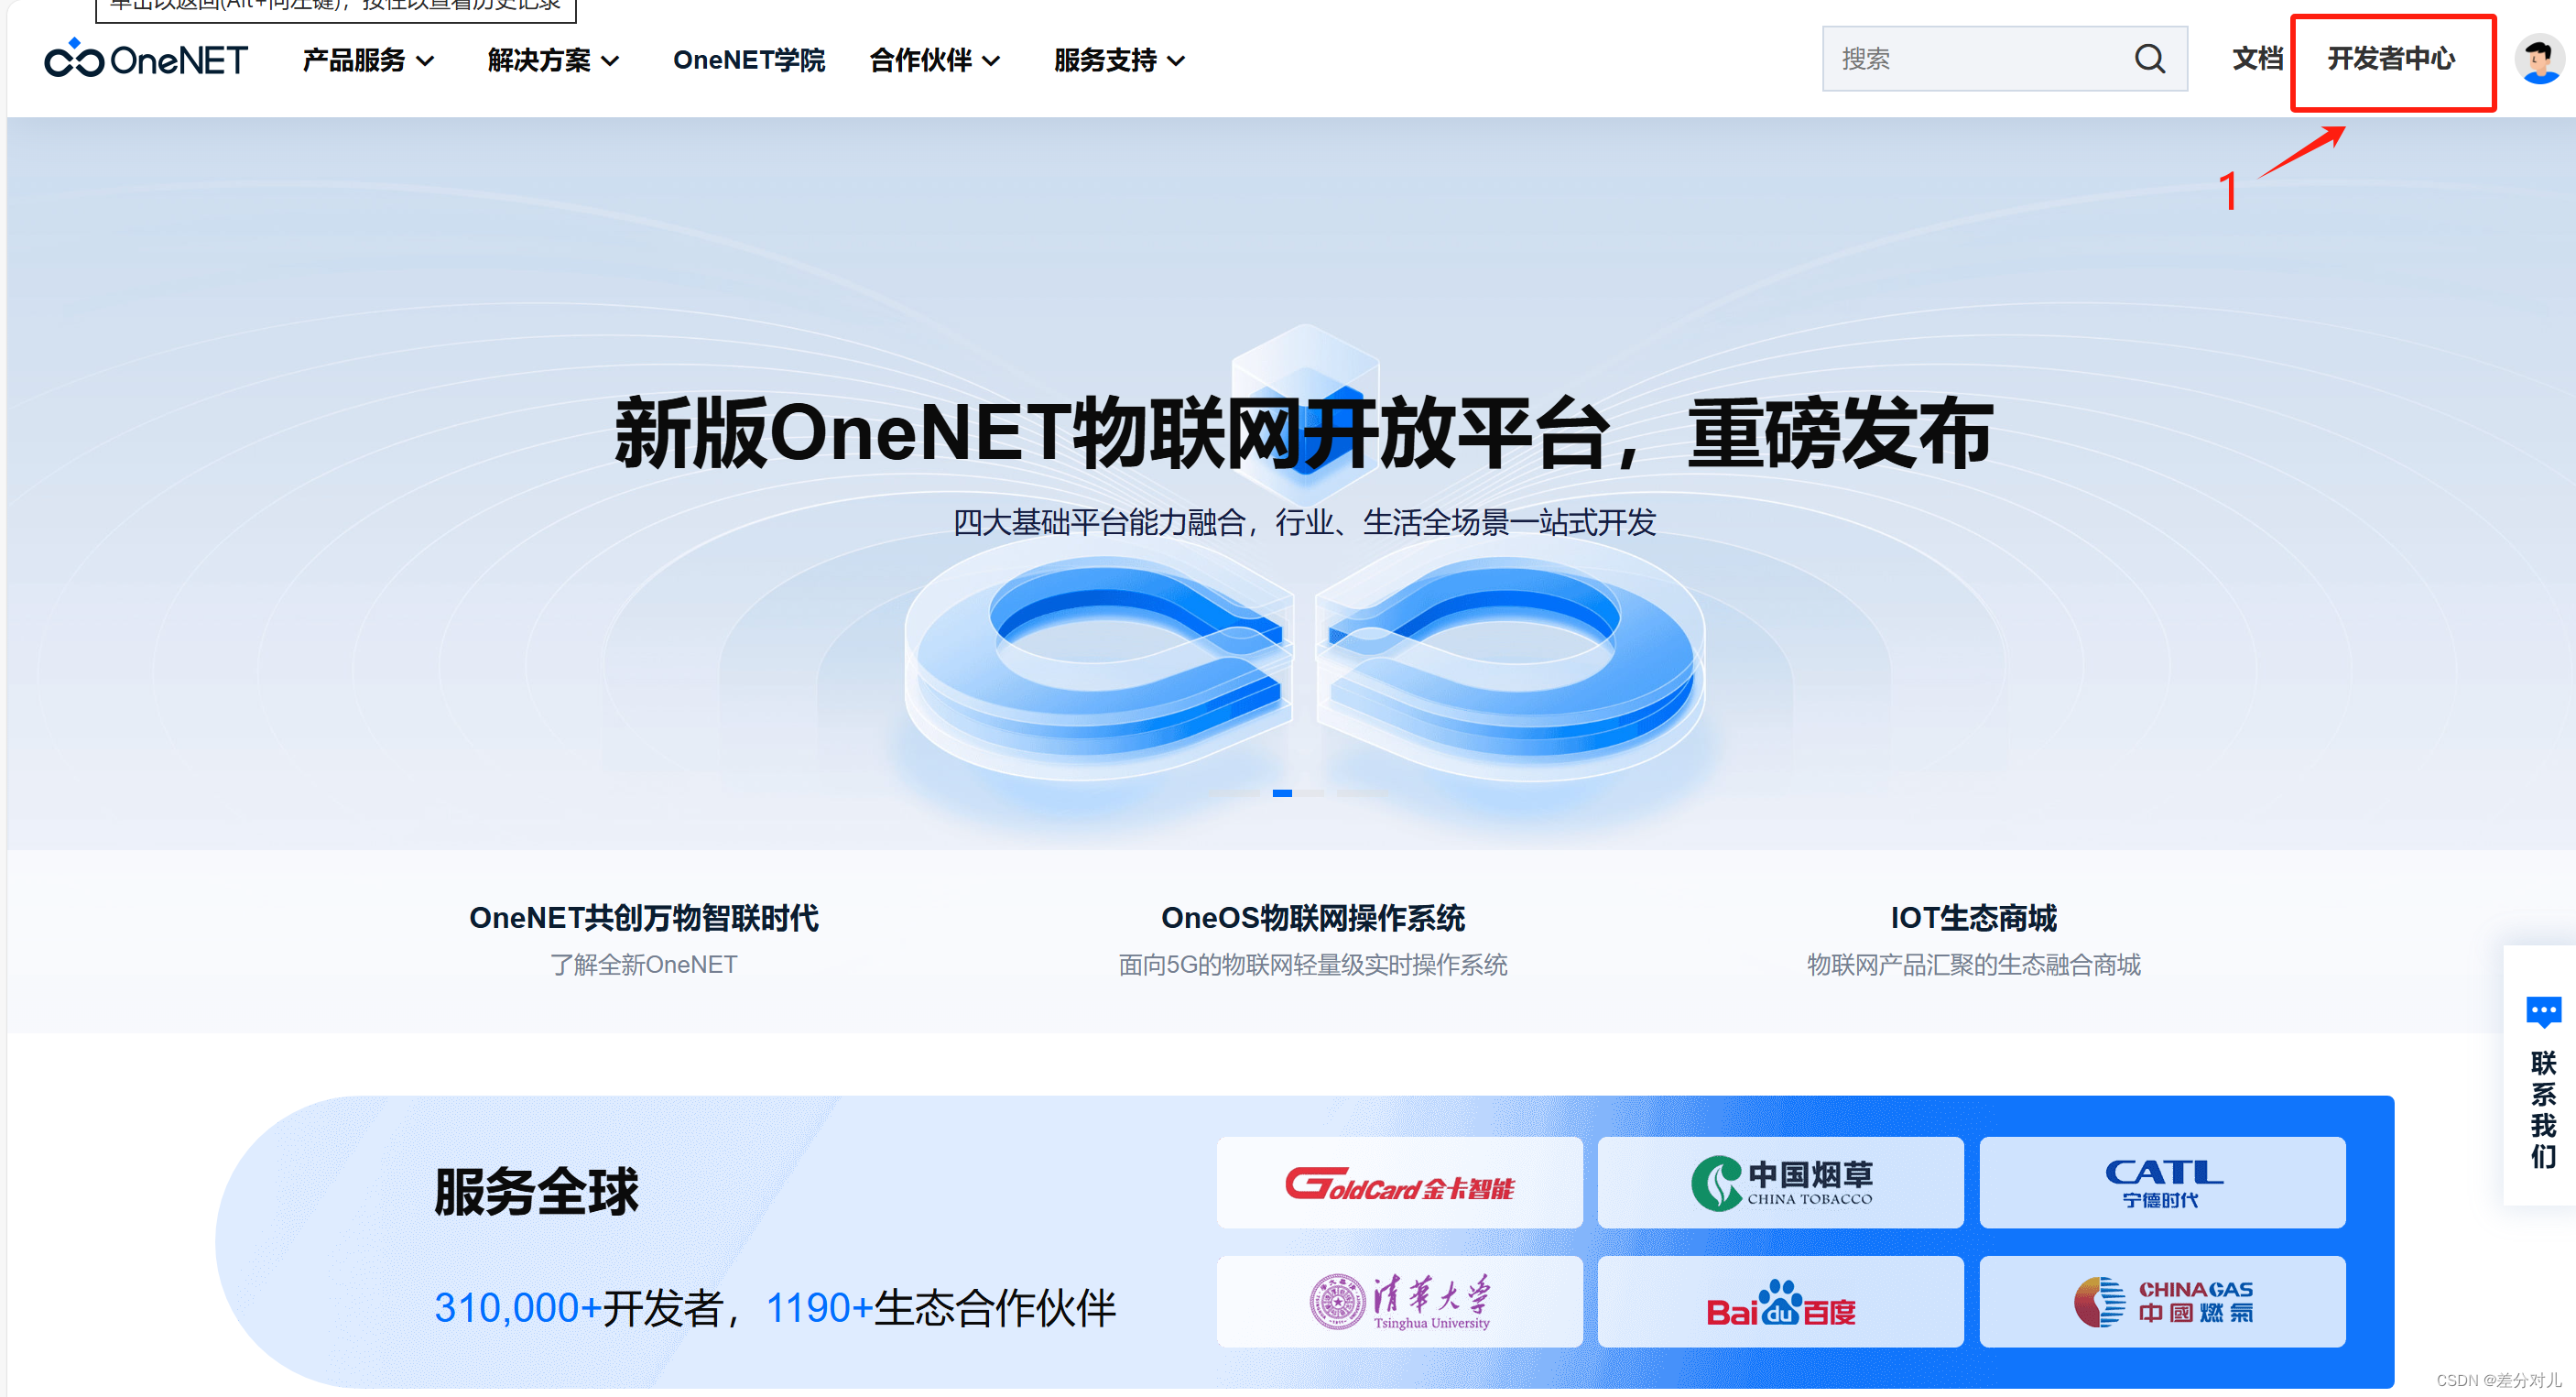 Figure 1: Developer Center entry
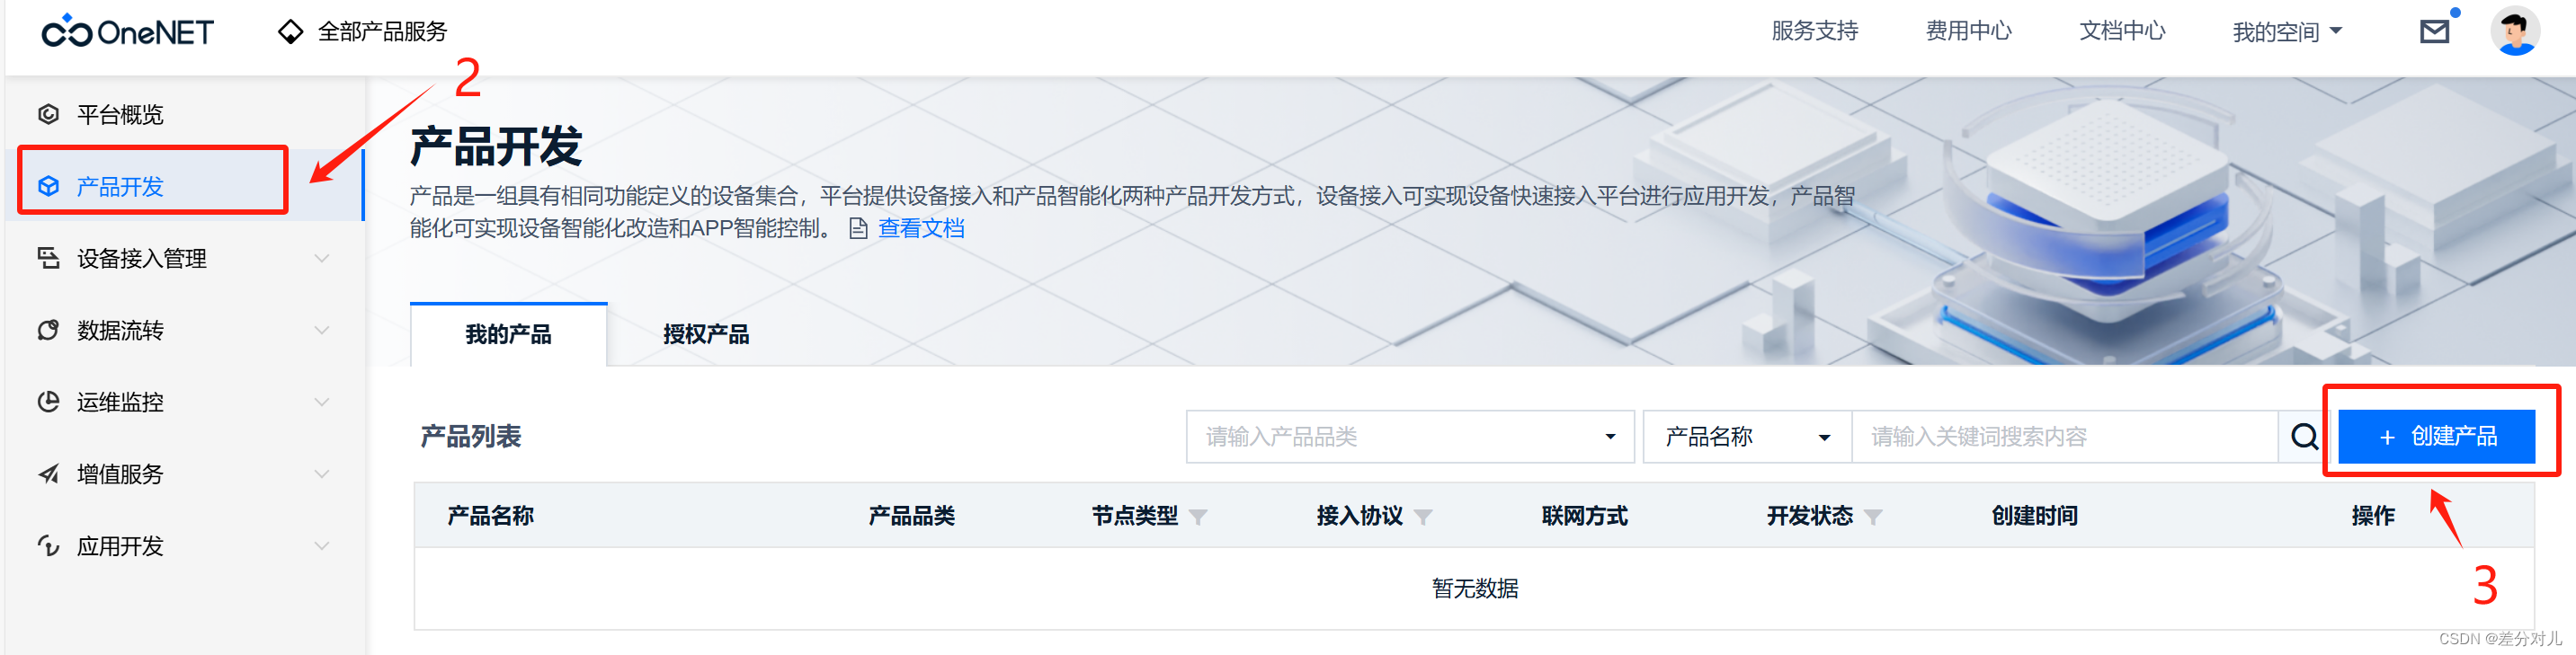 Figure 2: Product creation
 -
Configure the product: leave the default Product Category, select Device Access for the intelligence method, and fill in the product information according to your actual device. Figure 3 shows a sample configuration.
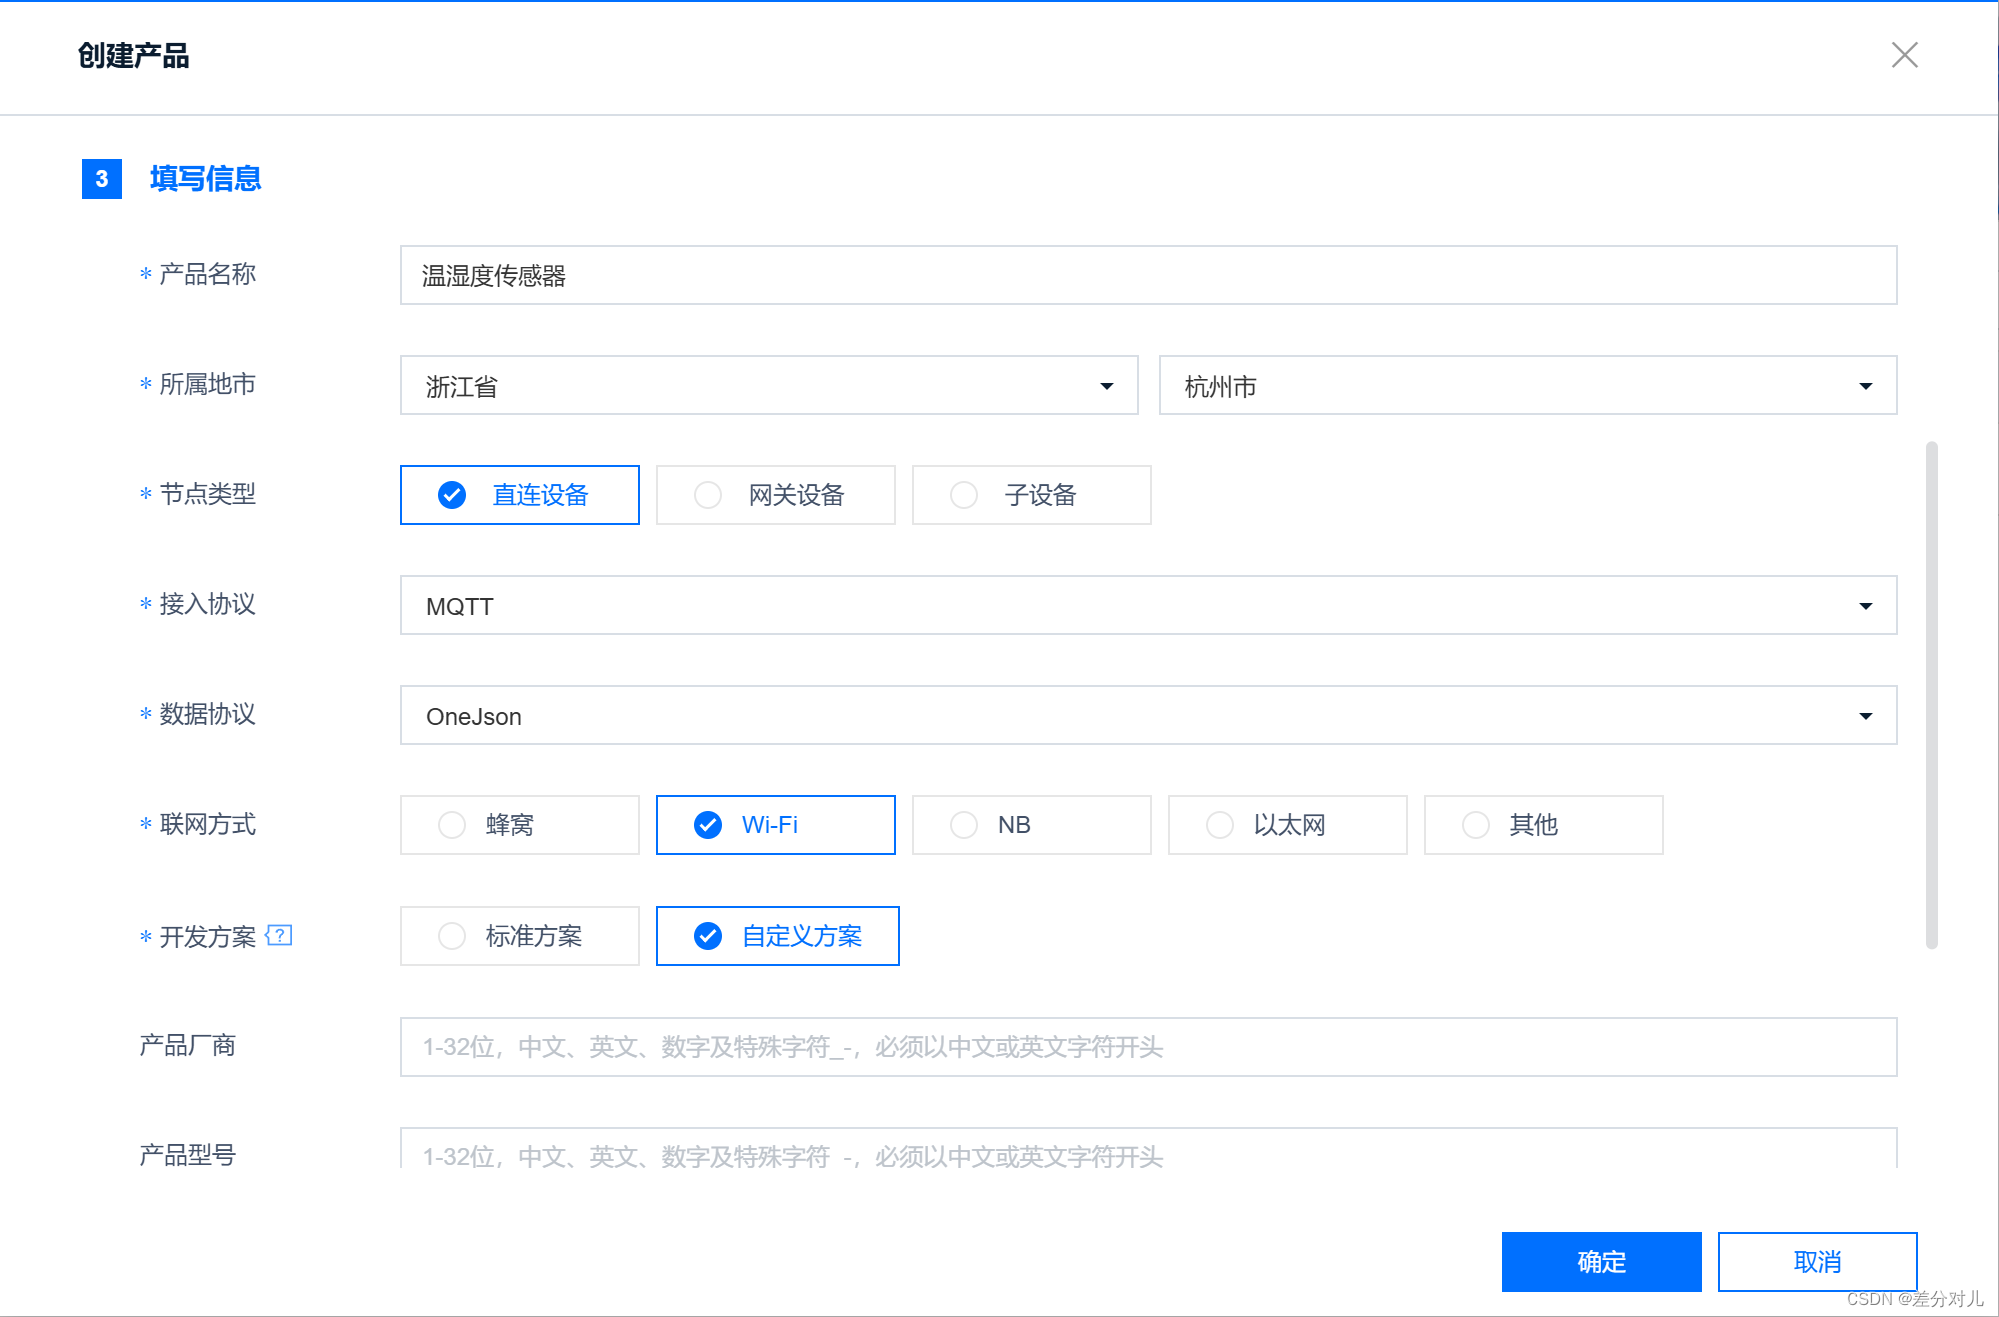 Figure 3: Product configuration example
The product information is now complete (Figure 4).
 Figure 4: Product information summary
 -
Click on Device Management (Figure 4), then Add Device (Figure 5), and confirm.
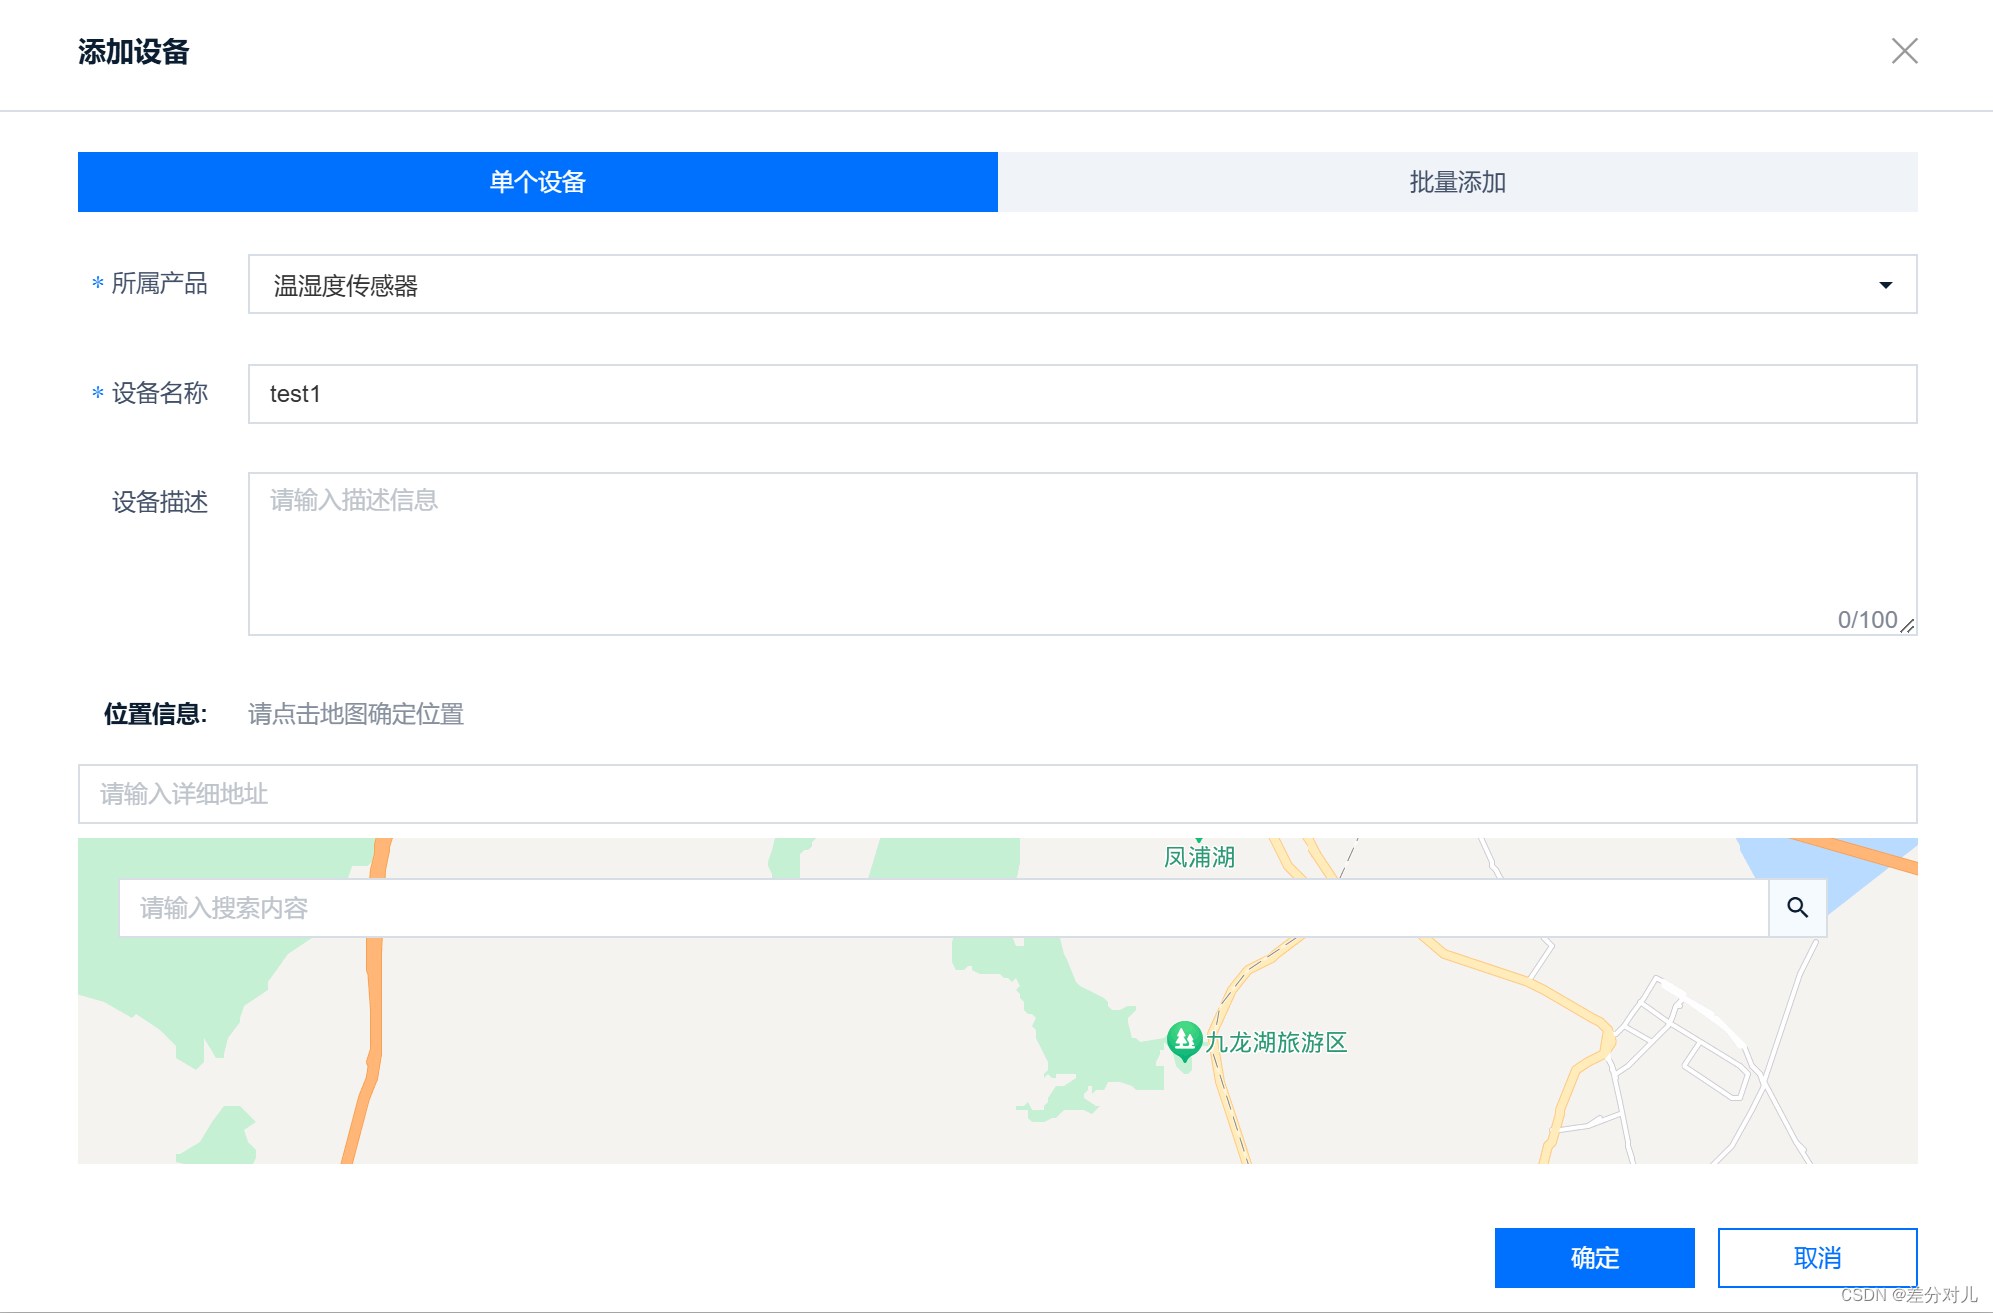 Figure 5: Device addition form
 -
Navigate as shown in Figures 6 and 7, then click Add Custom Feature Point. Define the data points you want to monitor. Because this example uses temperature and humidity, two custom feature points are added, as shown in Figure 8.
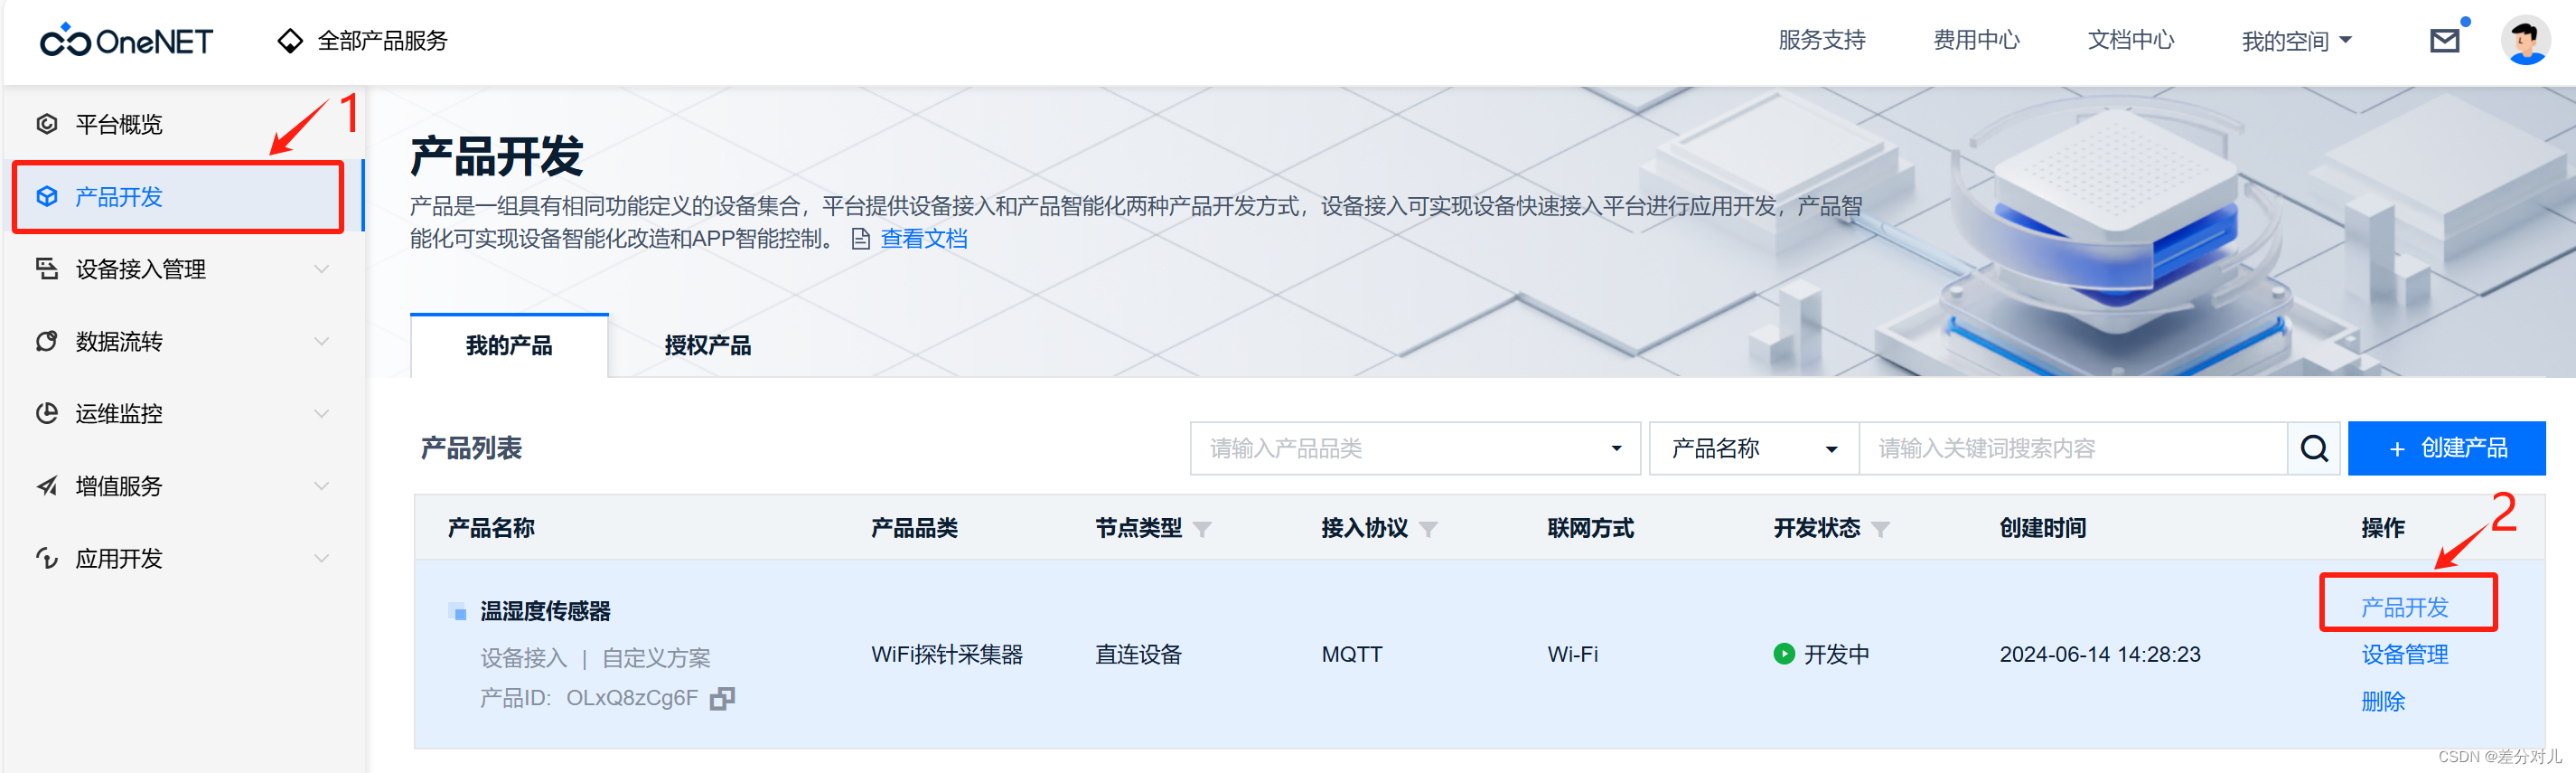 Figure 6: Product development
 Figure 7: Thing model configuration
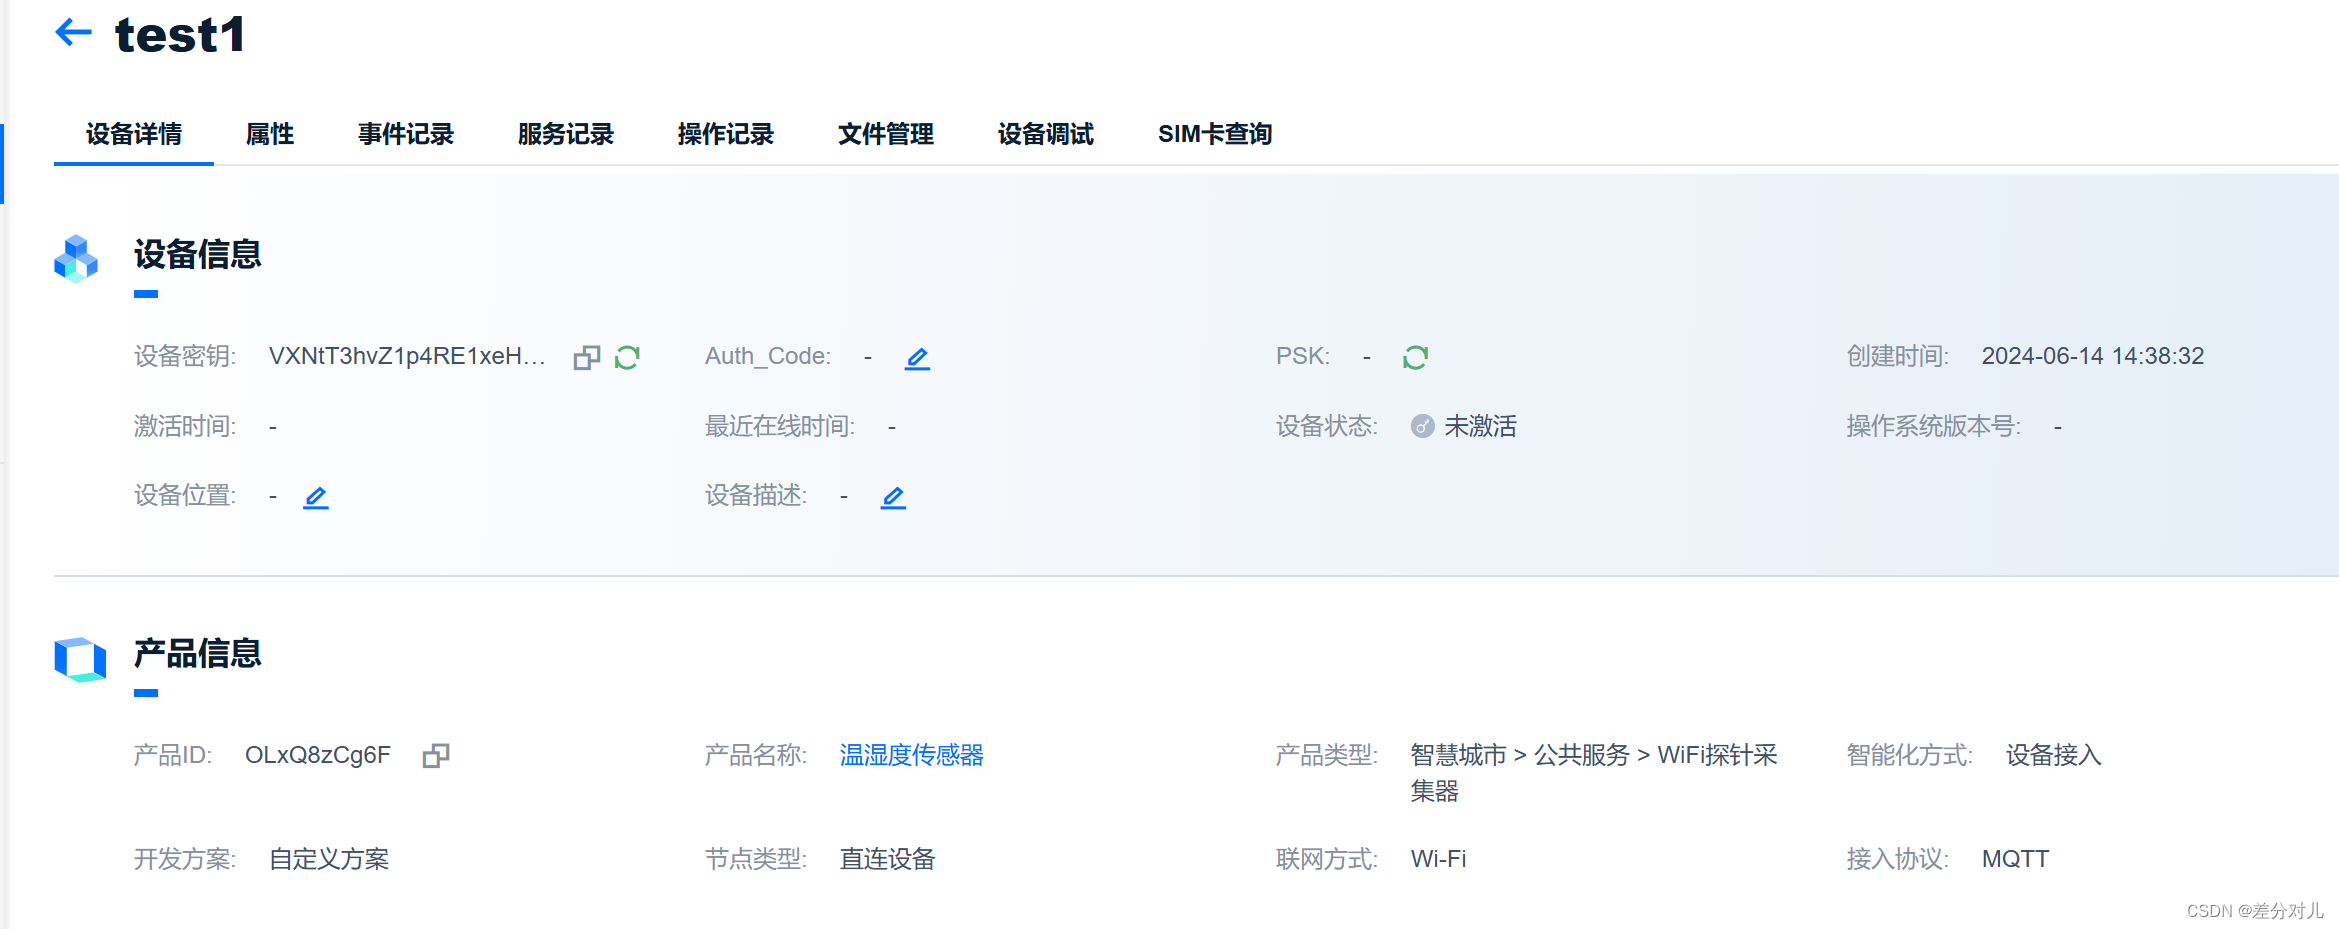 Figure 8: Defining custom feature points
2. WiFi Module and Hardware Setup
The module used here is the ATK-ESP-8266 serial-to-WiFi module, which is not the latest version.
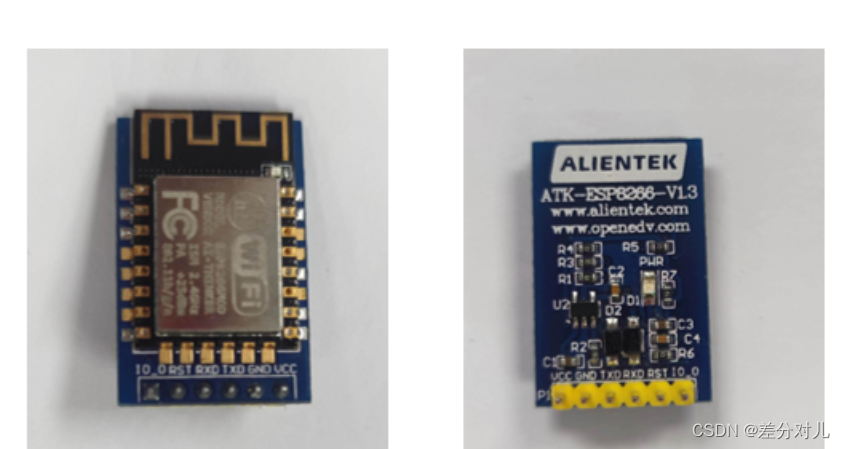 Figure 9: ATK-ESP-8266 module
Troubleshooting note: Some versions may have connection issues. Re-flashing the firmware resolved the problem in this case.
2.1 Firmware Flashing
 Figure 10: Flashing utilities
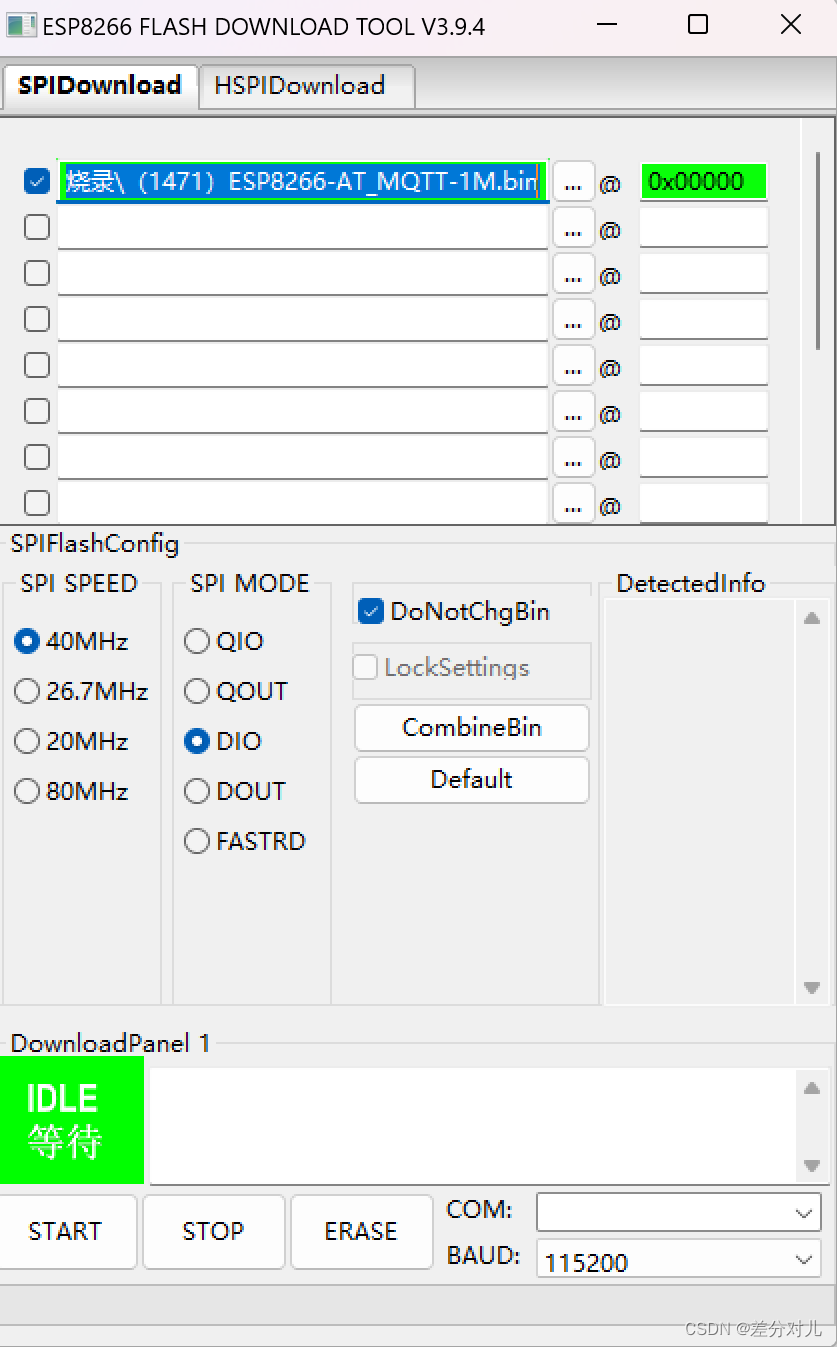 Figure 11: Firmware flashing
2.2 AT Command Configuration
Below are the necessary AT commands for network connnection and MQTT setup (replace placeholders with your own credentials):
1. AT
2. AT+RST
3. AT+CWMODE=1
4. AT+CWDHCP=1,1
5. AT+CWJAP="<WiFi_SSID>","<WiFi_Password>"
6. AT+MQTTUSERCFG=0,1,"<device_name>","<product_ID>","<token>",0,0,""
7. AT+MQTTCONN=0,"mqtts.heclouds.com",1883,1
8. AT+MQTTSUB=0,"$sys/<product_ID>/<device_name>/thing/property/post/reply",1
9. AT+MQTTPUB=0,"$sys/<product_ID>/<device_name>/thing/property/post","{\"id\":\"123\",\"params\":{\"temp\":{\"value\":23.6}}}",0,0
Command description:
AT: Test commandAT+RST: Reset the moduleAT+CWMODE=1: Set station modeAT+CWDHCP=1,1: Enable DHCPAT+CWJAP: Connect to a WiFi networkAT+MQTTUSERCFG: Configure MQTT user parameters (client ID, product ID, token)AT+MQTTCONN: Connect to the MQTT serverAT+MQTTSUB: Subscribe to a topic (here, the property post reply topic)AT+MQTTPUB: Publish a message to a topic (here, the property post topic)
3. MQTT Device Connection
You will need the following parameters:
- Server address and port:
mqtts.heclouds.com:1883 - Device name (Client ID):
test1(as set in Figure 5) - Product ID:
OLxQ8zCg6F(from Figure 8) - Password: Generated using the token tool described below.
3.1 Token Generation
Fill in the token tool as shown in Figure 12:
- res:
products/<product_ID>/devices/<device_name>, e.g.,products/OLxQ8zCg6F/devices/test1 - et: A future timestamp. Obtain one from an online timestamp converter, e.g., https://www.beijing-time.org/shijianchuo/
- key: Your device secret (can be found in the device details on OneNet)
Click Generate to obtain the token string.
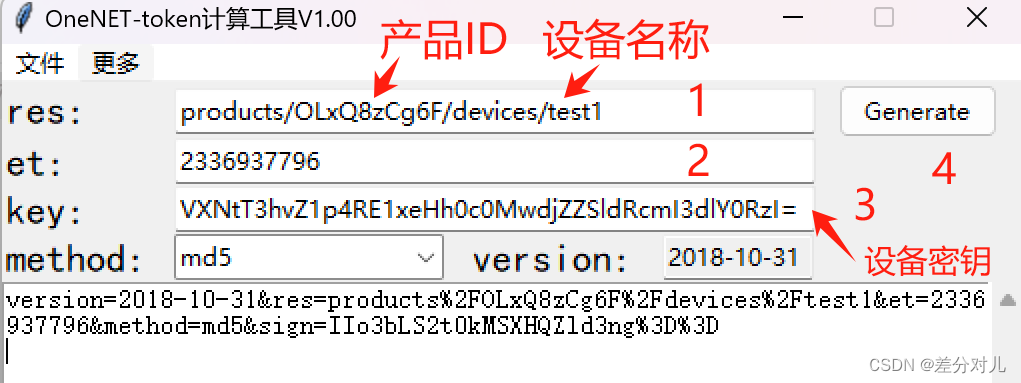 Figure 12: Token generation
3.2 Data Upload
 Figure 13: Data upload
To upload temperature and humidity values, execute the following AT command (adjust values as needed):
AT+MQTTPUB=0,"$sys/OLxQ8zCg6F/test1/thing/property/post","{\"id\":\"123\",\"params\":{\"temp\":{\"value\":24},\"hum\":{\"value\":6.17}}}",0,0
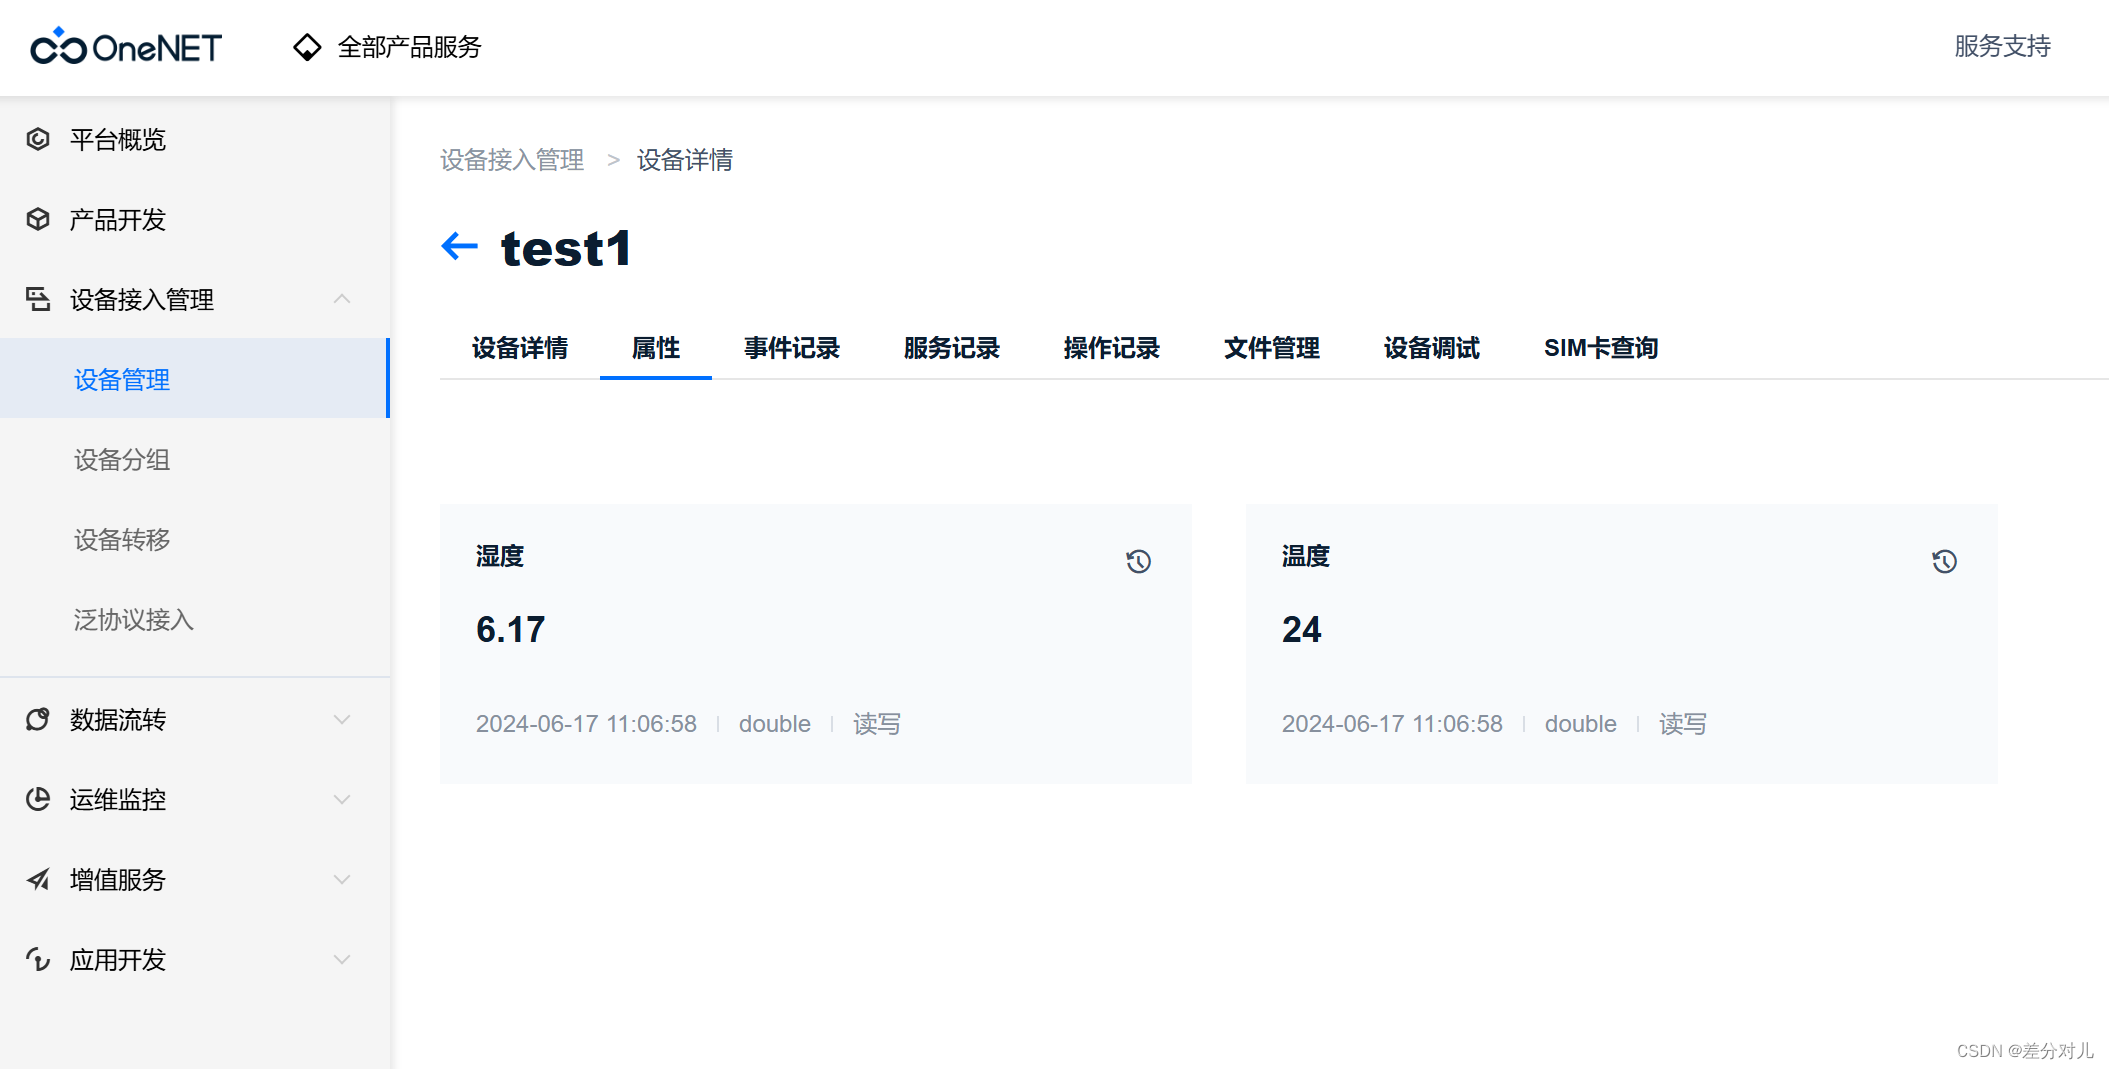 Figure 14: Property upload success
As shown in Figure 14, the data has been successfully uploaded to the OneNet platform.
3.3 Cloud-Initiated Commands (Data Downlink)
To receive commands from the cloud, the device must subscribe to the set topic and publish a reply to the set_reply topic.
-
Subscribe to the
settopic:AT+MQTTSUB=0,"$sys/OLxQ8zCg6F/test1/thing/property/set",1 -
Publish a reply (optional but recommended):
AT+MQTTPUB=0,"$sys/OLxQ8zCg6F/test1/thing/property/set_reply","{\"id\":\"123\",\"code\":200}",0,0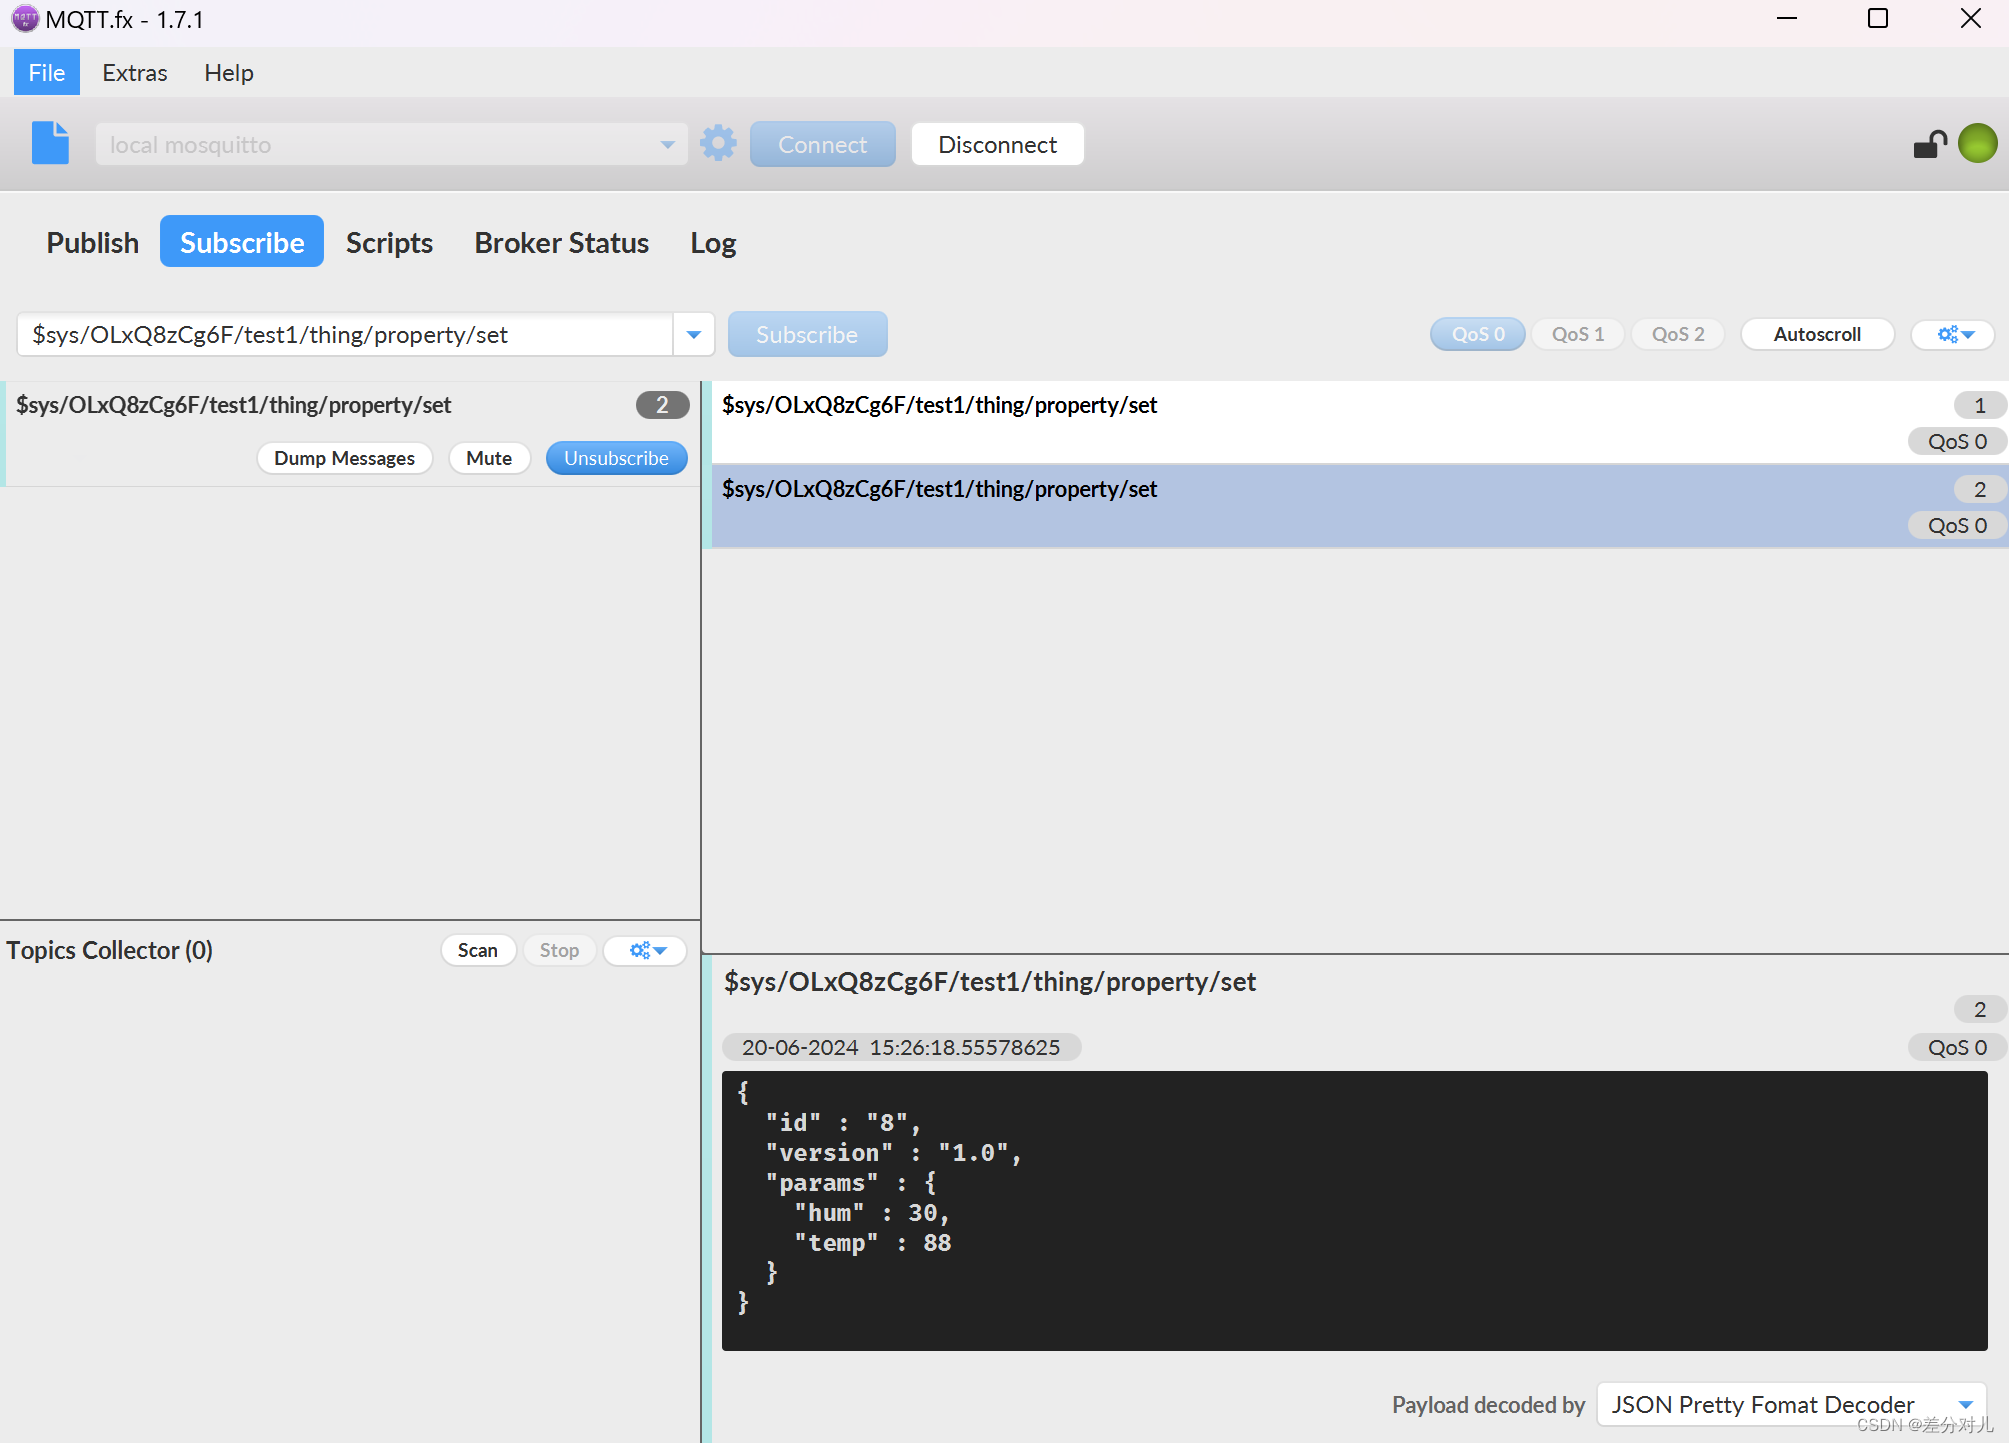 Figure 15: Subscribing to the command topic
 -
Send a command from the OneNet console:
Go to the Device Debugging page (Figure 16). Set the desired values for temperature and humidity and click Send. The ESP8266 will receive the message on the subscribed topic.
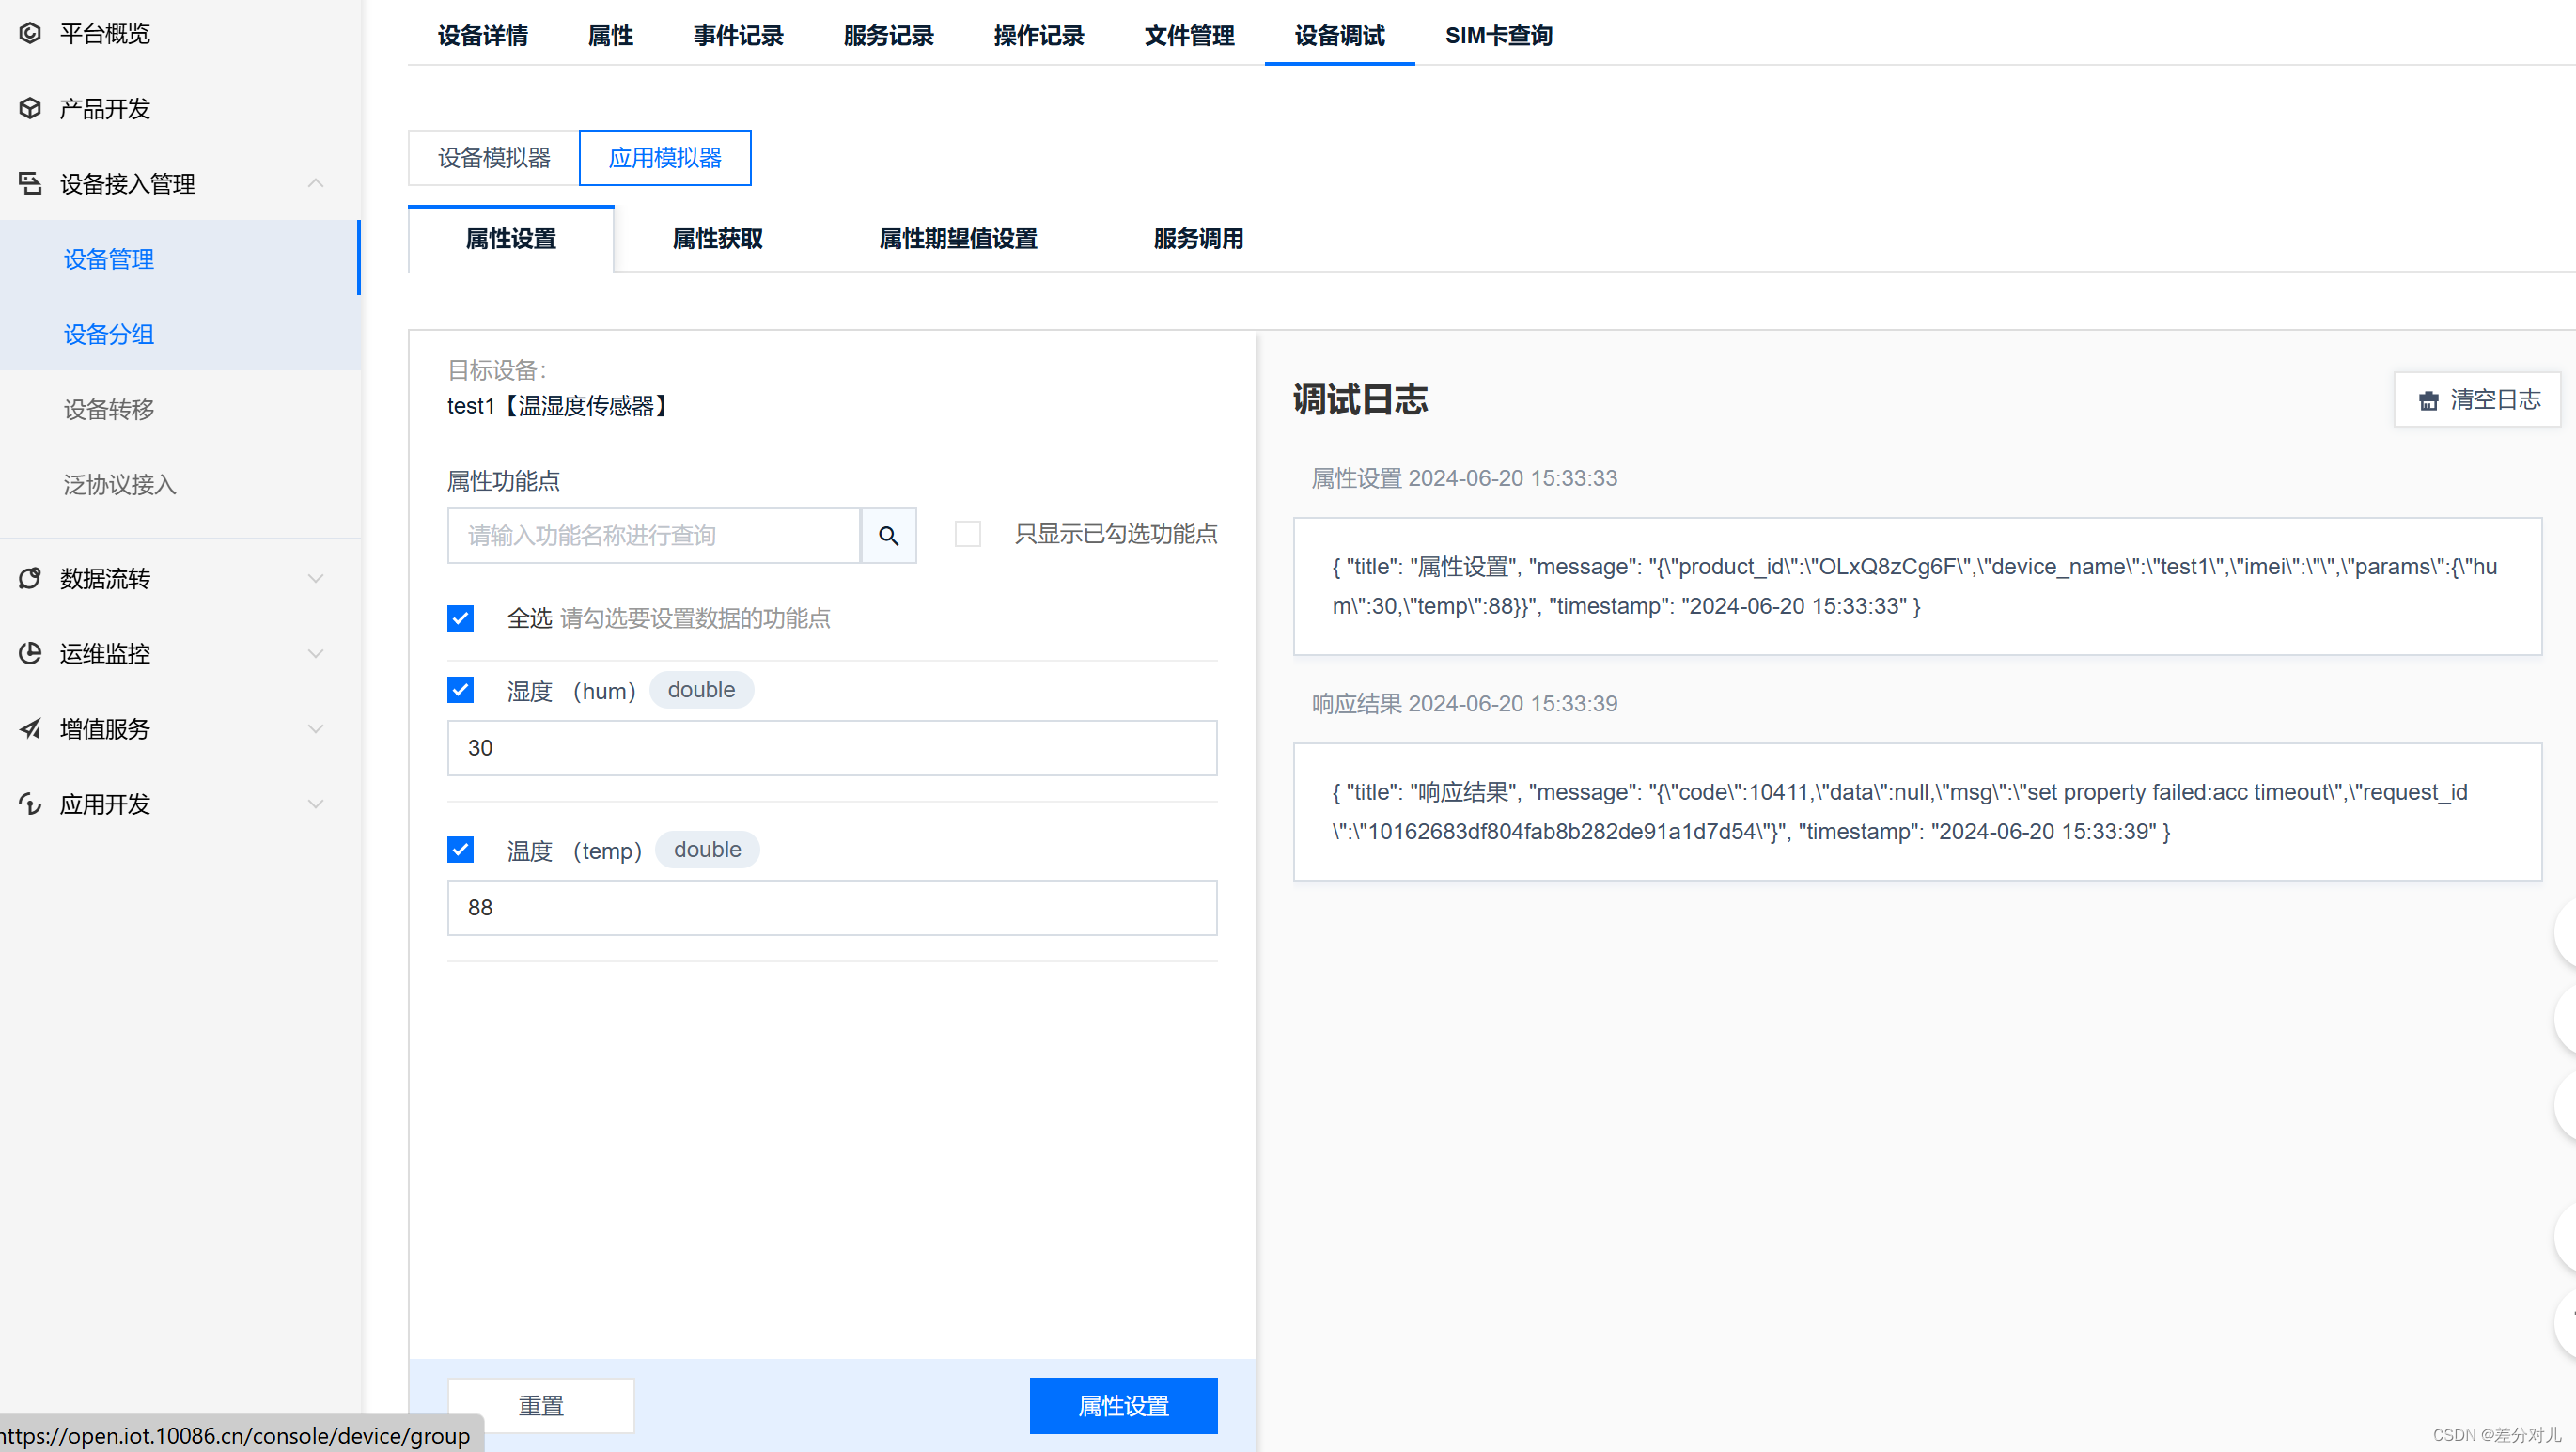 Figure 16: Cloud console for sending commands
The data sent from the cloud will appear in the serial output of the ESP8266, confirming successful downlink communication.
Conclusion
This guide demonstrated how to connect an ESP8266 to the OneNet cloud platform, upload sensor data using MQTT, and receive commands triggered from the cloud. The principles can be adapted to other IoT scenarios involving different sansors and actuators.