Gits a distributed version control system used to track file changes and facilitate collaborative development. It was originally created by Linus Torvalds to manage Linux kernel development and is now a widely adopted version control tool.
Key features of Git include:
- Distributed: Every developer maintains a complete copy of the repository, enabling them to commit changes and work independently without relying on a central server. This boosts development efficiency, offers flexibility, and allows offline work.
- Fast and Efficient: Git employs a "snapshot" mechanism to store file changes rather than tracking file differences. This makes Git operations very fast and minimizes storage requirements.
- Branching Model: Git's powerful branching capabilities allow development teams to work on multiple features in parallel. Each branch can be independently developed and tested before being merged into the main branch.
- Version Tracking: Git records every modification to files, including additions, deletions, and updates. This enables easy rollback to any historical version and facilitates comparison or restoration of different file versions.
- Remote Repositories: Git supports hosting code repositories on various public platforms like GitHub, GitLab, and Bitbucket, simplifying multi-person collaboration and code sharing.
Installing Git
Installing Git is straightforward, with several methods available across different operating systems.
Installing on Windows
- Download the Git installer from the official website (https://git-scm.com/downloads).
- Run the downloaded
.exefile and follow the setup wizard. You can stick with the default options or customize them as needed. - After installation, open Command Prompt or PowerShell and execute the followinng command to verify the installation was successful:
If successful, the Git version information will be displayed.git --version
Installing on macOS
- Using Homebrew is a recommended method. Open the Terminal application and install Homebrew by running:
/bin/bash -c "$(curl -fsSL https://raw.githubusercontent.com/Homebrew/install/master/install.sh)" - Install Git using the following command:
brew install git - Verify the installation by checking its version:
A successful installation will output the version number.git --version
Installing on Linux (Debian/Ubuntu)
- Open a terminal and run the following commands:
sudo apt-get update sudo apt-get install git - Confirm the installation by checking the version:
If installed correctly, the terminal will show the version details.git --version
Common Installation Issues
- Installation Failure: If the wizard fails, try re-downloading the installer and running it again. If the problem persists, attempt an alternative installation method or inspect the log files for error details.
- "Command not found" Error: On Windows, this usually means Git's path is missing from the system environment variables. You can add the Git installation directory (e.g.,
C:\Program Files\Git\bin) to your system'sPATHvariable. On Linux/macOS, you can add a line likeexport PATH=$PATH:/usr/local/git/binto your shell configuration file (~/.bashrc,~/.zshrc, or~/.bash_profile).
Core Git Concepts
-
Repository A Git repository is where your project's code and its entire change history are stored. It can be a directory on your local machine, or one hosted on a remote server.
- Initialize a new local repository:
git init # Creates a new `.git` subdirectory in the current folder - Clone an existing remote repository:
git clone <remote-repository-url> # Creates a local copy of the remote repo
- Initialize a new local repository:
-
Commit A commit is a snapshot of your project's staged changes at a specific point in time. It creates a new version in the repository, complete with metadata like author, timestamp, and a descriptive commit message.
- Stage changes for the next commit:
git add <file> # Stage a specific file git add . # Stage all modified and new files in the current directory - Create a commit from staged changes:
git commit -m "Your concise and descriptive commit message"
- Stage changes for the next commit:
-
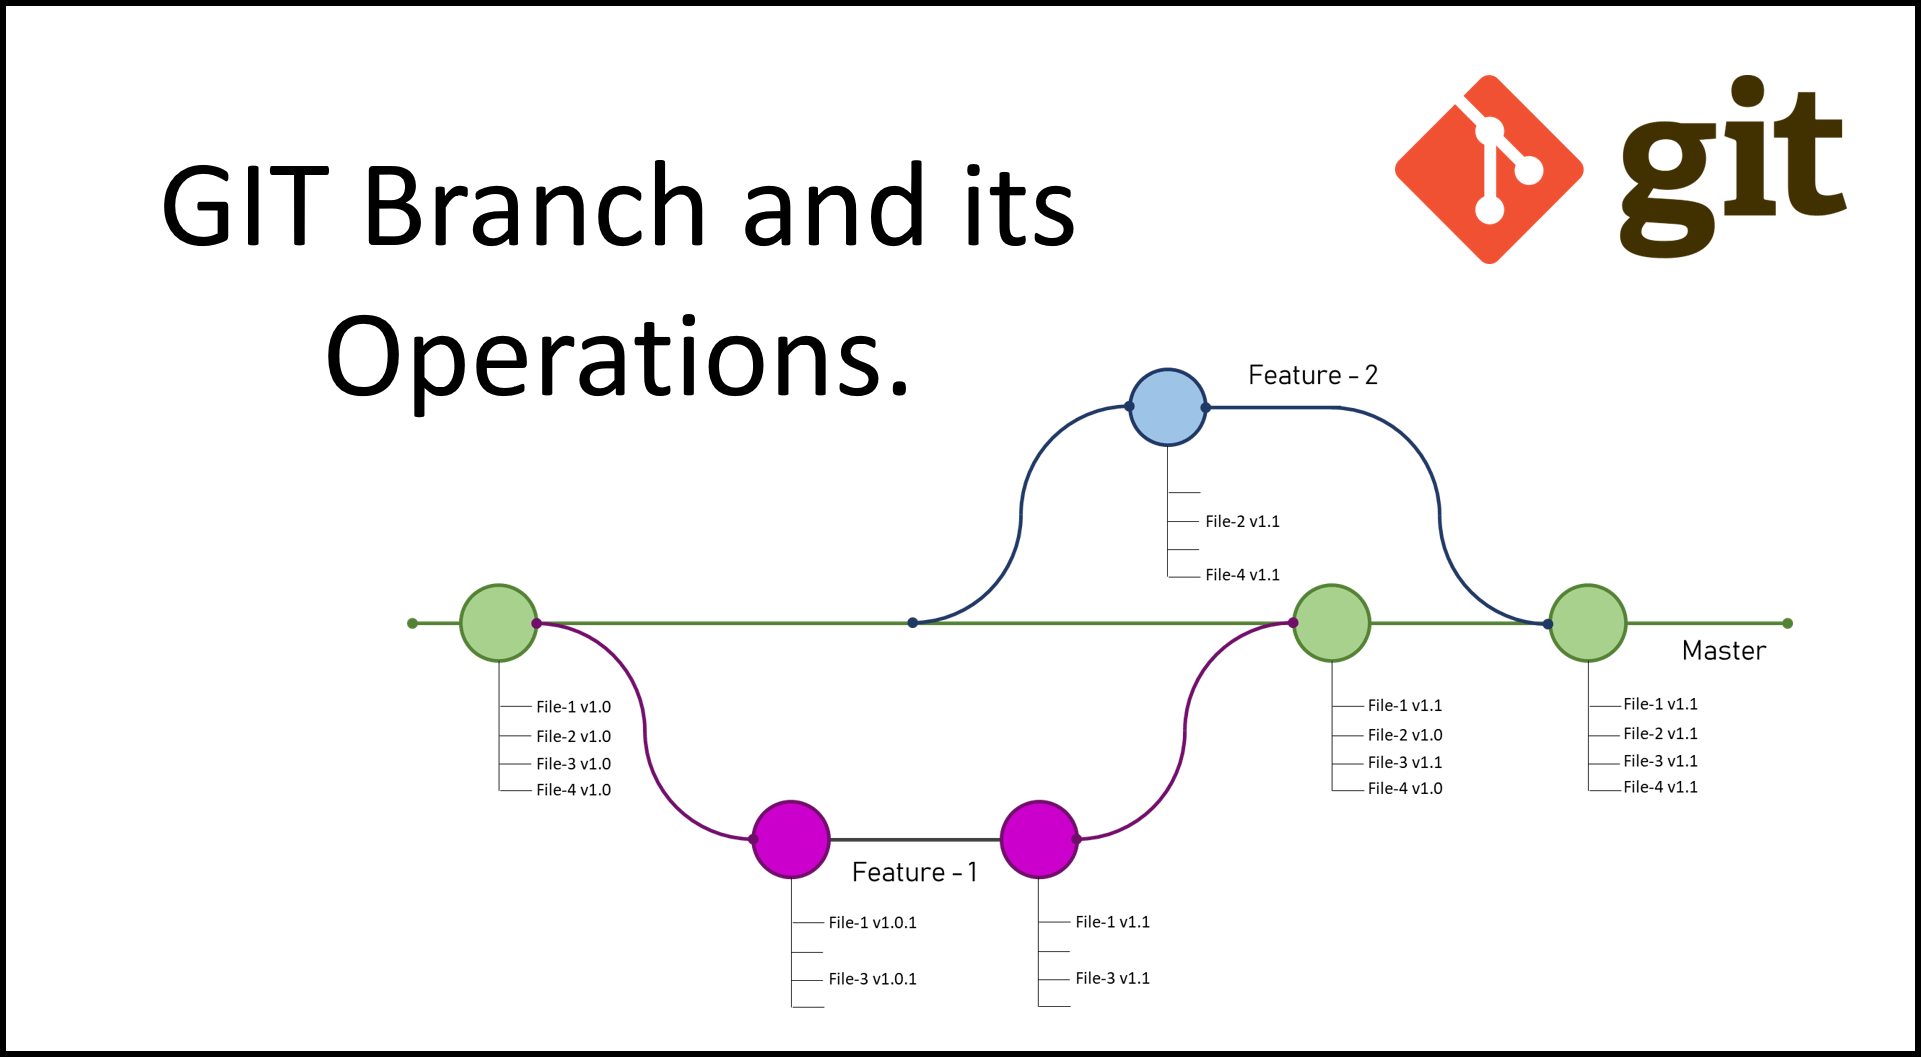
Branch A branch is a movable pointer to a specific commit. It allows multiple lines of development to proceed in isolation, enabling developers to work on features or fixes without affecting the main codebase.
- Create a new branch:
git branch <new-branch-name> - Switch to an existing branch:
git checkout <existing-branch-name> # Or, in newer Git versions, you can use: git switch <existing-branch-name> - List local branches:
git branch
- Create a new branch:
-
Merge Merging is the process of integrating the changes from one branch into another. This is typically done when a feature branch is ready to be integrated into the main development line.
- Merge another branch into your current active branch:
git merge <branch-to-merge-in>
- Merge another branch into your current active branch:
Git Branching Management
The branching model is a foundational pillar of Git's flexibility. Here are essential operations and common strategies.
Key Branch Operations
- Branching:
git branch <branch-name>creates a new pointer at your current commit. - Switching:
git checkout <branch-name>updates the files in your working directory to match the version stored in that branch. - Merging:
git merge <branch-name>joins the histories of two branches together. - Deleting:
git branch -d <branch-name>removes a branch pointer that is no longer needed.
Common Branching Strategies
- Main Branch (e.g.,
mainormaster): This branch stores the production-ready, stable code. It is the single source of truth for releases. For smaller projects, work might happen directly here, but larger teams rely on feature branches. - Feature Branches: These are short-lived branches created for developing a new feature or resolving a specific bug. Each feature gets its own branch, which is merged into the main branch upon completion. This keeps the main branch stable and allows parallel development.
- Release Branches: A release branch is created from the main branch when it's time to prepare for a new production release. Final testing and minor bug fixes are performed on this branch. Once ready, it is merged into the main branch and tagged with a release number.
Essential Git Workflow Commands
A typical day-to-day Git workflow consists of the following steps:
- Initialize a repo:
git initstarts version tracking in a project directory. - Clone a repo:
git clone <url>downloads a remote repository. - Check status:
git statusshows the state of your working directory and staging area. - Stage changes:
git add <file>adds modifications to the staging area, preparing them for a commit. - Commit work:
git commit -m "message"records a snapshot of the staging area permanently in your local history. - View history:
git logdisplays the chronological commit log. Usegit log --onelinefor a compact view. - Create a branch:
git branch <name>creates a new line of development. - Integrate changes:
git merge <name>combines the work from another branch into your current one. - Fetch updates:
git pullretrieves changes from a remote repository and integrates them into your current branch. - Publish changes:
git pushuploads your local commits to a remote repository.
Advanced Concepts and Troubleshooting
Resolving Merge Conflicts
Conflicts occur when Git cannot automatically merge changes from different branches. To resolve them:
- Open the conflicted file(s) in your editor and locate the conflict markers (
<<<<<<<,=======,>>>>>>>). - Manually edit the file to keep the desired code and remove the markers.
- Stage the resolved file using
git add <filename>. - Finalize the merge by running
git commit. Git will typically generate a default merge commit message.
Undoing Changes
- To create a new commit that reverses a previous one (safe for shared history), use
git revert <commit-hash>. - To unstage a file, use
git reset HEAD <file>. - To discard local, uncommitted changes in a file, use
git checkout -- <file>. - To move the branch pointer backward and discard commits, use
git reset <commit-hash>. Use--softto keep changes staged,--mixed(default) to unstage them, and--hardto discard them entirely from the working directory.
Recommended Learning Resources
- Pro Git Book: A comprehensive, free guide to everything Git, from fundamental to advanced topics.
- Git Hooks: Learn how to trigger custom scripts at important points in the Git workflow.
- Git Flow Model: A robust and popular branching workflow for managing larger projects and teams.
Why Version Control Matters
Adopting a version control system like Git is critical for modern software development for several reasons:
- Team Collaboration: Version control allows developers to work on the same project concurrently. It facilitates merging changes smoothly, preventing conflicts and data loss.
- Change Tracking: Every modification is recorded, answering who, what, when, and why. This audit trail is invaluable for understanding project evolution and debugging.
- Backup and Recovery: The full history serves as an implicit backup. You can confidently experiment, knowing you can easily restore any previous state of the project.
- Release Management: Version control enables the management of different software releases. You can create tags or branches for each release, making it simple to switch between or roll back to specific versions.
- Isolated Development: Branching and merging allow for isolated work on complex features or bug fixes, ensuring the main development line remains uncompromised until the work is fully tested and ready.