This article demonstrates how to integrate both JSP and Thymeleaf with Spring Boot, featuring a simple user CRUD (Create, Read, Update, Delete) example. Three separate project setups are covered: two standalone integrations and one combined project. Choose the relevant section based on your needs. Project source code is available via links at the end.
Spring Boot with JSP Integration
Project Setup
Environment Requirements
- JDK: 1.7 or higher
- Database: MySQL
First, create a user table in MySQL to store user information.
Database DDL Script:
CREATE TABLE `t_user` (
  `id` int(11) NOT NULL AUTO_INCREMENT COMMENT 'Primary Key',
  `name` varchar(10) DEFAULT NULL COMMENT 'Name',
  `age` int(2) DEFAULT NULL COMMENT 'Age',
  `password` varchar(24) NOT NULL COMMENT 'Password',
  PRIMARY KEY (`id`)
) ENGINE=InnoDB AUTO_INCREMENT=17 DEFAULT CHARSET=utf8;
This project is a standard Maven web application. Add Spring Boot and JSP dependencies in the pom.xml file. Comments are included within the dependency declarations.
Maven Dependencies:
<dependencies>
    <!-- Spring Boot Web Starter -->
    <dependency>
        <groupId>org.springframework.boot</groupId>
        <artifactId>spring-boot-starter-web</artifactId>
    </dependency>

    <!-- Spring Boot DevTools (auto-restart on changes) -->
    <dependency>
        <groupId>org.springframework.boot</groupId>
        <artifactId>spring-boot-devtools</artifactId>
        <optional>true</optional>
    </dependency>

    <!-- Spring Boot Test Starter -->
    <dependency>
        <groupId>org.springframework.boot</groupId>
        <artifactId>spring-boot-starter-test</artifactId>
        <scope>test</scope>
    </dependency>

    <!-- Spring Boot JPA Starter -->
    <dependency>
        <groupId>org.springframework.boot</groupId>
        <artifactId>spring-boot-starter-data-jpa</artifactId>
    </dependency>

    <!-- MyBatis Starter for Spring Boot -->
    <dependency>
        <groupId>org.mybatis.spring.boot</groupId>
        <artifactId>mybatis-spring-boot-starter</artifactId>
        <version>${mybatis-spring-boot}</version>
    </dependency>

    <!-- MySQL Connector -->
    <dependency>
        <groupId>mysql</groupId>
        <artifactId>mysql-connector-java</artifactId>
    </dependency>

    <!-- FastJSON -->
    <dependency>
        <groupId>com.alibaba</groupId>
        <artifactId>fastjson</artifactId>
        <version>${fastjson}</version>
    </dependency>

    <!-- JSP Dependencies -->
    <!-- JSTL -->
    <dependency>
        <groupId>javax.servlet</groupId>
        <artifactId>jstl</artifactId>
    </dependency>

    <!-- Servlet API -->
    <dependency>
        <groupId>javax.servlet</groupId>
        <artifactId>javax.servlet-api</artifactId>
        <scope>provided</scope>
    </dependency>

    <!-- Embedded Tomcat Jasper for JSP compilation -->
    <dependency>
        <groupId>org.apache.tomcat.embed</groupId>
        <artifactId>tomcat-embed-jasper</artifactId>
        <scope>provided</scope>
    </dependency>
</dependencies>
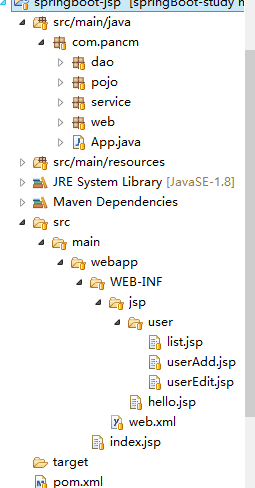
After dependencies are resolved, confirm the project structure:
Backend packages:
src/main/javacom.pancm.web– Controller layercom.pancm.dao– Data Access layercom.pancm.pojo– Entity classescom.pancm.service– Service layerApplication– Main application class
Configuration:
src/main/resources/application.properties– Application configuration file
Frontend file locations:
src/main/webapp/WEB-INF– Core web configuration (web.xml)src/main/webapp/WEB-INF/jsp– JSP file directory
Project Structure Diagram:
Next, add the required configuration in application.properties. The datasource configuration is similar to standard setups. Note the JSP-specific configuration: Spring Boot's default template engine is Thymeleaf, so adjustments are needed to support JSP views.
Configuration (application.properties):
## Encoding
banner.charset=UTF-8
server.tomcat.uri-encoding=UTF-8
spring.http.encoding.charset=UTF-8
spring.http.encoding.enabled=true
spring.http.encoding.force=true
spring.messages.encoding=UTF-8

## Server Port
server.port=8088

## DataSource
spring.datasource.url=jdbc:mysql://localhost:3306/springBoot?useUnicode=true&characterEncoding=utf8
spring.datasource.username=root
spring.datasource.password=123456
spring.datasource.driver-class-name=com.mysql.jdbc.Driver

## JSP View Configuration
spring.mvc.view.prefix=/WEB-INF/jsp/
spring.mvc.view.suffix=.jsp
Code Implementation
The code closely resembles a typical Spring Boot application, with a notable difference: JPA is used for database operations, demonstrating the JPA framework.
Entity Class uses annotations:
@Entity: Marks the class as a JPA entity.@Table: Maps the entity to a database table.@Column: Configures column properties (nullable,unique).
@Entity
@Table(name = "t_user")
public class User {

    @Id
    @GeneratedValue
    private Long id;

    @Column(nullable = false, unique = true)
    private String name;

    @Column(nullable = false)
    private String password;

    @Column(nullable = false)
    private Integer age;

    // getters and setters omitted
}
Data Access Layer extends JpaRepository, specifying the entity type and primary key type.
@Mapper
public interface UserDao extends JpaRepository<User, Long> {
}
The service layer calls JPA methods: save for insert/update, delete for removal, findOne for retrieval by ID, findAll for listing all records, etc.
Service Implementation:
@Service
public class UserServiceImpl implements UserService {

    @Autowired
    private UserDao userDao;

    @Override
    public boolean addUser(User user) {
        try {
            userDao.save(user);
            return true;
        } catch (Exception e) {
            System.out.println("Add failed!");
            e.printStackTrace();
            return false;
        }
    }

    @Override
    public boolean updateUser(User user) {
        try {
            userDao.save(user);
            return true;
        } catch (Exception e) {
            System.out.println("Update failed!");
            e.printStackTrace();
            return false;
        }
    }

    @Override
    public boolean deleteUser(Long id) {
        try {
            userDao.delete(id);
            return true;
        } catch (Exception e) {
            System.out.println("Delete failed!");
            e.printStackTrace();
            return false;
        }
    }

    @Override
    public User findUserById(Long id) {
        return userDao.findOne(id);
    }

    @Override
    public List<User> findAll() {
        return userDao.findAll();
    }
}
Controller Layer provides endpoints for JSP interaction. Use @Controller instead of @RestController to support view resolution. Apply @ResponseBody on methods that must return JSON.
@Controller
public class UserController {

    @Autowired
    private UserService userService;

    @RequestMapping("/hello")
    public String hello() {
        return "hello";
    }

    @RequestMapping("/")
    public String index() {
        return "redirect:/list";
    }

    @RequestMapping("/list")
    public String list(Model model) {
        System.out.println("Querying all users");
        List<User> users = userService.findAll();
        model.addAttribute("users", users);
        return "user/list";
    }

    @RequestMapping("/toAdd")
    public String toAdd() {
        return "user/userAdd";
    }

    @RequestMapping("/add")
    public String add(User user) {
        userService.addUser(user);
        return "redirect:/list";
    }

    @RequestMapping("/toEdit")
    public String toEdit(Model model, Long id) {
        User user = userService.findUserById(id);
        model.addAttribute("user", user);
        return "user/userEdit";
    }

    @RequestMapping("/edit")
    public String edit(User user) {
        userService.updateUser(user);
        return "redirect:/list";
    }

    @RequestMapping("/toDelete")
    public String delete(Long id) {
        userService.deleteUser(id);
        return "redirect:/list";
    }
}
Functional Testing
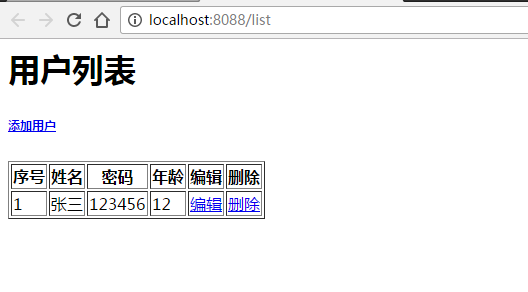
Start the application and navigate to http://localhost:8088/list in a browser.
Main List Page:
After Adding a Record:
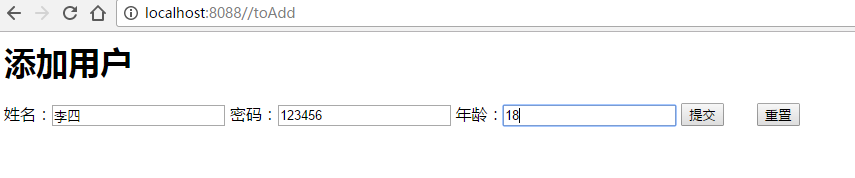
Another view after adding:
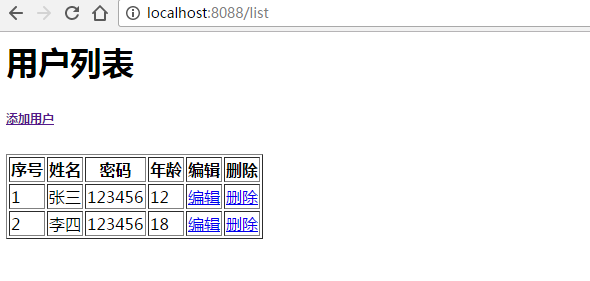
Editing and deleting operations also work correctly.
Spring Boot with Thymeleaf Integration
Reference: http://www.ityouknow.com/springboot/2017/09/23/spring-boot-jpa-thymeleaf-curd.html
Thymeleaf Overview
Thymeleaf is a modern server-side template engine for web and standalone environments, capable of processing XML/XHTML/HTML5, JavaScript, CSS, and plain text.
Using Thymeleaf
For detailed usage, refer to the official documentation: https://www.thymeleaf.org/documentation.html
Project Setup
The setup is largely similar to the JSP integration. Since Spring Boot defaults to Thymeleaf, just add the Thymeleaf starter dependency:
<dependency>
    <groupId>org.springframework.boot</groupId>
    <artifactId>spring-boot-starter-thymeleaf</artifactId>
</dependency>
In application.properties, note the spring.thymeleaf.cache property. Setting it to false disables Thymeleaf caching, allowing hot-reload of templates during development.
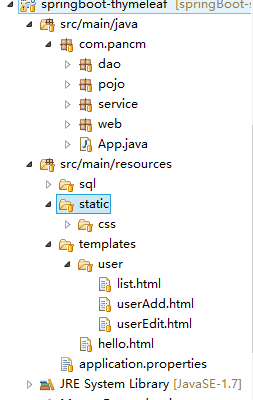
A key difference from JSP integration is file placement:
- Thymeleaf resources go under
src/main/resources. staticdirectory for static assets (CSS, JS, images).templatesdirectory for.htmlThymeleaf templates.
Project Structure Diagram:
The backend code is essentially the same as the JSP example.
Functional Testing
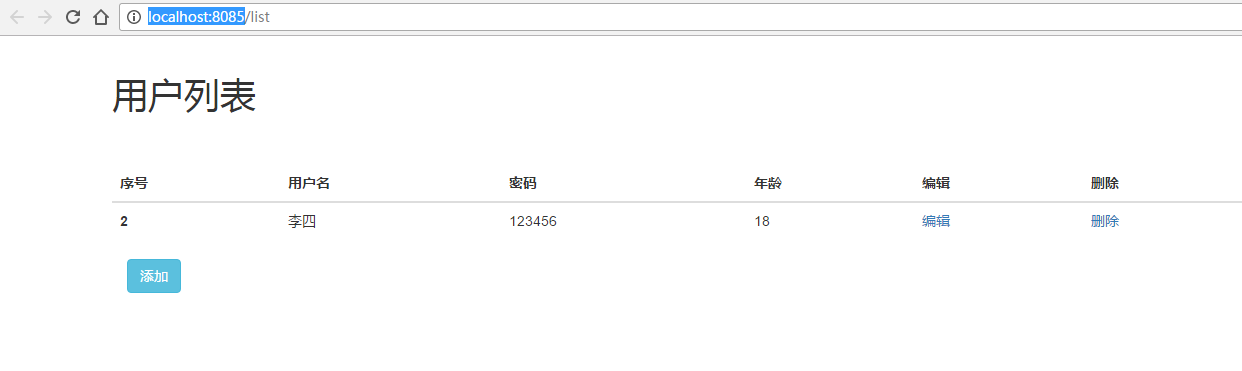
Start the application and access http://localhost:8085.
Main Page:
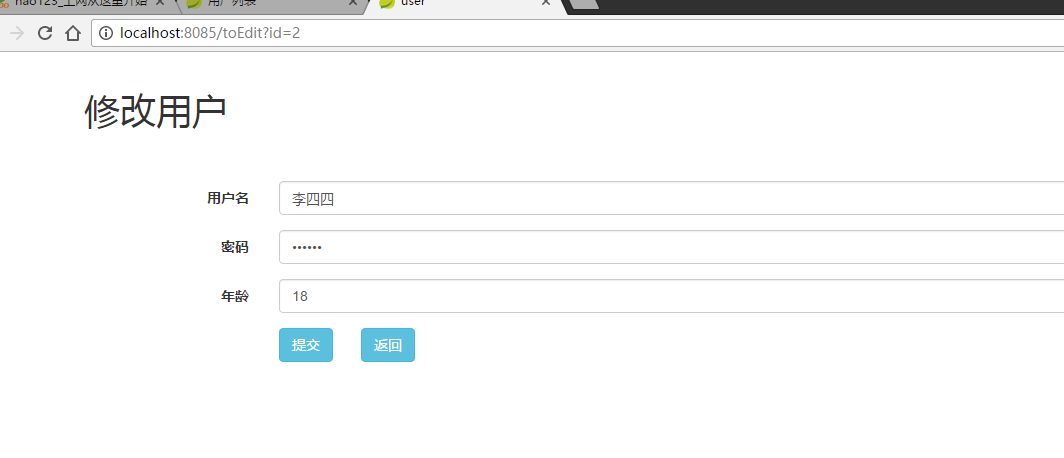
After Editing User Data:
Another edit view:
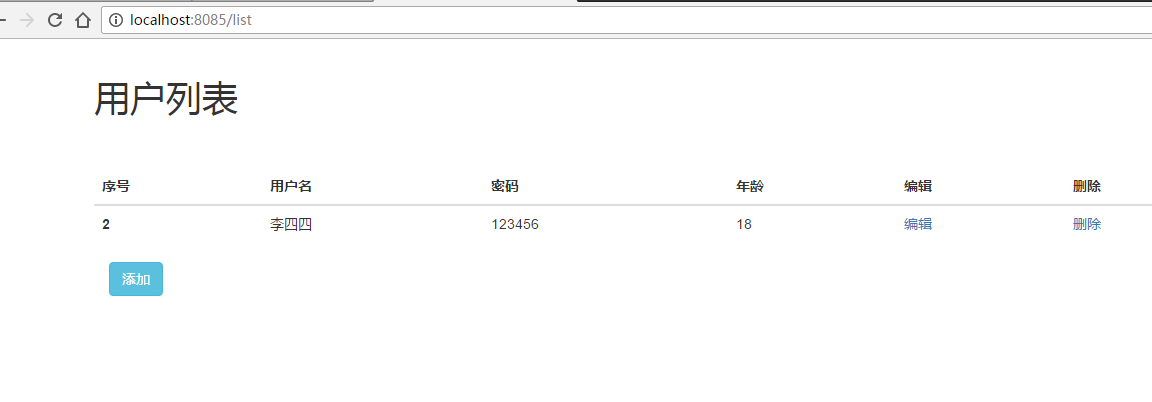
All CRUD operations are functional.
Spring Boot with Combined JSP and Thymeleaf
Note: A combined integration was requested, and after some investigation, a working coexistence strategy was found. By default, Spring Boot favors Thymeleaf; adding JSP does not automatically enable its resolver. Disabling Thymeleaf dynamically is possible but cumbersome. A cleaner approach is detailed below.
Key Differences from the Standalone Projects:
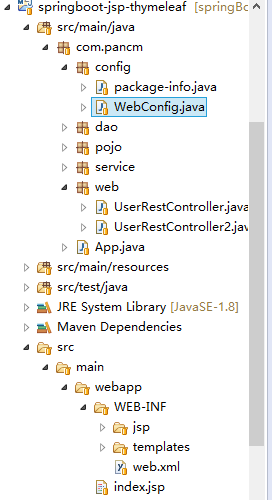
- Configuration Placement: JSP and Thymeleaf resolver configurations move from
application.propertiesinto a Java configuration class. - File Location: Thymeleaf templates are relocated to the
WEB-INFdirectory alongside JSP files. - Path Separation: Controllers for JSP and Thymeleaf use distinct URL prefixes (
jspandthymeleaf), ensuring clear routing.
View Resolver Configuration Class:
@Configuration
@EnableWebMvc
@ComponentScan
public class WebConfig extends WebMvcConfigurerAdapter {

    @Bean
    public ViewResolver jspViewResolver() {
        InternalResourceViewResolver resolver = new InternalResourceViewResolver();
        resolver.setPrefix("/WEB-INF/");
        resolver.setSuffix(".jsp");
        resolver.setViewNames("jsp/*");
        resolver.setOrder(2);
        return resolver;
    }

    @Bean
    public ITemplateResolver templateResolver() {
        SpringResourceTemplateResolver templateResolver = new SpringResourceTemplateResolver();
        templateResolver.setTemplateMode("HTML5");
        templateResolver.setPrefix("/WEB-INF/");
        templateResolver.setSuffix(".html");
        templateResolver.setCharacterEncoding("utf-8");
        templateResolver.setCacheable(false);
        return templateResolver;
    }

    @Bean
    public SpringTemplateEngine templateEngine() {
        SpringTemplateEngine engine = new SpringTemplateEngine();
        engine.setTemplateResolver(templateResolver());
        return engine;
    }

    @Bean
    public ThymeleafViewResolver thymeleafViewResolver() {
        ThymeleafViewResolver viewResolver = new ThymeleafViewResolver();
        viewResolver.setTemplateEngine(templateEngine());
        viewResolver.setCharacterEncoding("utf-8");
        viewResolver.setViewNames(new String[]{"thymeleaf/*"});
        viewResolver.setOrder(1);
        return viewResolver;
    }

    @Override
    public void configureDefaultServletHandling(DefaultServletHandlerConfigurer configurer) {
        configurer.enable();
    }

    @Override
    public void addResourceHandlers(ResourceHandlerRegistry registry) {
        super.addResourceHandlers(registry);
    }
}
Combined Project Structure:
Functional Testing
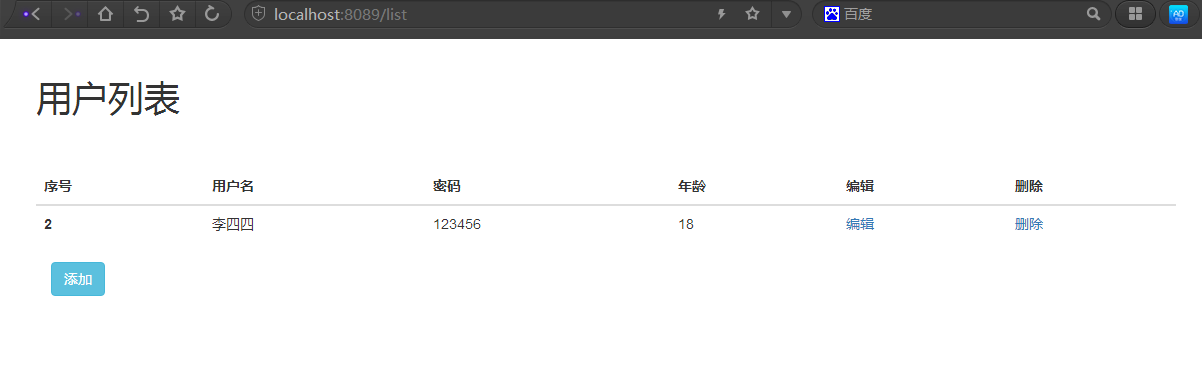
Navigate to http://localhost:8089/list for the Thymeleaf rendering:
Navigate to http://localhost:8089/list2 for the JSP rendering:
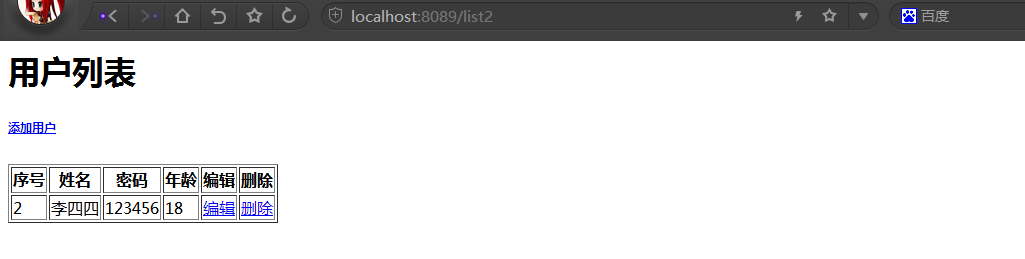
Both template engines operate successfully within the same application.
Source Code
- Spring Boot + JSP: https://github.com/xuwujing/springBoot-study/tree/master/springboot-jsp-jpa
- Spring Boot + Thymeleaf: https://github.com/xuwujing/springBoot-study/tree/master/springboot-thymeleaf
- Spring Boot + JSP & Thymeleaf (Combined): htps://github.com/xuwujing/springBoot-study/tree/master/springboot-jsp-thymeleaf