Test Suites in JUnit 4
In previous chapters, we executed only one test class at a time. However, in real unit testing projects, there are often many test classes, and running them one by one is impractical. JUnit's Test Suite functionality alllows you to organize multiple test classes together and run them in batch. This section introduces how to use Test Suites in JUnit 4 to run multiple test classes.
Knowledge Points
- Using Test Suites in JUnit 4 to run multiple test classes
Steps
Step 1: Create two teest classes: ClassATest and ClassBTest.
ClassATest:
import static org.junit.Assert.*;
import org.junit.Test;

public class ClassATest {

    @Test
    public void testA_1() {
        System.out.println("This is test method testA_1 in ClassATest");
        assertEquals(1 , 1);
    }

    @Test
    public void testA_2() {
        System.out.println("This is test method testA_2 in ClassATest");
        assertEquals(1 , 1);
    }
}
ClassBTest:
import static org.junit.Assert.assertEquals;
import org.junit.Test;

public class ClassBTest {
    @Test
    public void testB_1() {
        System.out.println("This is test method testB_1 in ClassBTest");
        assertEquals(1 , 1);
    }

    @Test
    public void testB_2() {
        System.out.println("This is test method testB_2 in ClassBTest");
        assertEquals(1 , 1);
    }

    @Test
    public void testB_3() {
        System.out.println("This is test method testB_3 in ClassBTest");
        assertEquals(1 , 1);
    }
}
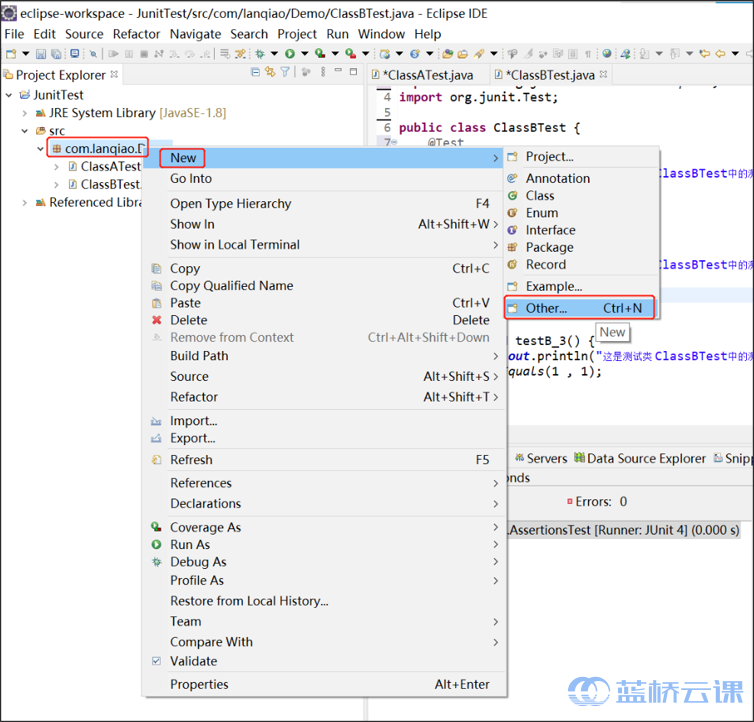
Step 2: Right-click on the package in Eclipse, select "New -> Other...", and the "New" window will open.
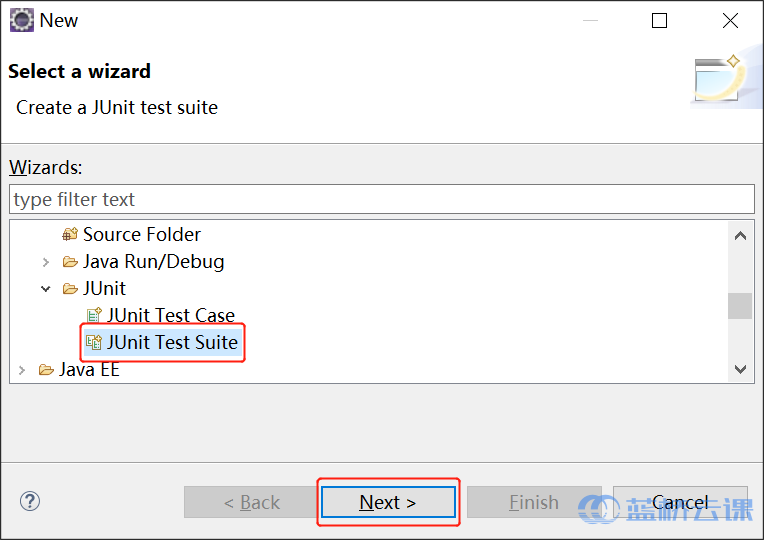
Step 3: Choose "JUnit Test Suite" and click "Next".
In the "New JUnit Test Suite" window, the "Test classes to include in suite" section shows the test classes to be included. You can select or deselect as needed.
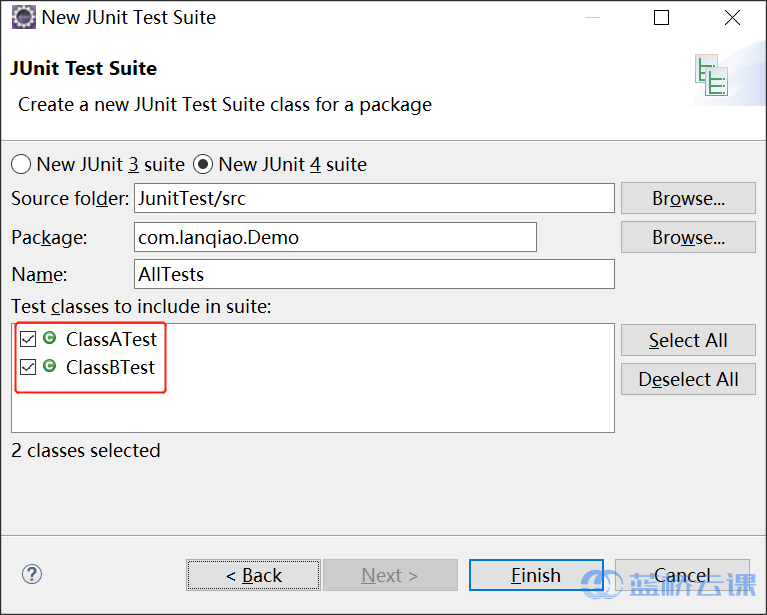
Step 4: Enter the suite name, select the test classes, and click "Finish".

After clicking "Finish", a test suite is created with automatically generated code. You can also create a Java class manually and write the suite code yourself.
package test.com.lanqiao.Demo;

import org.junit.runner.RunWith;
import org.junit.runners.Suite;
import org.junit.runners.Suite.SuiteClasses;

@RunWith(Suite.class)
@SuiteClasses({ ClassATest.class, ClassBTest.class })
public class AllTests {

}
Code Explanation:
-
A public empty class acts as the entry point for the test suite.
-
The class needs
@RunWithand@SuiteClassesannotations for batch testing. Import the necessary libraries:import org.junit.runner.RunWith; import org.junit.runners.Suite; import org.junit.runners.Suite.SuiteClasses; -
@RunWith(Suite.class)tells JUnit to use the suite runner for this class. -
@SuiteClasses({ ClassATest.class, ClassBTest.class })specifies the array of test classes to include in the suite. When the suite runs, all classes listed will be executed.
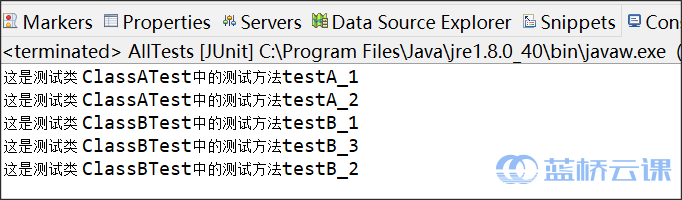
Step 5: Run the test suite by clicking the "Run" button in Eclipse. The result shows that both ClassATest and ClassBTest are executed.
Summary
In JUnit 4, you can create test suites to run multiple test classes together. A test suite can contain not only basic test classes but also other test suites, enabling hierarchical management of unit tests across modules. If multiple suites exist, avoid circular dependencies to prevent infinite loops.
Customizing Test Execution Order
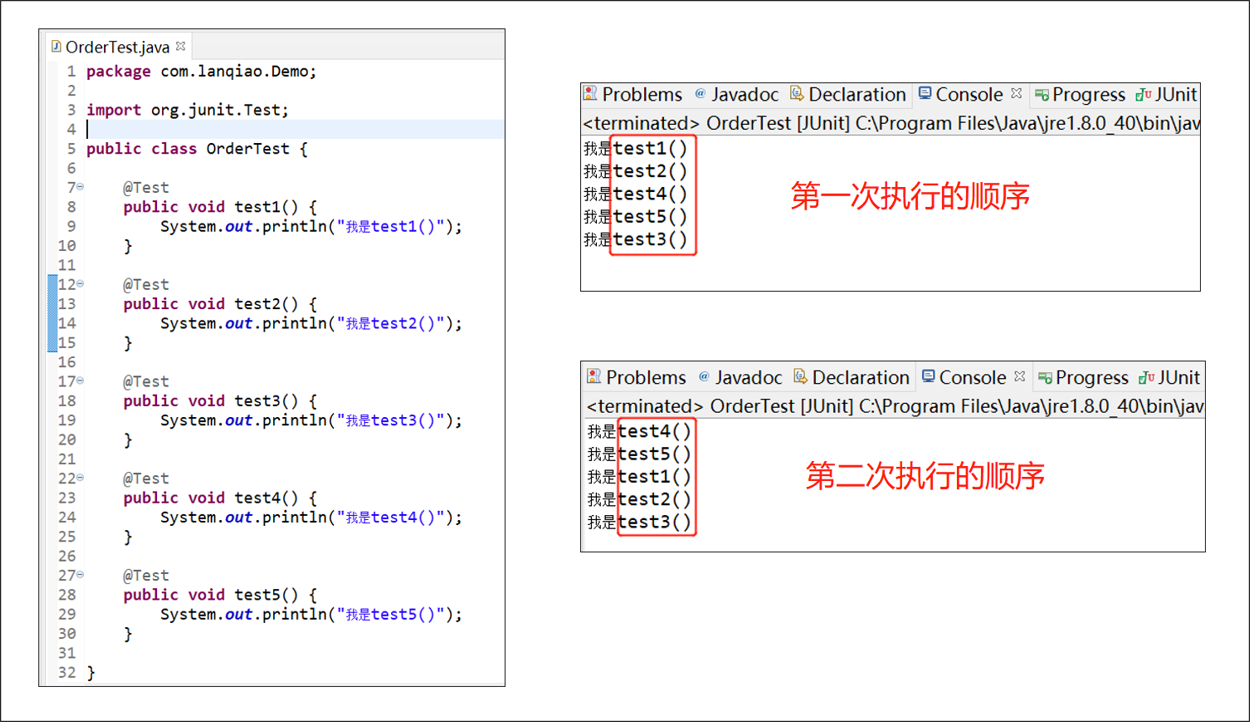
Sometimes tests need to run in a specific order. By default, JUnit does not guarantee the order. Let's see an example: the left side shows a test class with five methods named "test + number" in ascending order. Running it twice yields different orders, and the order does not match the code order – the default execution order is non-deterministic.
From JUnit 4.11 onwards, you can specify the execution order using the @FixMethodOrder(annotation) annotation on the test class. The annotation's parameter is a org.junit.runners.MethodSorters object, which defines three types:
MethodSorters.DEFAULTMethodSorters.JVMMethodSorters.NAME_ASCENDING
Let's test these using JUnit 4.13 (Eclipse default) with the following test class:
package com.lanqiao.Demo;

import org.junit.Test;

public class OrderTest {

    @Test
    public void test1() {
        System.out.println("I am test1()");
    }

    @Test
    public void test2() {
        System.out.println("I am test2()");
    }

    @Test
    public void test3() {
        System.out.println("I am test3()");
    }

    @Test
    public void test4() {
        System.out.println("I am test4()");
    }

    @Test
    public void test5() {
        System.out.println("I am test5()");
    }

}
Import the required classes:
import org.junit.FixMethodOrder;
import org.junit.runners.MethodSorters;
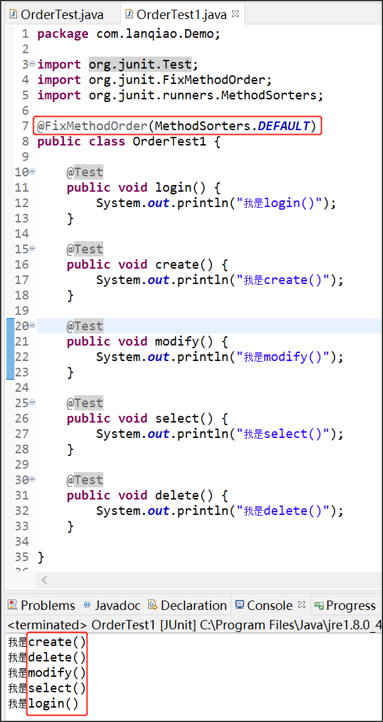
MethodSorters.DEFAULT
Annotation: @FixMethodOrder(MethodSorters.DEFAULT)
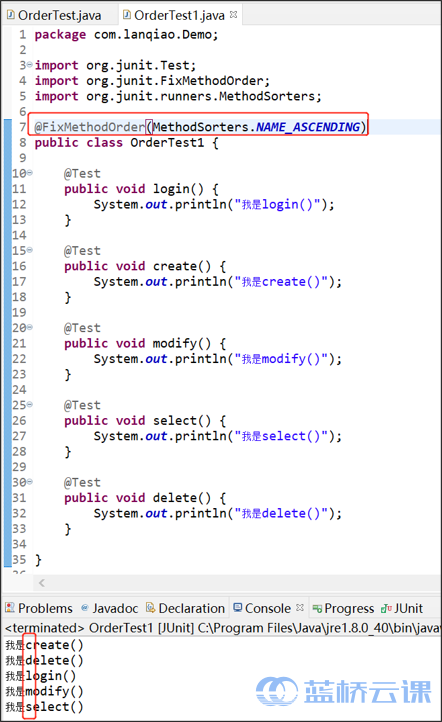
Methods are executed in a deterministic but unpredictable order. The order is based on the method name's hashcode; if hashcodes are equal, names are sorted lexicographically. For example, the class below uses "test + number" naming; execution order is consistent with the code order.
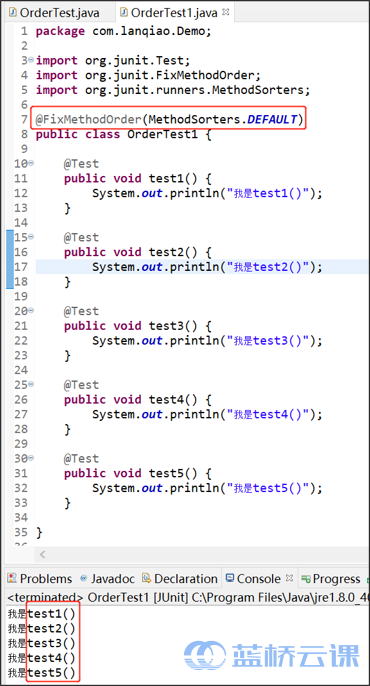
However, sometimes the order may differ from the code order, as shown below:
Note: The order may vary across different operating systems but remains consistent on the same system.
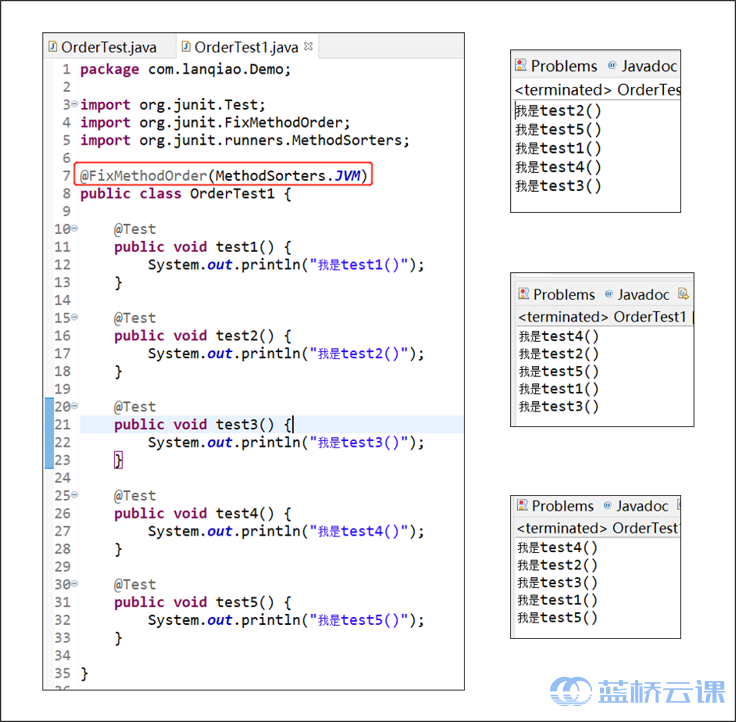
MethodSorters.JVM
Annotation: @FixMethodOrder(MethodSorters.JVM)
Methods are executed in an unpredictable order; each run may be diffferent. For example:
MethodSorters.NAME_ASCENDING
Annotation: @FixMethodOrder(MethodSorters.NAME_ASCENDING)
Methods are executed in lexicographic order based on method names. This order is consistent and predictable. For example:
In summary:
JVM: random order each time.DEFAULT: deterministic but not predictable (no explicit sorting rule).NAME_ASCENDING: sorted by method name, consistent. Recommended.
Ignoring Tests
Sometimes you need to temporarily skip certain test classes or methods, e.g., when they are not yet written. JUnit 4 provides the @Ignore annotation to skip tests.
Example: In the test class below, testCase1() and testCase2() have @Ignore, resulting in "2 skipped". The skipped methods appear gray in the results.
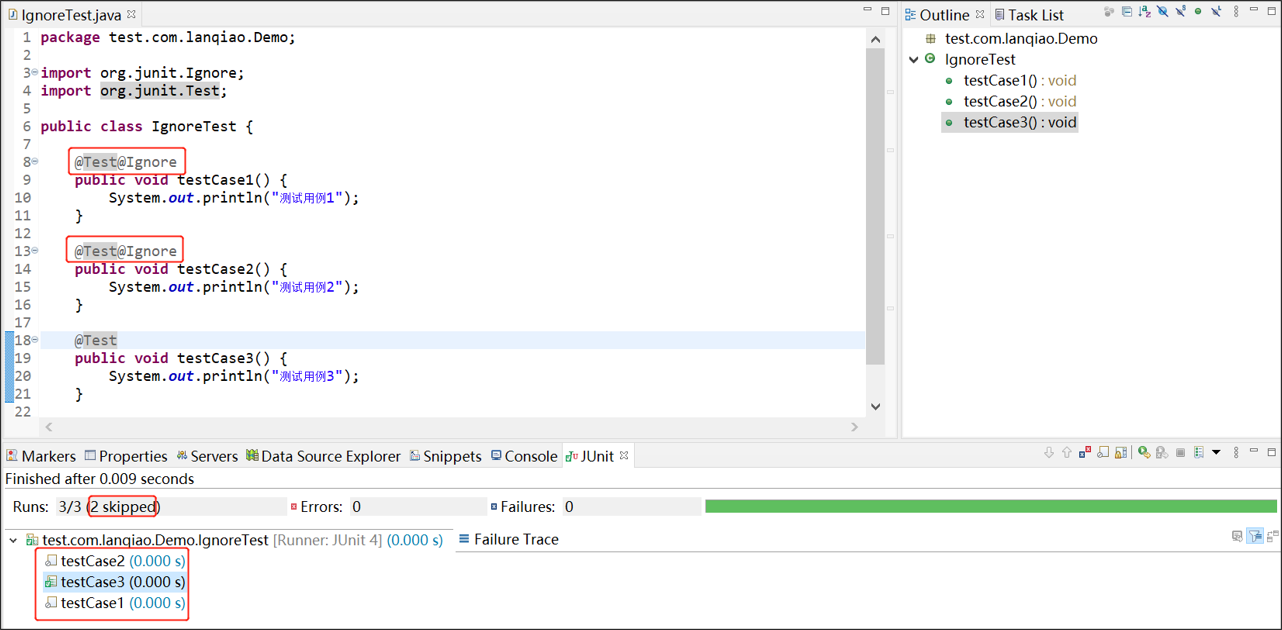
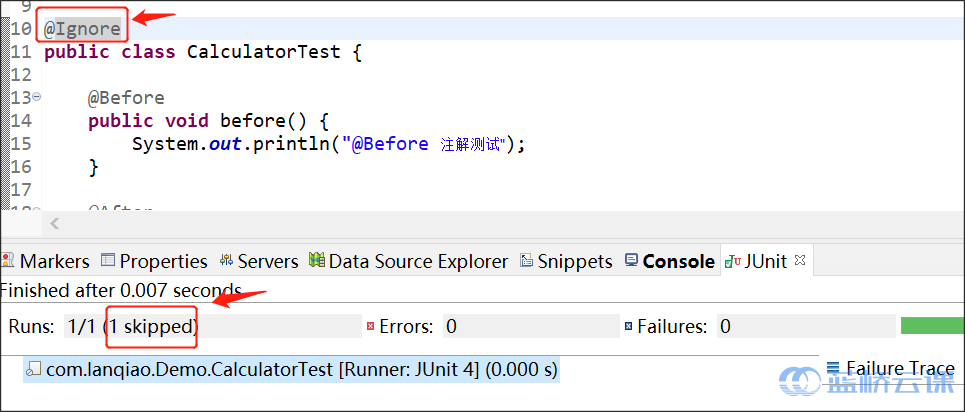
@Ignore can also be applied to a test class, skipping all its methods:
Exception Testing
In unit testing, besides verifying normal behavior, you need to test that exceptions are thrown correctly. For example, dividing by zero should throw ArithmeticException, and accessing an invalid array index should throw ArrayIndexOutOfBoundsException. This section covers common exception testing methods in JUnit 4 (using JUnit 4.10 as an example).
Knowledge Points
- Using
@Test(expected = ...) - Using try/catch blocks
- Using
ExpectedExceptionrule
Example: Testing for ArithmeticException
Class under test:
package com.lanqiao.Demo;

public class ExceptionTest {
    public int division(int a, int b) {
        return a / b ;
    }
}
Test case: When b = 0, expect ArithmeticException.
Method 1: @Test(expected = ...)
package test.com.lanqiao.Demo;
import org.junit.Test;
import com.lanqiao.Demo.ExceptionTest;
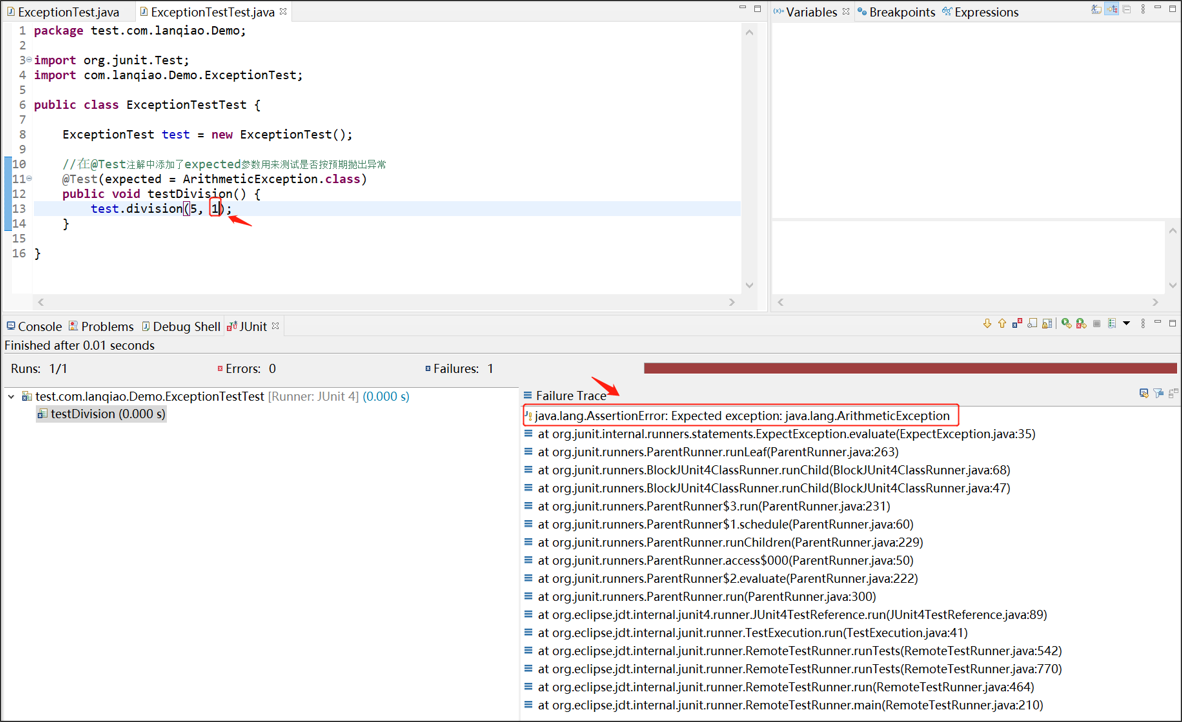
public class ExceptionTestTest {
ExceptionTest test = new ExceptionTest();
@Test(expected = ArithmeticException.class)
public void testDivision() {
test.division(5, 0);
}
}
Explanation: The expected parameter specifies the expected exception. If the test passes, the exception was thrown; if not, the test fails.
If the code does not throw the exception (e.g., test.division(5, 1)), the test fails:
Method 2: try/catch Block
This method allows you to check the exception message and other details.
package test.com.lanqiao.Demo;

import static org.junit.Assert.fail;
import static org.junit.Assert.assertTrue;
import org.junit.Test;
import com.lanqiao.Demo.ExceptionTest;

public class ExceptionTestTest {

    ExceptionTest test = new ExceptionTest();

    @Test
    public void testDivision() {
        try {
            test.division(5, 0);
            fail("Test failed: No exception thrown!");
        } catch (ArithmeticException e) {
            assertTrue(e instanceof ArithmeticException);
            assertTrue(e.getMessage().contains("/ by zero"));
        }
    }

}
Explanation:
- The try block contains the code that should throw an exception.
fail()is called if no exception is thrown, causing the test to fail.- The catch block contains assertions to verify the exception type and message.
Method 3: ExpectedException Rule
This method provides detailed failure information and can assert both type and message.
package test.com.lanqiao.Demo;

import org.junit.Rule;
import org.junit.rules.ExpectedException;
import org.junit.Test;
import com.lanqiao.Demo.ExceptionTest;

public class ExceptionTestTest {

    ExceptionTest test = new ExceptionTest();

    @Rule
    public ExpectedException exceptedE = ExpectedException.none();

    @Test
    public void testDivision() throws ArithmeticException {
        exceptedE.expect(ArithmeticException.class);
        exceptedE.expectMessage("/ by zero");
        test.division(5, 0);
    }

}
Explanation:
- The
@Ruleannotation declares a publicExpectedExceptionfield. expect()sets the expected exception type.expectMessage()checks the exception message.- The method call must come after the assertions.
If the first two methods fail, the error information is less detailed. With ExpectedException, the failure trace provides more details, aiding debugging.
Summary
@Test(expected = ...): Only checks exception type, not message.- try/catch and
ExpectedException: Can check type and message.ExpectedExceptiongives more detailed error information.
Timeout Testing
Sometimes you need to verify that a test method completes within a specified time. JUnit 4 provides two timeout testing methods: the timeout parameter in @Test, and the Timeout rule with @Rule.
Knowledge Points
- Using
@Test(timeout = ...)for timeout testing - Using
Timeoutrule
Class under test
public class TimeoutTest {

    public int add(int a, int b) {

        // sleep 5000 ms to simulate a long operation
        try {
            Thread.sleep(5000);
        } catch (InterruptedException e) {
            e.printStackTrace();
        }

        return a + b + 1 ;
    }
}
Method 1: @Test(timeout = ...)
import static org.junit.Assert.*;
import org.junit.Test;
import com.lanqiao.Demo.TimeoutTest;

public class TimeoutTestTest {

    TimeoutTest test = new TimeoutTest();

    @Test(timeout = 1000)
    public void test() {
        assertEquals(6, test.add(2, 3));
    }
}
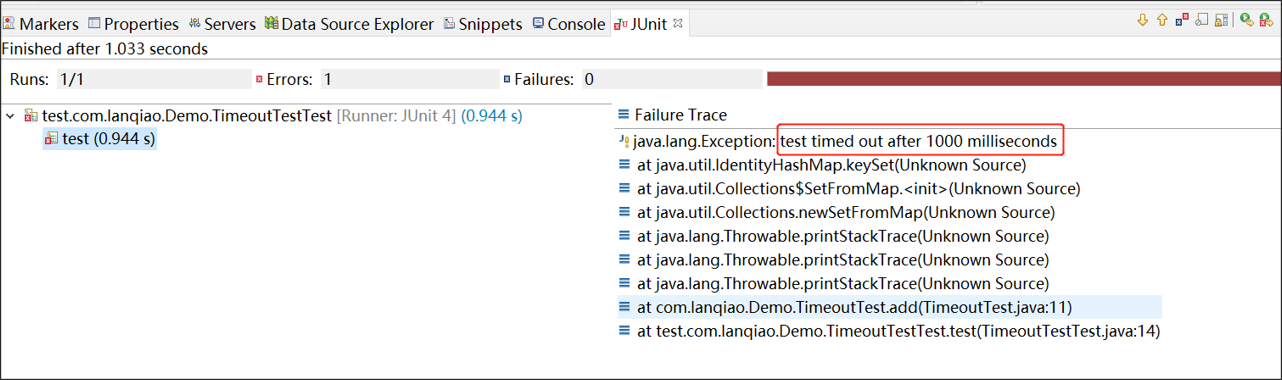
If the method takes longer than 1000 ms, the test fails with "test timed out after 1000 milliseconds".
If you increase the timeout to 6000 ms, the test passes.
Method 2: Timeout Rule
The Timeout rule applies to all test methods in the class.
package test.com.lanqiao.Demo;

import static org.junit.Assert.*;
import org.junit.Rule;
import org.junit.Test;
import org.junit.rules.Timeout;
import com.lanqiao.Demo.TimeOutTest;

public class TimeOutTestTest {

    TimeOutTest test = new TimeOutTest();

    @Rule
    public Timeout testTimeOut = new Timeout(1000);

    @Test
    public void test() {
        assertEquals(6, test.add(2, 3));
    }

}
Summary
@Test(timeout = ...): Applies to a single test method.Timeoutrule: Applies to all test methods in the class.
Choose based on whether you need per-method or per-class timeout settings.