This article covers how to set screen orientation in Unity, focusing on landscape mode, and addresses common pitfalls when combining Unity with native Android development or using auto-rotation with a specific default orientation.
Setting the Screen Orietnation
For both Android and iOS projects, it's common to lock the screen to a specific orientation, most often landscape. The orientation is configured via:
File > Building Settings > Player Settings > (select platform) Resolution and Presentation > Default Orientation
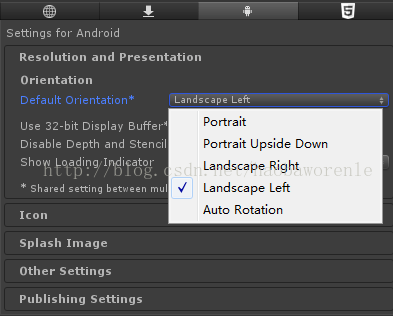
The available options are:
- Portrait: Potrrait mode
- Portrait Upside Down: Portrait mode, phone upside down
- Landscape Right: Landscape with the screen on the right side of the home button
- Landscape Left: Landscape with the screen on the left side of the home button (commonly used)
- Auto Rotation: Enables automatic orientation changes, with additional checkboxes to select which orientations are allowed.
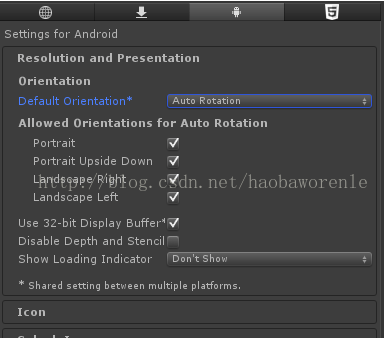
When Auto Rotation is selected, you can choose the allowed orientations by checking or unchecking the boxes.
Common Issues and Solutions
1. Black Screen When Combining Unity with Native Android Code
If your Unity Android project includes native Android code (e.g., activities or plugins), you must also declare the screen orientation in the AndroidManifest.xml file. In the <application> or <activity> element, add:
android:screenOrientation="landscape"
Ensure the value matches the orientation set in Unity (e.g., "landscape" for landscape). Failing to do this may result in a black screen with no error messages.
2. Using Auto Rotation with Multiple Specified Orientations
When the project requires two or more specific orientations, set Default Orientation to Auto Rotation and then enable only the needed orientations in the Player Settings. For example, to allow both left and right landscape modes, enable only those two checkboxes. By default, Unity selects Landscape Left as the starting orientation for auto-rotation.
3. Setting a Default Orientation When Using Auto Rotation
Sometimes game designers want a specific default orientation even when auto-rotation is enabled (e.g., allow both left and right landscape but start in Landscape Right). There are two approaches:
Approach A: Override in Code After Auto Rotation
Set Default Orientation to Auto Rotation and enable both landscape directions. Then, in an initialization script (e.g., Awake or Start), first force the desired orientation, then enable auto-rotation. However, be aware: Unity's splash screen runs before Awake, so it will still use the orientation from Project Settings—which for auto-rotation defaults to Landscape Left. This causes the splash screen to appear in a different orientation than the rest of the game (acceptable only if the default is Landscape Left).
void Awake()
{
    // Force the screen to be right landscape (home button on the right)
    Screen.orientation = ScreenOrientation.LandscapeRight;
}

void Start()
{
    // Enable auto-rotation and set supported orientations
    Screen.orientation = ScreenOrientation.AutoRotation;
    Screen.autorotateToLandscapeLeft = true;
    Screen.autorotateToLandscapeRight = true;
    Screen.autorotateToPortrait = false;
    Screen.autorotateToPortraitUpsideDown = false;
}
Approach B: Set Default Orientation to the Desired One, Then Enable Auto Rotation
Set Default Orientation to the specific orientation you want (e.g., Landscape Right) in Player Settings. Since the splash screen reads this setting, it will display in the correct orientation. Then enable auto-rotation in Start(). This avoids the mismatch.
void Start()
{
    // Enable auto-rotation and set supported orientations
    Screen.orientation = ScreenOrientation.AutoRotation;
    Screen.autorotateToLandscapeLeft = true;
    Screen.autorotateToLandscapeRight = true;
    Screen.autorotateToPortrait = false;
    Screen.autorotateToPortraitUpsideDown = false;
}
With this method, the splash screen and the game start consistently.
Originally posted on CSDN (https://blog.csdn.net/haobaworenle/article/details/54097713). If there is any copyright issue, please contact us for removal.